Vision MOD is a real-time visual synthesizer for macOS and Windows. It borrows the Complex Oscillator idea from modular synthesis, where one oscillator shapes the other: the Modifier material provides the dynamics, and the Carrier material is the image carried by those dynamics. One footage modulates another footage, producing a new audio-visual phenomenon.
Every station downstream of the source operates on the resulting Carrier stream. Background removal only happens at the very source (Fundamental Vision). Areas with no content carry alpha 0 from that point on, and every downstream station discards those pixels, so the subject stays cut out through the whole chain.
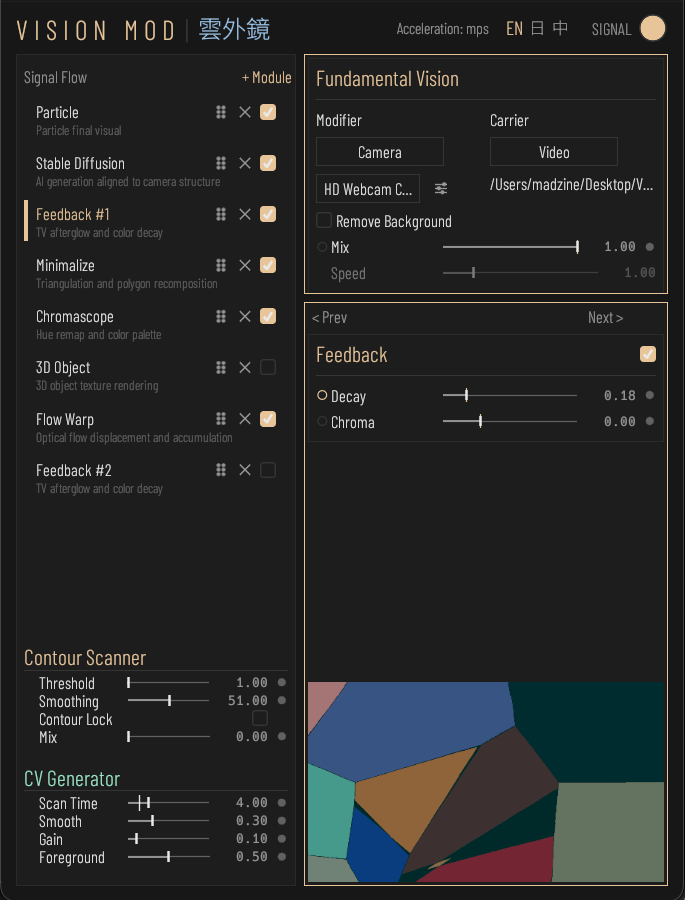
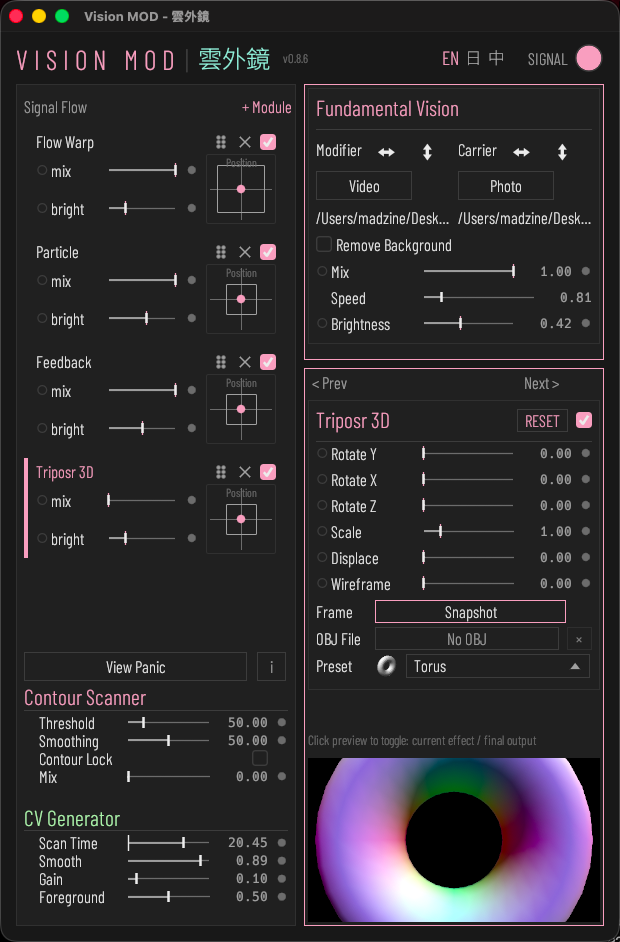
The main control window: top bar, the parameter panel of the selected module, the Contour Scanner and CV Generator block, and the module catalog on the right.
Top bar
HUE
Toggle the HUE colour-wheel panel to adjust the interface accent colour
SIGNAL
Toggle the SIGNAL floating window (audio input meters + CV Output routing + seven CV meters)
Language
Switch the interface language (EN / JA / ZH); hover descriptions follow and the choice persists
SD status
SD service status: shows SD Loading while starting, then the active acceleration backend
HUE wheel
Outer ring
Outer ring: drag to change the accent hue
Centre
Centre: drag vertically to change the accent saturation
Presets
Preset hues: click to apply Coral / Mint / Sky / Violet
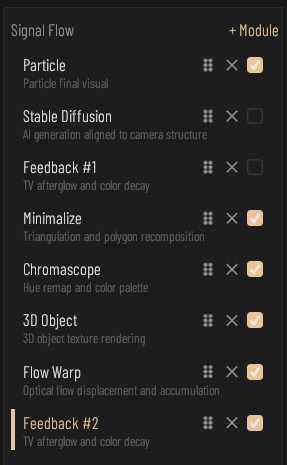
The pipeline is defined by the module catalog on the right side of the main window. Fundamental Vision is pinned to slot 1 as the source anchor; every other module is added, reordered, bypassed, or removed by the user. Drag the grip icon to reorder, click the X icon (two-click confirmation) to remove, toggle the checkbox to bypass an instance. The same module kind can be added multiple times; each instance keeps its own parameters and is wired in series, top to bottom.
The module catalog. Click a row to show that module's parameters in the panel on the left. Each row has a grip icon, an X icon, and an enable checkbox.
Catalog
Module catalog (Signal Flow): the pipeline list, executed top to bottom; the same module kind can be instantiated multiple times with independent parameters
Drag to reorder
Drag to reorder: hold the grip icon and drag vertically to change the instance position in the signal flow (Fundamental Vision is pinned to the first slot)
Remove
Remove instance: first click prompts a trilingual confirmation; click again to delete, or click outside / press Esc to cancel
Enable
Enable this instance: unchecking bypasses the instance (signal passes through to the next station) without affecting parameters or order
+ Module
The + Module button opens the module library popup. Available modules: Stable Diffusion, Minimalize, Chromascope, 3D Object, Particle, Flow Warp, Feedback, Triposr 3D, Slow Motion, Plugin. Stable Diffusion is a single-instance module: once it is in the chain, its entry is greyed out. Fundamental Vision is the fixed anchor and cannot be added or removed.
Common station controls
Every station after Fundamental Vision shares the same header controls: an enable checkbox, Mix, Brightness, and a Position / Scale pad. Mix is the station dry/wet and is the only mix control; modules have no mix fader of their own. A newly added instance starts with Mix at 0, so adding a module does not change the picture until you raise Mix.
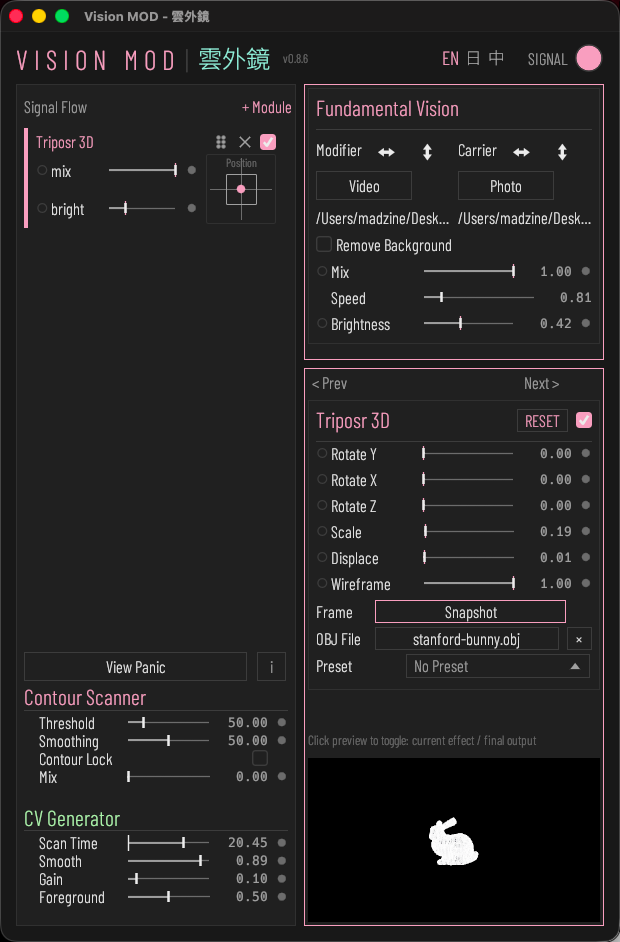
A station panel (Triposr 3D shown). The header row holds the enable checkbox and RESET; Mix, Brightness, and the Position / Scale pad are shared by all stations.
Mix
Station dry/wet mix: 0 passes the previous station's output through, 1 is fully wet
Brightness
Output brightness gain of this station (0–4, double-click resets to 1)
Position / Scale
Position / Scale: drag to move, scroll to zoom (0.25–4), double-click to reset
Detail panel icon
Click to open the detail settings panel for this module (brush mask, under development)
3. Fundamental Vision
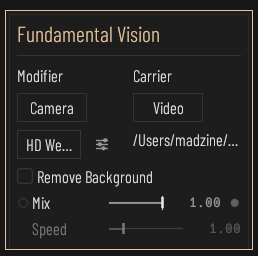
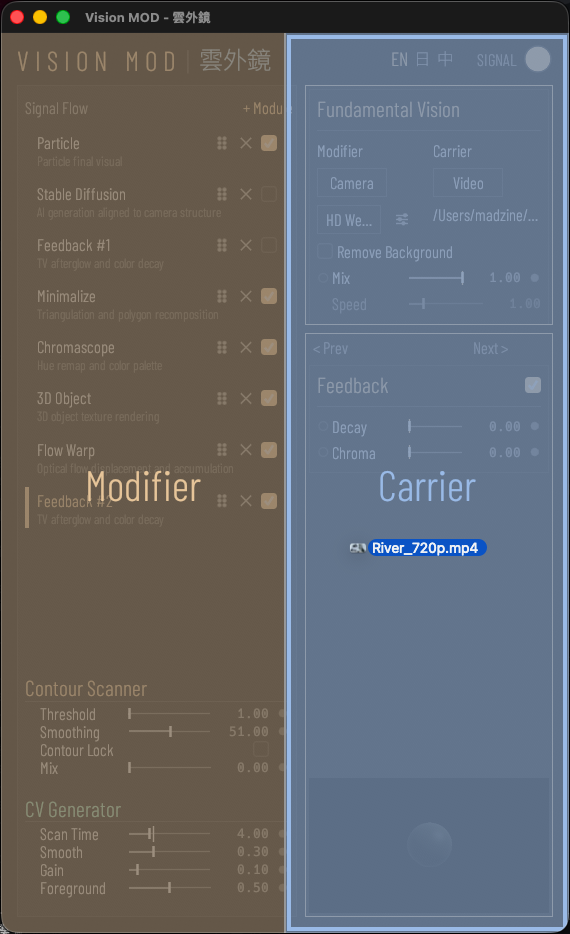
The source station. Two slots sit side by side: Modifier on the left, Carrier on the right. Each slot takes a camera, a video file, or a photo. The Modifier is analysed for the Movement and Color signals and drives Image Displace and the Flow Warp flow field; the Carrier is the image fed into the chain.
Fundamental Vision: Modifier (left) and Carrier (right) with the Mix fader between them.
Card
Source input card: Modifier (left) modulates Carrier (right); Mix blends between them
Modifier
Modifier slot: the modulating material; source for Movement/Color CV, particle Displace, and the Flow Warp flow field
Carrier
Carrier slot: the main image, fed into the downstream processing chain
Mix
Blend between the Carrier and Modifier sources: right shows Carrier, left shows Modifier
Source type
Source type: camera, video, or photo (drop a file to load video/photo)
Remove background
Camera background removal: MediaPipe masks the foreground, keeping only the subject
Flip H
Horizontal flip (left-right mirror) of the source image; applied at the producer stage, affecting the whole chain
Flip V
Vertical flip (top-bottom mirror) of the source image; applied at the producer stage, affecting the whole chain
Video speed
Playback speed of the loaded video (0 pause, 1 normal, 5 fivefold)
Camera menu and settings
Camera selection dropdown and the camera settings icon.
Camera
Select the camera input device
Settings icon
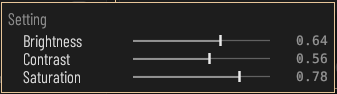
Click to open the camera settings panel (Brightness / Contrast / Saturation — three hardware-controllable parameters); Carrier and Modifier cameras keep independent settings
Drop a file onto the window: the left half loads it into the Modifier, the right half into the Carrier.
File path
Path of the loaded file; drop a file onto the window to load (left half = Modifier, right half = Carrier)
4. Contour Scanner and CV Generator
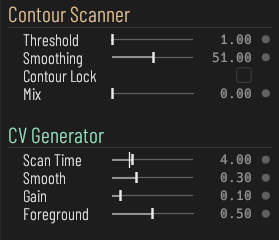
Below the module panel, the main window always shows the Contour Scanner card and the CV Generator. The scanner detects contours from the image; the CV Generator turns the scan, motion, and colour into modulation signals. The global action rows (PRESET, PLUGINS, OUTPUT, View Panic, Help) sit at the top of the Contour Scanner card.
Contour Scanner
Card
Contour Scanner card: detects contours from the image for the SEQ signals and the contour overlay
Preview
Contour preview: live image with contour lines and a draggable scan ROI circle
Scan ROI
Scan ROI circle: drag the centre to move the scan anchor, drag the edge to resize the scan range
Threshold
Contour edge detection threshold: higher keeps only stronger edges
Smoothing
Contour smoothing: suppresses jaggedness and noise
Scene Threshold
Contour update gate (not the edge detection threshold): the image must change by more than this percent before contours are detected again. Higher holds the contour stiller and costs less CPU/GPU, lower reacts faster, 0 recomputes almost every frame
Lock
Lock the current contour: freezes CV and particle signals at this moment
Mix
Blend ratio of the contour overlay onto the image
CV Generator
Card
CV Generator: derives modulation signals from the image (contour SEQ, Movement, Color)
Scan Time
Contour scan period: time for one full scan pass (2-10 s); the white line on the track shows the current scan position
Smooth
Smoothing of the SEQ sequence signals
Gain
Gain of the Movement foreground-energy signal (source: full Modifier frame)
Foreground
Movement CV foreground threshold; VAV legacy interface, currently inert because the Modifier path is not background-removed
5. Stable Diffusion
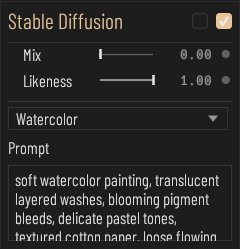
Turns the incoming image into AI-generated visuals. macOS runs Stable Diffusion 1.5 with ControlNet and a Hyper-SD15 1-step LoRA on Metal; Windows runs Stream Diffusion on CUDA / TensorRT. Only one Stable Diffusion instance can exist in the chain. The dry/wet balance is the station Mix; while Enable is unchecked, Mix is forced to 0 so the chain never receives an empty AI frame.
Text prompt for AI generation (describes the desired style)
LoRA
Choose a LoRA file (.safetensors) for Stable Diffusion; clear to disable LoRA. The row shows No LoRA when none is set.
Status
SD service status: shows SD Loading while starting, then the active acceleration backend
6. Chromascope
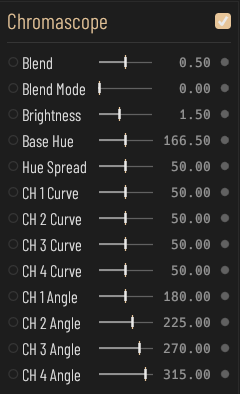
Four colour channels are laid over the image. Base Hue sets the starting hue, Hue Spread distributes the four channels around it, and each channel has its own Curve and Angle. The dry/wet balance is the station Mix.
Chromascope panel: Base Hue, Hue Spread, and the per-channel Curve and Angle faders.
Enable
Enable the Chromascope colour effect
Base Hue
Chromascope base hue
Hue Spread
Chromascope hue spread across channels
CH 1 to 4 Curve
Chromascope colour curve for this channel
CH 1 to 4 Angle
Chromascope hue rotation angle for this channel
7. Minimalize
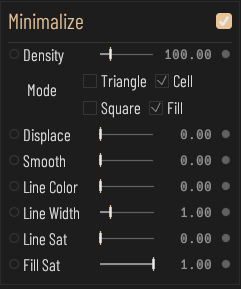
Rebuilds the image as polygons from tracked seed points. Topology picks Triangle (Delaunay mesh), Cell (Voronoi), or Square (Quadtree rectangles); Fill toggles between filled polygons and edge-only wireframe. Polygon colour is sampled from the chain input; the Modifier only displaces the seed points.
Minimalize panel: Density, Topology, Fill, Displace, Smooth, Line Color, Line Width, Line Sat, Fill Sat.
Enable
Enable the Minimalize station: re-partition the Chromascope output into polygons (Voronoi / Delaunay / Quadtree) using seed points
Density
Upper bound of seed point count (2-1500); higher values yield finer polygons
Toggle polygon fill: when on, polygons are filled with Fill Sat saturation; when off, only edges are drawn (wireframe)
Displace
Seed points are displaced as 2D vectors by the Modifier image R/G channels (Image Displace exception: Modifier acts as a displacement vector source here, not as colour sampling); 0 = off, higher values yield stronger polygon jitter
Smooth
Temporal smoothing of seed points: higher values reduce LK tracking jitter but slow the response to image change
Fill saturation (no visible effect when the Fill toggle is off)
8. 3D Object
A ray-marched 3D object skinned with the chain input. Shape morphs between five primitives; Distort, Repeat, Spacing, Jitter, and Smooth shape the field; Zoom, Pan, and Tilt move the camera. Displace pushes the surface by Modifier luma.
Enable
Enable 3D Object: SDF raymarch solid object rendering
RESET
Reset all 3D Object parameters to their defaults
Shape
3D object shape: morph between 5 primitives (sphere/box/torus/octahedron/gyroid)
Size
Overall size of the 3D object
Distort
Domain warp (sine-domain distortion) strength
Displace
Displaces the 3D object surface by Modifier image luma (0 = off; higher = deeper relief)
Repeat
Domain repeat: amount of spatial array replication
Spacing
Spacing of the repeated array
Jitter
Jitter of the array arrangement
Smooth
Smoothness of shape blending (smin)
Zoom
Camera distance to the object (pull back to avoid overexposure)
Pan
Camera horizontal orbit angle
Tilt
Camera pitch angle
9. Triposr 3D
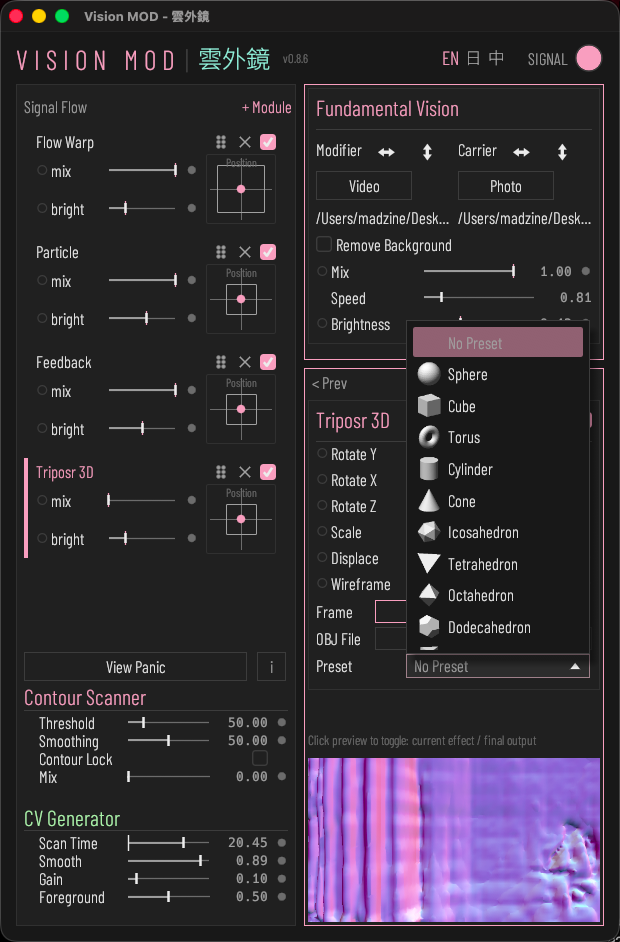
Renders a 3D mesh skinned with the chain input. The mesh comes from an OBJ file you choose or from one of 100 built-in preset shapes; there is no camera snapshot reconstruction in this version. Several Triposr 3D instances can be in the chain, each with its own mesh. Rotate X / Y / Z, Scale, Displace, and Wireframe are modulatable.
The Preset dropdown lists the 100 built-in shapes with thumbnails.
An OBJ file loaded through the OBJ File row.
Rotate Y
Rotation of the 3D mesh around the Y axis (0–360°)
Rotate X
Rotation of the 3D mesh around the X axis (0–360°)
Rotate Z
Rotation of the 3D mesh around the Z axis (0–360°)
Scale
Overall scale of the 3D mesh (0.1–5)
Displace
Displaces mesh vertices along their normals by Modifier image luma (0 = off; higher = deeper relief)
Wireframe
Wireframe blend: 0 solid, 1 pure wireframe, values between mix both
OBJ File
Choose an OBJ file (.obj) to load a 3D model; clear to remove it
Preset
Choose a built-in shape (100 total) as the 3D model; pick No Preset to deselect
10. Particle
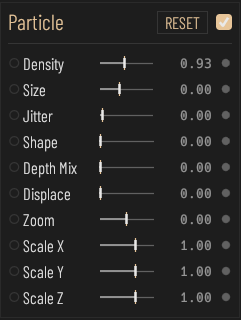
Samples the chain input into a 3D particle field. Density, Size, Jitter, and Shape define the particles; Depth Mix and Displace move them along the z-axis; Zoom and Scale X / Y / Z transform the whole field.
Particle panel.
Enable
Enable Particle rendering
RESET
Reset the particle field transform (Zoom / Scale X·Y·Z / orbit) to defaults
Density
Particle density (number of sampled particles)
Size
Particle size
Jitter
Amount of particle position jitter
Shape
Particle shape
Depth Mix
How much depth affects particle distribution along the z-axis
Displace
Strength of Modifier luma displacing particles along the z-axis
Zoom
Viewport zoom of the particle field
Scale X
Particle field scale along X (negative mirrors)
Scale Y
Particle field scale along Y (negative mirrors)
Scale Z
Particle field scale along Z (negative mirrors)
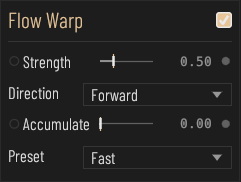
11. Flow Warp
Displaces the image along the optical flow computed from the Modifier.
Flow Warp panel.
Enable
Enable the Flow Warp effect (flow field is computed from the Modifier source)
Strength
Strength of the optical-flow displacement effect
Direction
Displacement direction (forward / reverse / bidirectional)
Accumulate
Whether to accumulate displacement across frames
Preset
Optical-flow speed preset (fast / medium / ultrafast)
12. Feedback
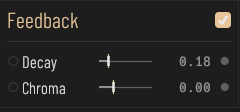
Feeds the output back into itself to build trails.
Feedback panel.
Enable
Enable the Feedback effect
Decay
Decay rate of the image feedback trail
Chroma
Colour shift through the feedback loop
13. Slow Motion
Records the incoming image at 30 fps into a segment, then loops it at a slower speed. The segment locks once Buffer seconds have been recorded; drag the Buffer fader or toggle the station off and on to capture a new segment.
Speed
Playback speed (0.05–1, 1 = original speed): the image is recorded at a fixed 30 fps and played back at 30 x this value. 0.25 = 4x slow motion. The segment loops once recording fills it
Buffer
Segment length (0.5-15 s): after N seconds are recorded at 30 fps the segment locks and loops. Drag this fader, or toggle the station off and on, to capture a new segment. Larger values use more VRAM
Blend
Frame blending: interpolates between two adjacent recorded frames so slow motion stays smooth. Off plays discrete frames with visible stutter
14. Plugin
Runs a third-party fragment shader as a station. Plugins are single .wgsl files read from the plugin folder (default ~/.visionmod/plugins/, top level only). The folder is chosen with the PLUGINS row in the main window and is rescanned automatically when it changes. In this version the Plugin panel shows no parameters; the first plugin in the folder that compiles is used, and a plugin that fails to compile is skipped so the station passes the image through.
Plugin file header
Metadata lives in a block of //! comment lines at the top of the file. api and name.en are required; name.zh, name.ja, author, description, url, and param lines are optional. Parsing stops at the first line that is not a //! comment. The plugin id is the file name in lower case, so renaming the file makes it a different plugin.
//! api = 1
//! name.en = My Effect
//! param0 = amount | 0.0 | 1.0 | 0.5 | mod | Amount (id, min, max, default, mod or -, label)
15. Global Actions
The action rows at the top of the Contour Scanner card apply to the whole program.
PRESET
SAVE AS writes all current parameters to a file. LOAD reads a file; because loading overwrites every current parameter and cannot be undone, an inline OVERWRITE / CANCEL confirmation appears first.
PLUGINS
CHOOSE opens a folder picker for the plugin folder; DEFAULT returns to the default folder. The second row shows the folder in use, or No folder available.
OUTPUT
+ WINDOW opens an output window showing the end of the chain. The output window can be cropped, panned, and zoomed.
View Panic
View Panic: click to force-repaint when the output viewport freezes (no GPU reset)
Help (i)
Toggle Help mode: when on, hover descriptions move from the top bar to a tooltip next to the cursor
16. SIGNAL Window
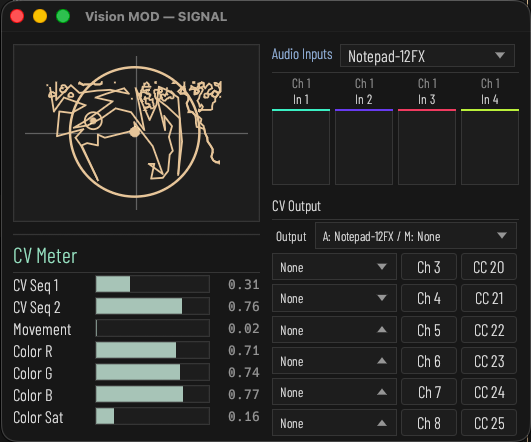
The SIGNAL toggle in the top bar opens a floating window. The left column shows a preview and the seven CV meters (Sequence 1 / 2, Movement, Color R / G / B / Saturation). The right column holds Audio Inputs, CV Output, and LFO.
SIGNAL window: CV meters on the left; Audio Inputs, CV Output routes, and LFO on the right.
CV meters
Sequence 1
SEQ1 sequence signal: horizontal distance between the moving scan point and the anchor (0-10V, smoothed); the fill shows the current output
Sequence 2
SEQ2 sequence signal: vertical distance between the moving scan point and the anchor (0-10V, smoothed); the fill shows the current output
Movement
Movement energy: mean frame-to-frame luma difference of the full Modifier frame, scaled by Gain (0-10V, smoothed)
Color Red
Average red of the Modifier frame (0-10V), usable as a modulation source and CV output
Color Green
Average green of the Modifier frame (0-10V), usable as a modulation source and CV output
Color Blue
Average blue of the Modifier frame (0-10V), usable as a modulation source and CV output
Color Saturation
Average saturation of the Modifier frame (HSV S, 0-10V), usable as a modulation source and CV output
Audio Inputs
Card
Audio Inputs: four audio input tracks whose levels (RMS) serve as modulation sources
Device
Audio input/output device selection
Channel
Which input device channel this track reads from
Meter
Input level meter for this track (peak); the top colour line matches the same-numbered Chromascope channel
CV Output
The Output dropdown selects the audio output device and the MIDI output port together. Each route then picks a source signal, an audio output channel, and a MIDI CC number.
Card
CV Output: sends modulation signals to audio output channels (ch 3+) and a MIDI device
Source
Source of a modulation signal; sent to both an audio output channel and a MIDI device (per-route CC#, 14-bit)
Ch
Which audio output channel this CV signal is sent to (the MIDI side uses the CC# field on the right)
CC
MIDI CC number for this route (0-127); sent as 14-bit (MSB=CC, LSB=CC+32), falling back to 7-bit when CC>95
Clock
Design constraint: the CV clock runs on the audio output callback; with no output device, CV and the scan/meters/visuals freeze
LFO
LFO 1 to 4
Built-in LFO 1 to 4. Each row has a waveform button that cycles Sine, Triangle, Square, Saw, and a rate value in Hz (0.01 to 20; drag, or double-click to type). Available as modulation sources LFO 1 to 4.
17. Modulation and MIDI Learn
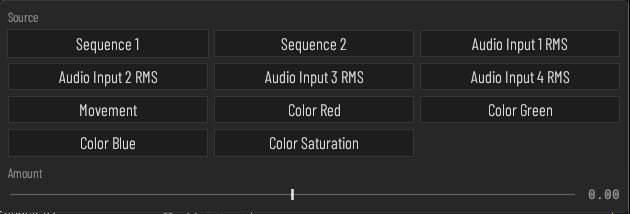
Modulatable faders have a small dot on the left of the label. Left-click the dot to switch the connection on or off; right-click it to open the popup, pick one Source from the grid, and set Amount. Amount is bipolar (-1 to 1, centre 0), so a source can push the parameter either way. Each parameter holds one connection.
Modulation source signals are generated continuously from the live image, audio, and the built-in LFOs.
Right-click a modulation dot to open the popup: choose a source, then drag Amount.
Sources
Sequence 1 / 2
Contour scan signals; Smooth Sequence 1 / 2 are the smoothed versions.
Audio Input 1 to 4 RMS
Level of the four audio input tracks.
Movement
Foreground motion energy; Movement Smooth is the smoothed version.
Color Red / Green / Blue / Saturation
Average colour of the Modifier frame.
LFO 1 to 4
Built-in LFOs set in the SIGNAL window.
MIDI Learn
Faders that support MIDI have a binding dot on the right of the value. Right-click it and choose MIDI Learn, then move a control on your MIDI device; the dot turns to the accent colour when bound. The same menu shows the bound channel and CC and offers Clear Binding. Only 7-bit Control Change messages are learned.
18. Mac App Store Version
The Mac App Store build draws a semi-transparent VISION MOD watermark in the bottom-right corner of the output until the one-time purchase is made. The purchase row sits above PRESET.
Remove Watermark
One-time purchase that permanently removes the watermark from the output. The App Store shows the price for your region. Once bought, the row reads Purchased: Watermark Removed. If the purchase is waiting for approval, the watermark is removed automatically once it is approved.
Restore Purchases
Already purchased (reinstall or another Mac)? Restore with the same Apple Account. You will not be charged again.
IMPORT
Imports settings saved by the earlier DMG version (from ~/.visionmod or ~/.config/visionmod) through a folder picker; the imported settings are applied immediately.