To switch pages, tap a page tab in the top bar or press number keys 1 to 6 on an external keyboard. While an edit overlay is open, the number keys switch between TRACK 1 to 4 and DRUMS instead. Page switching can be assigned with MIDI Learn. Two-finger swipe for page switching has been removed.
Heading position
The square button at the right end of the top bar moves the heading between corners, in the order top left, top right, bottom left, bottom right. When the heading is at the bottom, the Transport bar moves to the top of the screen.
Project slots
Slot count
26 banks (A to Z), 10 patterns per bank (00 to 09). Slot IDs use the format A-00.
Stored per slot
bank, programs, modulation, PERFORM layout, MASTER FX, per-track AU.
App-wide (not per slot)
INPUT COMP, HUE, CV device binding.
At launch
Restores the last used slot.
Undo
Undo works on whole-bank snapshots, up to 100 steps. Multiple changes within the same tick merge into one step, and a drag merges into one step. MIDI Learn writes, TAP tempo and bank loading do not enter undo.
2. Top Bar
Top bar: on the left the HONKI wordmark when stopped (during playback it becomes the timer with the "Click Twice to Reset" hint), then the MADZINE wordmark, the A-00 slot menu, the FILE menu, the six page tabs (MAIN is the current page), and at the far right the heading corner button.
Timer
Shows "H O N K I" at launch. Starts counting after the first PLAY and its recording confirmation (Y or N), in MM:SS format. Tap twice to reset; the "Click Twice to Reset" hint sits next to it.
MADZINE
Brand text.
A-00 menu
Two-level menu. The first level starts with CLEAR, followed by banks A to Z; the second level is patterns 00 to 09. MIDI Learn can be assigned as "next bank".
CLEAR
If the bank has content, asks "Clear everything?" first. Clears the bank, programs, SWING and TRANSPOSE to 0, modulation, PERFORM layout, MIDI bindings, per-track AU, MASTER FX, CV routing. Keeps INPUT COMP, HUE, CV device and STEREO OUT.
FILE menu
COPY, PASTE, SAVE, LOAD, plus a non-tappable VERSION item (shows the version number). PASTE is only available when the clipboard is not empty.
SAVE
Exports a .honki file. The default file name on iOS is "HONKI slot".
LOAD
Imports a .honki file. Asks "Replace current bank?" "Current changes will be lost." On failure shows "Bank File Error".
Page tabs
Six tabs, see chapter 1.
Corner button
Square button at the right end, showing the current heading corner. Tap to cycle to the next corner.
.honki files
The current file format contains the bank, programs, per-track AU, MASTER FX, modulation and PERFORM layout. Older .honki files and plain bank files can be imported.
3. Transport
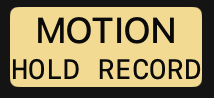
Transport row, left to right: PLAY (stopped in this image, so the triangle icon is shown), MOTION (two lines of text, lit here because it is on), RESET, BPM 132, TAP, scale button E Mixolydian, SWING 53 (dimmed), STYLE menu TECHNO, SETUP, MIDI, MOD, UNDO and REDO stacked, and the HUE wheel at the far right.
PLAY / STOP
When not in the recording state, pressing PLAY shows three segments inside the button: Y, REC?, N. It collapses after 5 seconds. Y records and plays, N plays only. The button shows STOP during playback. Can be assigned with MIDI Learn.
Recording stop button
Shown only in the recording state, as a red-dot capsule button to the left of PLAY. Pressing it shows "STOP RECORDING?" Y / N, which closes after 5 seconds. For the files produced, see chapter 14.
MOTION
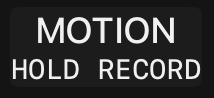
The button has two lines of text: MOTION and HOLD RECORD. Tap to toggle MOTION playback: yellow when playback is on (default), no colour when off. Hold for 1 second to start recording; while holding, red fills from left to right, and releasing early or dragging away cancels. The button is red while recording; tap to stop recording. Playback turns on automatically when recording starts. Cannot be assigned with MIDI Learn. See chapter 13.
RESET
Available only during playback. Returns the play position to zero. Can be assigned with MIDI Learn.
BPM
20 to 300. Drag vertically to adjust, tap to type a number. Dimmed to 40% when using an external clock. Can be assigned with MIDI Learn.
TAP
Averages up to 4 taps within a 2-second window. The buffer clears 5 seconds after the last tap. Not included in undo. Unavailable with an external clock.
SCALE
Two-level menu: scale first, then 12 root notes. The button shows the root and scale name. 16 built-in scales: Chromatic, Major, Minor, Penta Major, Penta Minor, Dorian, Phrygian, Lydian, Mixolydian, Locrian, Major Triad, Minor Triad, Blues, Arabic, Japanese, Whole Tone; followed by user scales and USER SCALE EDITOR. The menu marks how well each scale suits the current STYLE with a number of asterisks.
SWING
Filled horizontal fader, 0 to 100. Double-tap to return to 0.5. Odd steps are delayed by stepDuration x 0.25 x swing. Triplet notes are not affected by SWING. Can be assigned with MIDI Learn.
STYLE
The popover contains an AMOUNT knob (0 to 1) and 9 styles in two columns: West African, Afro-Cuban, Brazilian, Balkan, Indian, Gamelan, Electronic, Breakbeat, Techno. Both AMOUNT and the style index can be assigned with MIDI Learn.
SETUP
Opens and closes the SETUP panel. See chapter 11.
MIDI
Toggles MIDI Learn mode. The label is always MIDI; the background changes when on. Shortcut Cmd+L. When on, assignable controls show a dashed outline. Pressing MIDI turns MOD off. See chapter 12.
MOD
Toggles MOD mode. Located to the right of MIDI. Off at launch. When on, the button is in the accent colour and controls that can be modulated show a solid accent outline; tapping an outlined control does not change its value but opens the MOD ROUTE panel. Controls without an outline work as usual. Mutually exclusive with MIDI. Cannot be assigned with MIDI Learn. See chapter 9.
UNDO / REDO
Dimmed to 40% when there is nothing to undo or redo. Shortcuts Cmd+Z, Cmd+Shift+Z. PERFORM layout editing uses PERFORM's own undo stack.
HUE
"HUE" text and a colour wheel. Popover title "ACCENT HUE": drag the outer ring to change hue, drag the centre disc vertically to change saturation (0 to 2).
USER SCALE EDITOR
CLOSE
Closes the editor sheet.
SCALE NAME
Scale name text field.
Pitch class buttons
12 buttons, 2 rows of 6, relative to the global ROOT. The root is included by default.
Interval summary
Shows the selected intervals; with no pitch class selected it shows "SELECT AT LEAST ONE PITCH CLASS".
SAVE NEW SCALE / SAVE CHANGES
Adds a new scale or saves edits.
CANCEL EDIT
Cancels the current edit.
SAVED USER SCALES
List of saved scales; when empty it shows "No user scales saved yet.". Each entry has SELECT, EDIT, DELETE. Deleting the scale in use returns the global scale to Chromatic.
4. MAIN
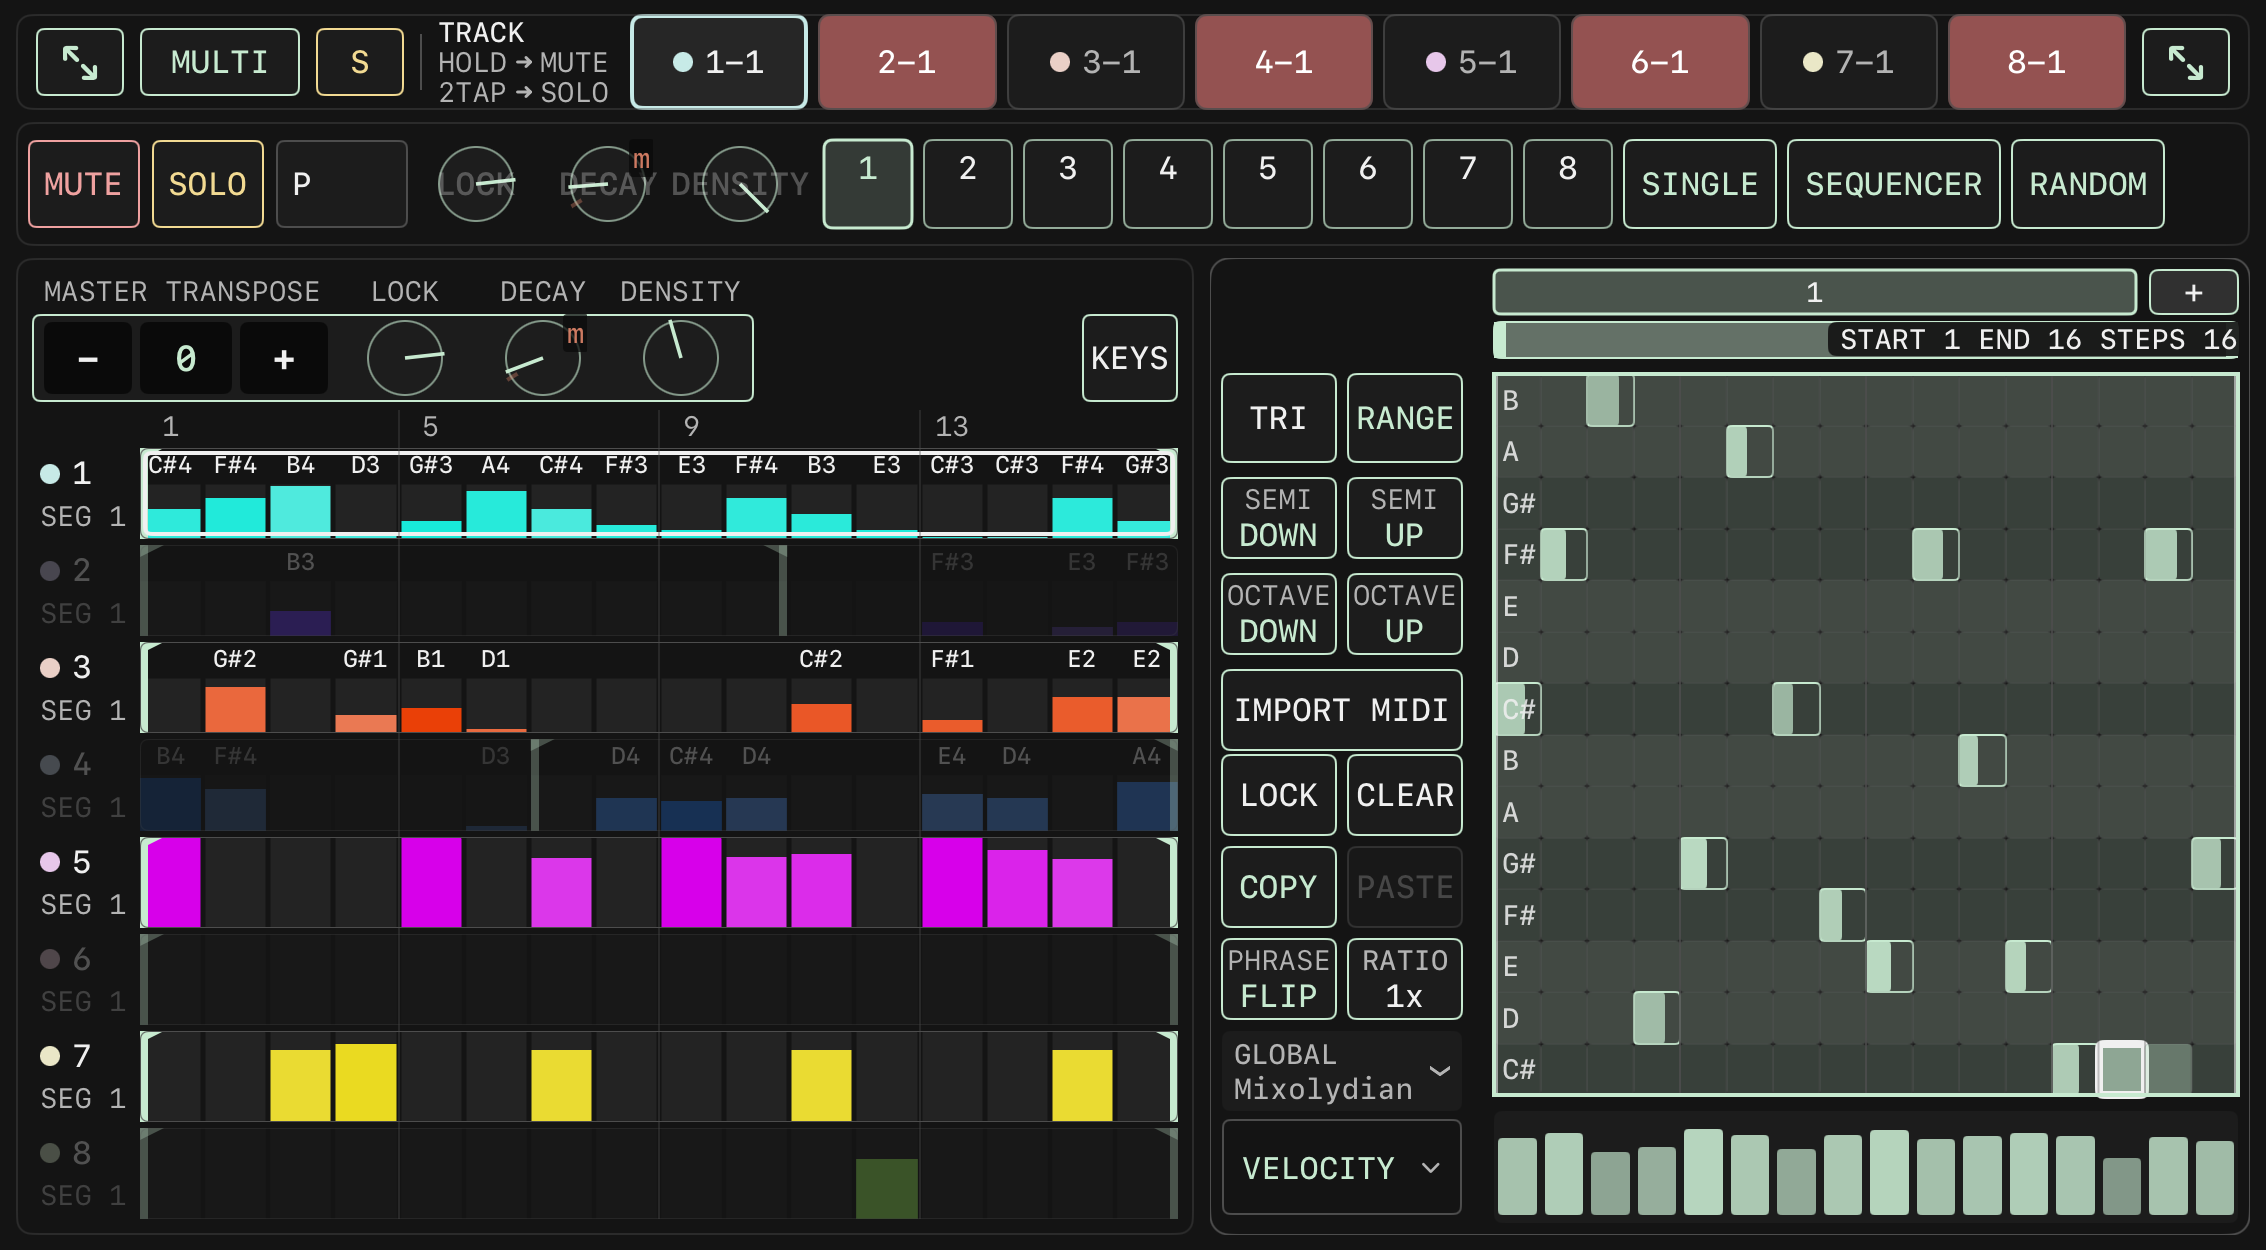
MAIN full page. Track tab row and parameter row at the top; the left column has MASTER TRANSPOSE, the MASTER LOCK / DECAY / DENSITY knobs, the KEYS button and 8 track bars; the embedded phrase editor on the right has the bar row, the START / END row, the left button column (TRI and RANGE at the top, the scale menu and the lane dropdown at the bottom) and the note grid.
Track tab row
Track tab row: a diagonal-arrow full-screen button at each end, MULTI, S, the hint text (hold to mute, tap twice to solo), and the eight track tabs 1-1 to 8-1 (1-1 is the current track in the image), each with a color dot above it.
Full-screen buttons
One diagonal-arrow button at each end of the row. Opens or closes the editor in full screen.
MULTI
Multi-track synchronized editing. When on, synchronized knobs show a dashed ring.
S
Clears solo on all tracks.
Track tabs
Tap to select a track; tap twice within 0.35 seconds to toggle SOLO; hold 0.45 seconds to toggle MUTE. The tab text is the track number and current segment (for example 1-1).
Parameter row
Parameter row: MUTE, SOLO, P (program menu), the three knobs LOCK / DECAY / DENSITY, segments 1 to 8 (1 is the current segment in the image), and the playback modes SINGLE / SEQUENCER / RANDOM.
MUTE / SOLO
Mute and solo for the current track.
P
Program menu: SAVE, LOAD, CLEAR, for Program 1 to 8.
LOCK
0 to 100%, vertical drag, no double-tap reset.
DECAY
Melodic tracks show 0 to 100% with an internal range of -0.99 to 0.99; drum tracks range 0.2 to 2.0 (1.0 shows as 44%). Double-tap resets (drum tracks 1.0, melodic tracks -0.78).
DENSITY
0 to 100%. Double-tap clears the segment override.
Segments 1 to 8
Three states: missing, empty, filled. Shows a label when a RATIO is set. Chain state is shown as a 3pt bar at the bottom; the playing segment shows a 3pt line at the top. Tap priority: chain setup > RANDOM pool > MULTI > select.
SINGLE
Plays only the current segment, shows SEG n.
SEQUENCER
Tap START, then the start slot, then END, then the end slot; afterwards shows SEQ a-b.
RANDOM
Shows CHOOSE; tap slots to add them to or remove them from the random pool.
FOLLOW
Drum tracks only. Follows the segment of the paired melodic track.
Left column
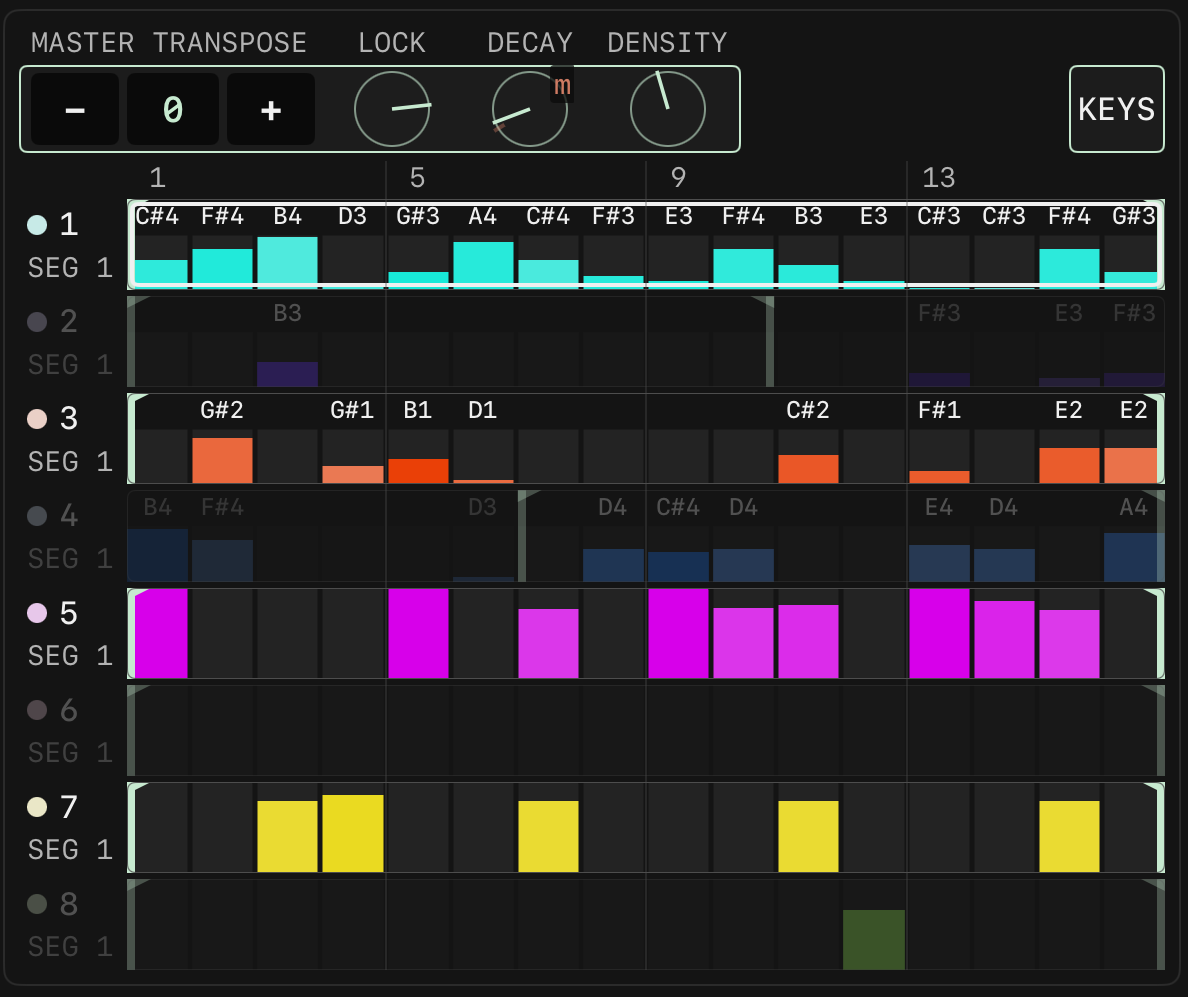
Left column: MASTER TRANSPOSE, the MASTER LOCK / DECAY / DENSITY knobs, the KEYS button at the top right, then 8 track bars (labelled 1 to 8 and SEG 1), each with a step ruler and note names above it. In the image, track 1 is outlined as the current track.
MASTER TRANSPOSE
Left to right: "-", the value field, "+". Tap the value field to type a number, drag vertically to change it. Range ±24 semitones.
MASTER LOCK / DECAY / DENSITY
Writes the corresponding parameter on all 8 tracks at once.
KEYS
The only button at the right of the header row. When on, the track bars are replaced by a keyboard. See KEYS mode below.
Track bars
Show the content of the current bar of each track. On drum tracks the bar height is velocity; on melody tracks the bar height is pitch position and the opacity is velocity. Cells outside the play range are dimmed. The step ruler shows the step numbers of the current bar; the page is synchronised with the editor on the right. Track bars are for viewing only; notes are entered in the editor on the right.
Range handles
The handles at both ends of each track bar are always shown. Drag them to set the start and end of the play window; the start and end steps of that track are shown while dragging. Holding a handle at the edge turns the page. Up to 4 fingers can drag at once.
Triplet marker
When a segment has triplet notes, a thin three-part marker appears at the bottom of every two cells of the track bar. The first part is shared with the straight step and is not drawn separately; the second and third parts are filled with the track colour when they hold a note, with opacity showing velocity.
Track bars do not support long press.
Phrase editor (TRACK 1 to 4)
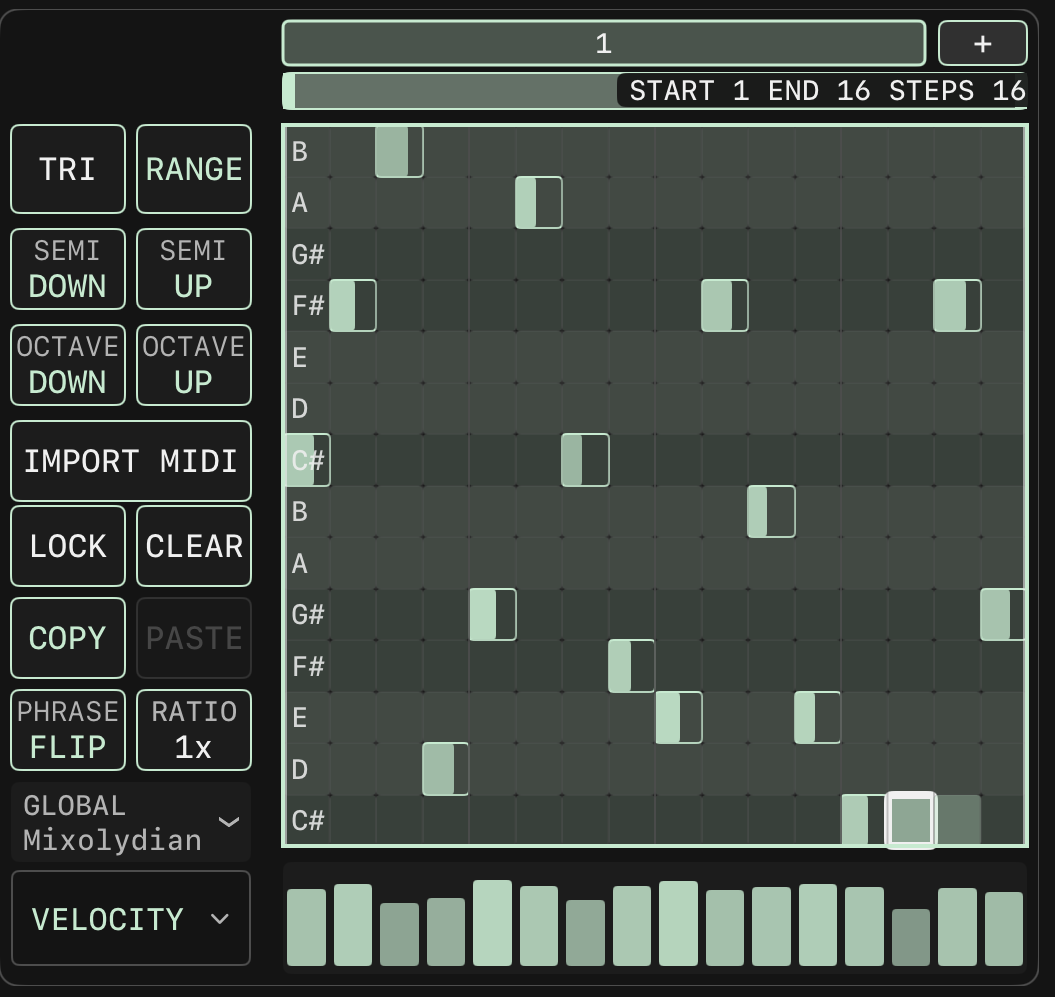
Phrase editor: the bar row ("1" and "+") at the top, START 1 END 16 STEPS 16 below it, and the left button column, top to bottom: TRI / RANGE, SEMI DOWN / SEMI UP, OCTAVE DOWN / OCTAVE UP, IMPORT MIDI, LOCK / CLEAR, COPY / PASTE, PHRASE FLIP / RATIO, the scale menu, and the bottom row with the lane dropdown (VELOCITY in the image) on the left half and EDIT on the right half. The note grid is on the right, with velocity bars at the bottom.
Left button column, top to bottom: FOLLOW (shown only when there is more than one bar), TRI and RANGE, SEMI DOWN and SEMI UP, OCTAVE DOWN and OCTAVE UP, IMPORT MIDI, LOCK and CLEAR, COPY and PASTE, PHRASE FLIP and RATIO, SCALE menu, and the bottom row of lane dropdown and EDIT.
Bar row
One page is one bar of 16 steps, up to 64 bars. Tap a page number to switch; long-press 0.6 seconds to show "DELETE BAR n?" Y / N. "+" adds a bar. With more than 8 bars, 8 are shown at a time with switch buttons at both ends; full screen shows all bars. The bar being played has a colour band at the bottom.
Full screen
Full screen shows two bars at once, and edge page turning moves two bars at a time. Page numbers, COPY / PASTE of 1 BAR and bar deletion still work on a single bar.
Edge page turning
When stretching a note horizontally, sweeping across a lane, or dragging START / END, holding at the edge for 0.3 seconds turns the page. Changing pitch vertically does not turn the page.
START / END
Sets the start and end steps of playback, shown as "START n END m STEPS k"; BARS is added above 16 steps, and RATE is added when RATIO is not 1x.
FOLLOW
Makes the page follow playback. Toggled only by this button.
TRI
Toggles the triplet grid. See "TRI triplet grid" below.
RANGE
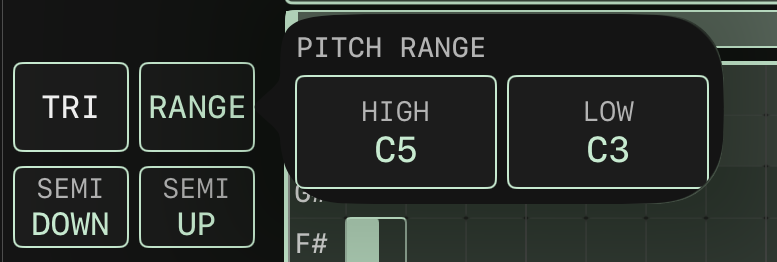
Opens the PITCH RANGE window with two fields, HIGH and LOW, the upper and lower limits of the pitch range. Tap to type a note name, drag vertically for one semitone per 24px; both fields can be dragged at once. HIGH is at least one semitone above LOW. Tap outside the window to close.
SEMI DOWN / UP
Transposes the whole segment by ±1 semitone; unavailable at the limit. Triplet notes are transposed as well.
OCTAVE DOWN / UP
Transposes the whole segment by ±12 semitones; unavailable at the limit. Triplet notes are transposed as well.
IMPORT MIDI
Imports a .mid file. On completion shows "IMPORTED n NOTE(S)", with "SKIPPED m" added when notes were skipped; errors are shown in red. The message disappears after 4 seconds. Does not affect triplet notes.
LOCK
Toggles lock mode.
CLEAR
Two-stage: "CLEAR LOCK?" appears. Y clears all notes including locked ones, N clears only unlocked notes; triplet notes are handled the same way. Cancels automatically after 5 seconds.
COPY
Shows "COPY BAR n OR ALL?"; choose 1 BAR or ALL. Triplet notes are copied as well.
PASTE
Can paste across tracks; the clipboard is kept after pasting. When the source has no triplets, the triplets of the destination are cleared.
PHRASE FLIP
Reverses the phrase within the play window; requires at least 2 steps. Triplet notes are reversed as well.
RATIO
The button face shows RATIO and the current value. 15 options: x8, x6, x4, x3, x2.5, x2, x1.5, 1x, /1.5, /2, /2.5, /3, /4, /6, /8. Triplets scale by the same ratio.
SCALE
Segment scale menu: GLOBAL, built-in scales, user scales, each with 12 root notes.
Lane dropdown
On the left half of the bottom row of the button column. Selects the lane shown below the note grid, seven items. See the table below.
EDIT
On the right half of the same row, beside the lane dropdown. Opens the tall parameter editor. See "EDIT panel" below.
The PITCH RANGE popover opened with RANGE. HIGH is C5 and LOW is C3.
Lanes
VELOCITY
1 to 127; shows "VELOCITY n" while dragging. New notes are 100.
PROBABILITY
0 to 100%; shows "PROB nn%". Default 100%.
PITCH PROBABILITY
0 to 100%; shows "PITCH nn%". The probability of a random pitch. Default 0.
DECAY
0 to 100%; shows "DECAY nn%". Default 50%, which follows the DECAY of the segment; below 50% is shorter, above 50% is longer.
RATCHET
0 to 100%; shows "RATCHET nn%". The probability that the step retriggers. Default 0.
RATCHET COUNT
The number of retriggers, nine values: 2, 3, 4, 6, 8, 12, 16, 24, 32; shows "COUNT n". Default 2. For notes whose RATCHET is 0, the bar in this lane is faded but can still be edited.
RATCHET COUNT PROBABILITY
0 to 100%; shows "COUNT PROB nn%". Default 0. When a RATCHET occurs, a second check is made: if it passes, the count becomes random, drawn from 1 and the values not exceeding the set COUNT, where 1 means the step does not retrigger; if it does not pass, the set COUNT is used.
All lanes support vertical drag and a one-finger horizontal sweep. The DECAY and RATCHET values of locked notes are not changed by generation.
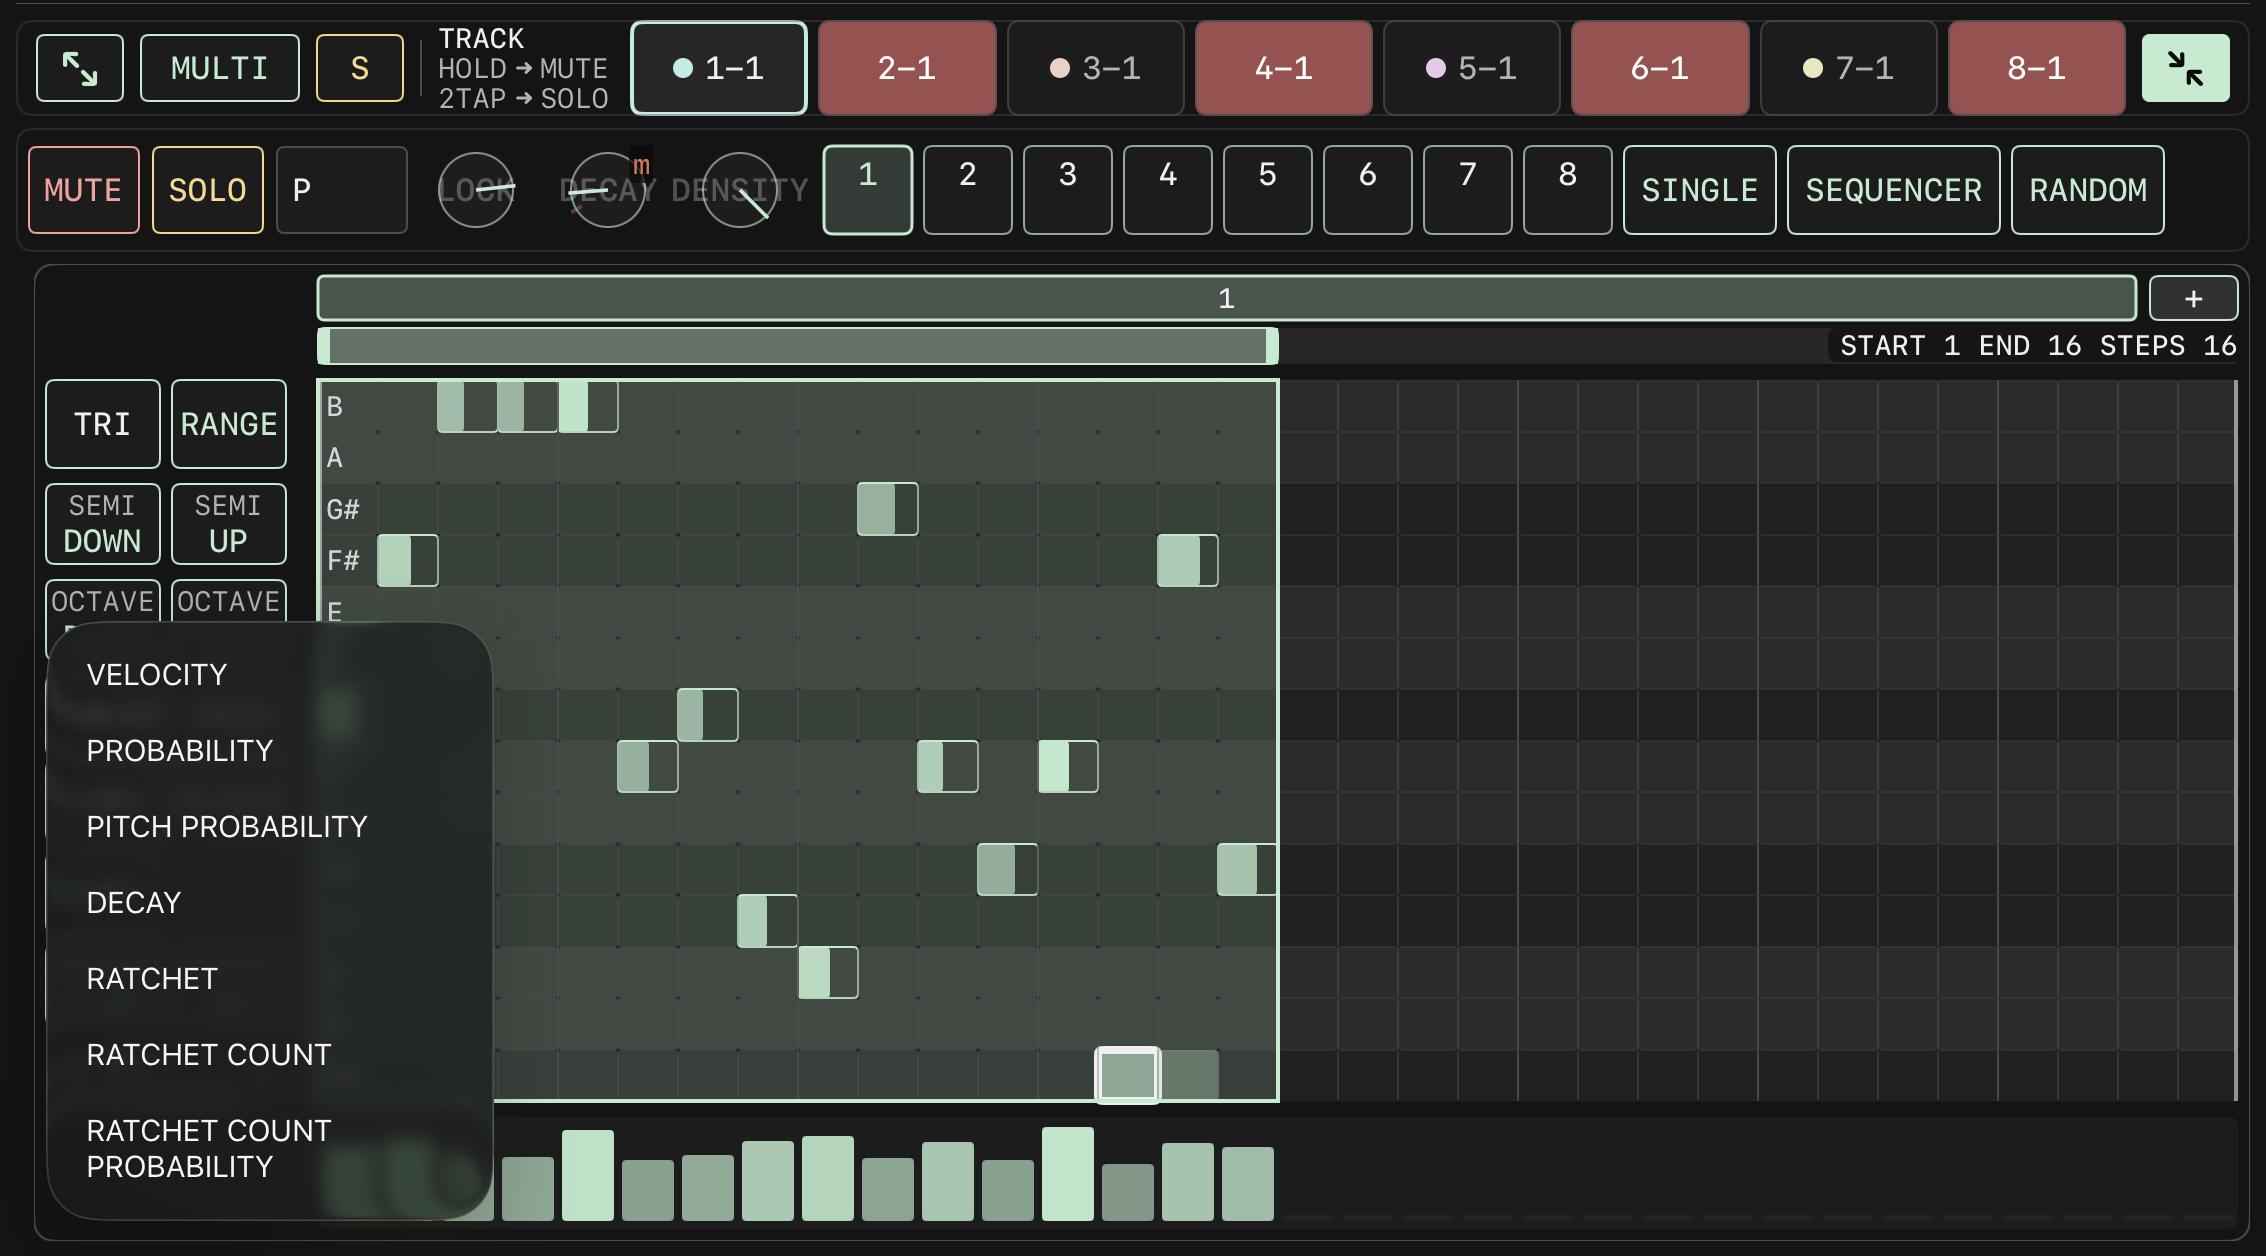
The lane menu open, listing VELOCITY, PROBABILITY, PITCH PROBABILITY, DECAY, RATCHET, RATCHET COUNT and RATCHET COUNT PROBABILITY.
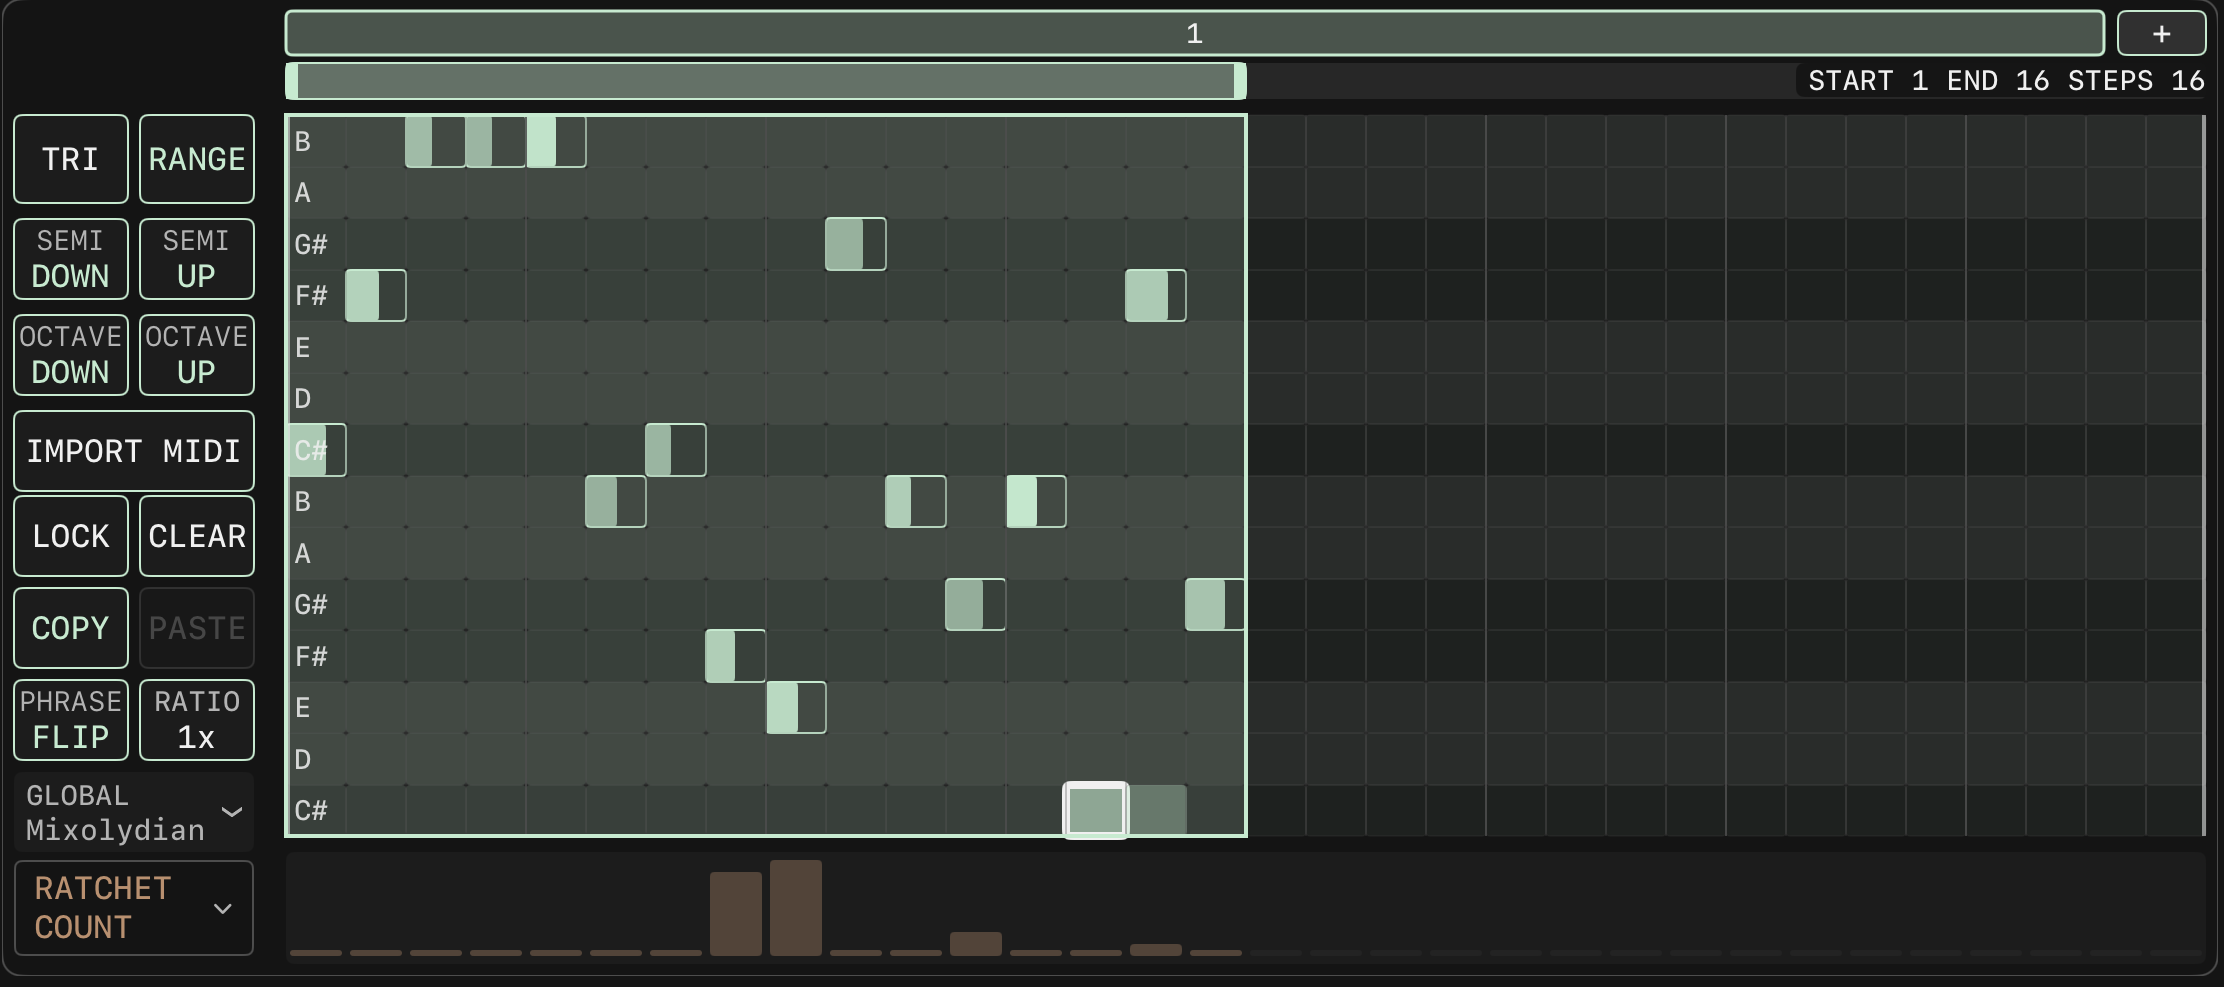
The lane set to RATCHET COUNT. The bars under the grid are the retrigger counts; steps whose RATCHET is 0 are drawn dimmer.
EDIT panel
The bottom row of the left button column is split in two: the lane dropdown on the left half, an EDIT button on the right half. All eight tracks have it. EDIT opens a tall parameter editor: the note grid above shrinks to half its height and the editor takes the space below. Pressing EDIT again collapses it and the grid returns to full height. The lane dropdown still works while EDIT is open, so the editor follows whichever parameter is selected.
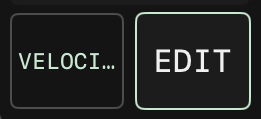
The bottom row of the left button column: the lane dropdown on the left half, abbreviated when the name is too long, and the EDIT button on the right half.
On TRACK 1 to 4 the editor is the same lane as before, only taller; the gestures are unchanged, vertical drag and a one-finger horizontal sweep. A row at the top of the editor shows the full parameter name in the colour of that parameter. That row is a label only and does not respond to touch: the dropdown is now half width and may shorten its own wording, while this row always spells the name out in full.
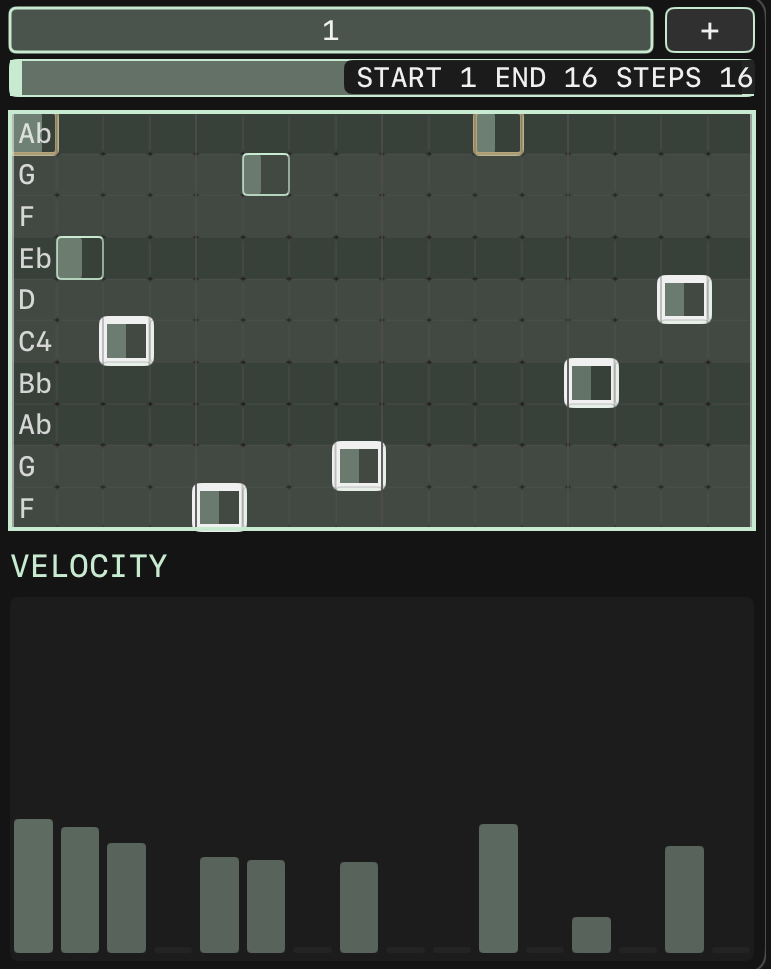
TRACK 1 with EDIT on: the note grid drops to half height and the tall parameter editor takes the lower half, with the full parameter name in the parameter colour along its top row.
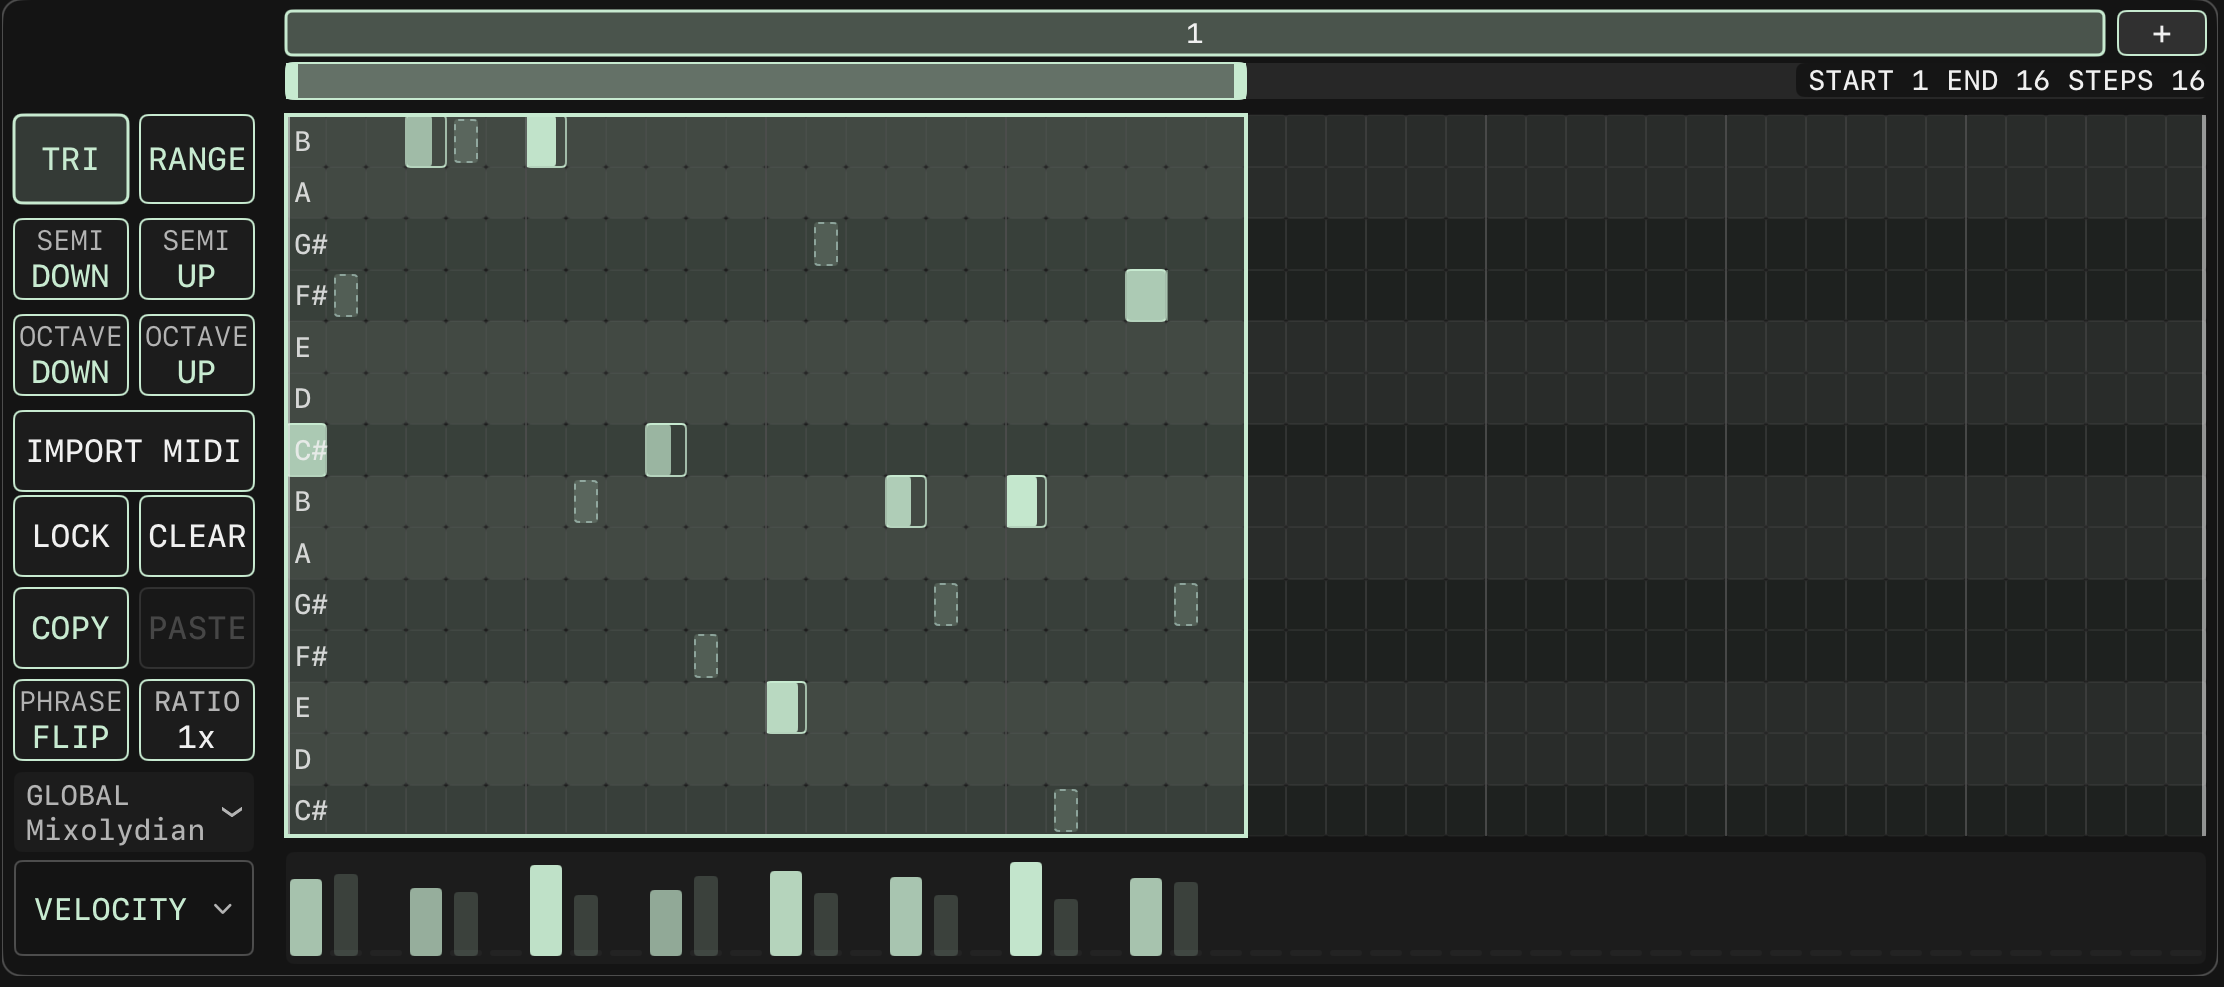
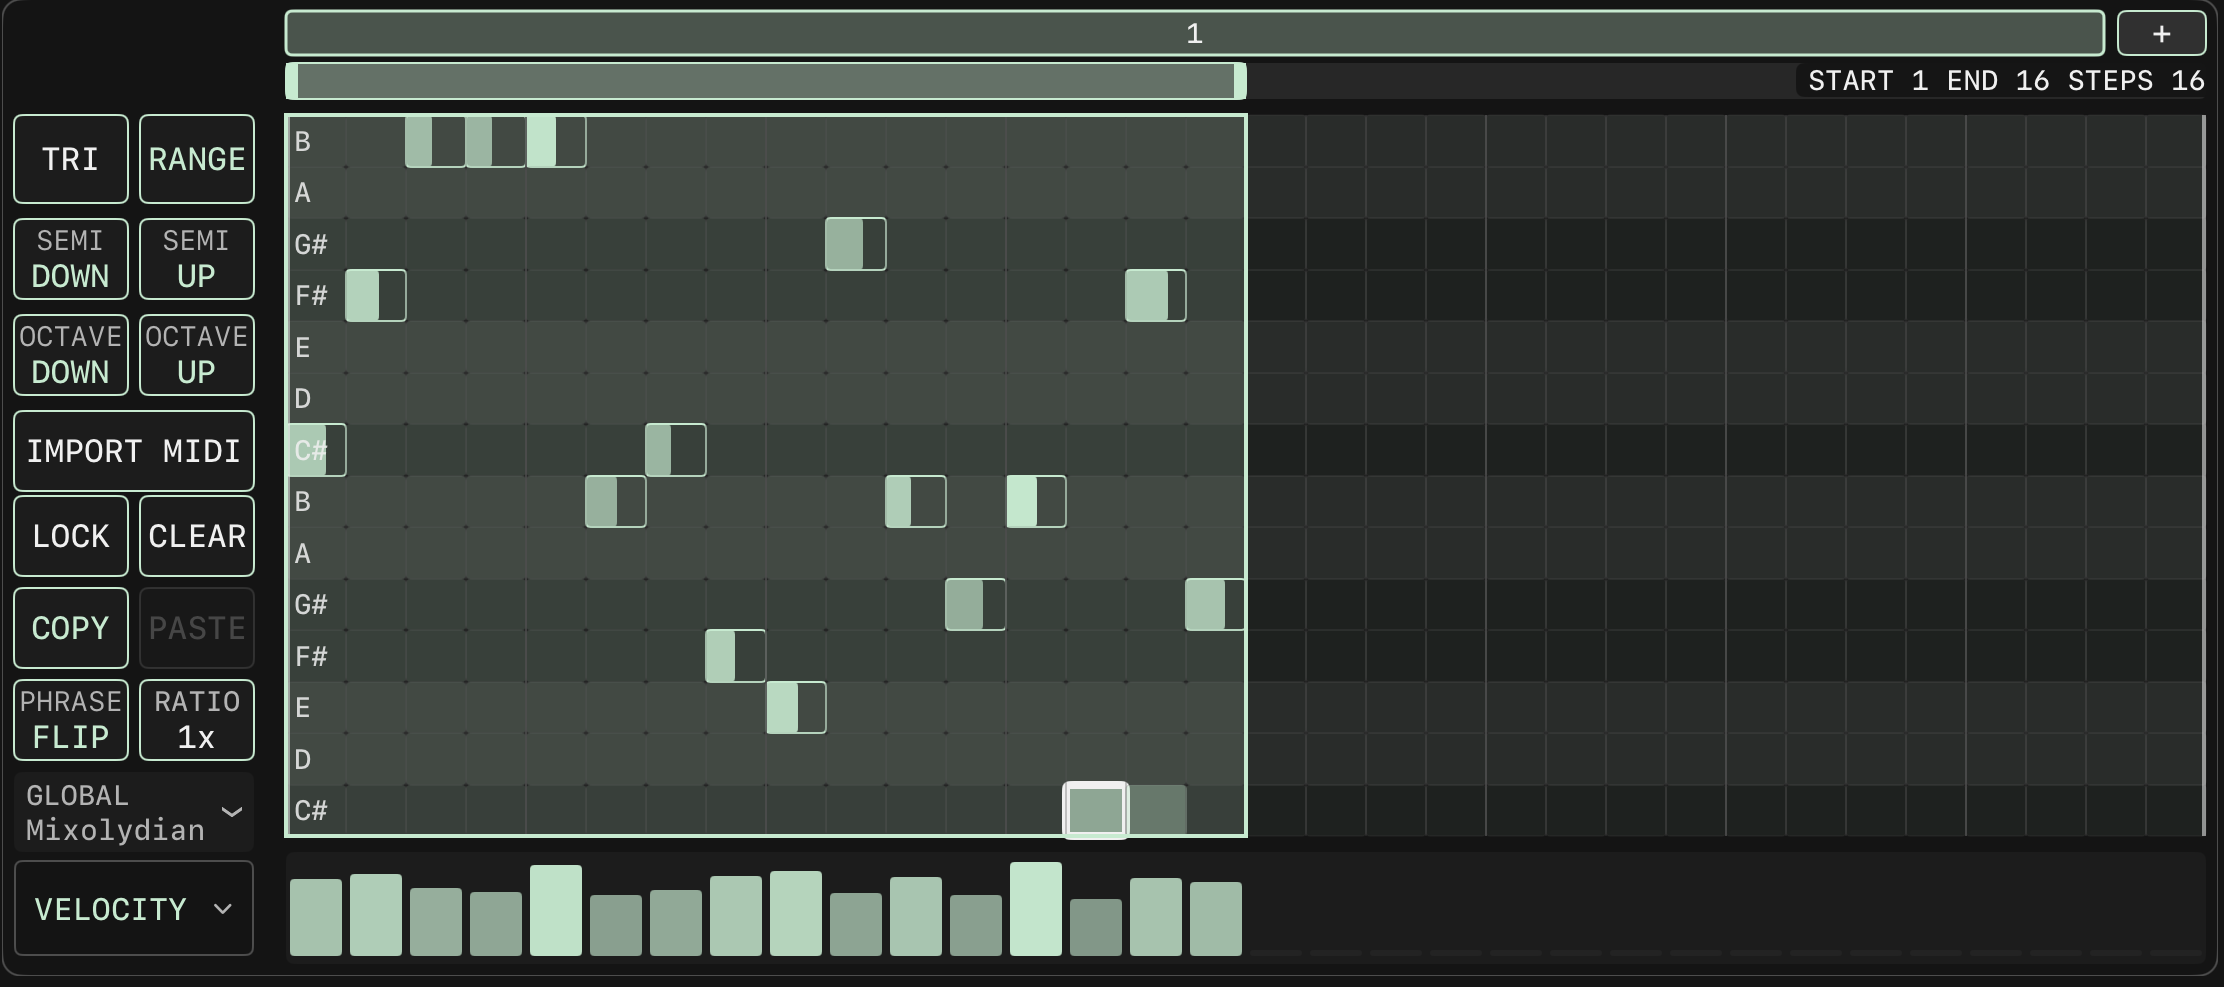
TRI triplet grid
TRI only switches the grid used for display and editing. Straight notes and triplet notes are two separate sets of data; both play whether TRI is on or off.
On melody tracks, TRI applies only to the current track and is kept per track. The TRI state is not saved; it is off after the app restarts.
With TRI on, a bar changes from 16 columns to 24 columns: every two straight steps are divided into three cells. The first cell of each group is the same note as the even straight step.
With TRI on, notes on odd straight steps are shown at their original time position with a faded dashed frame and cannot be edited. With TRI off, triplet notes are shown with a faded dashed frame and cannot be edited.
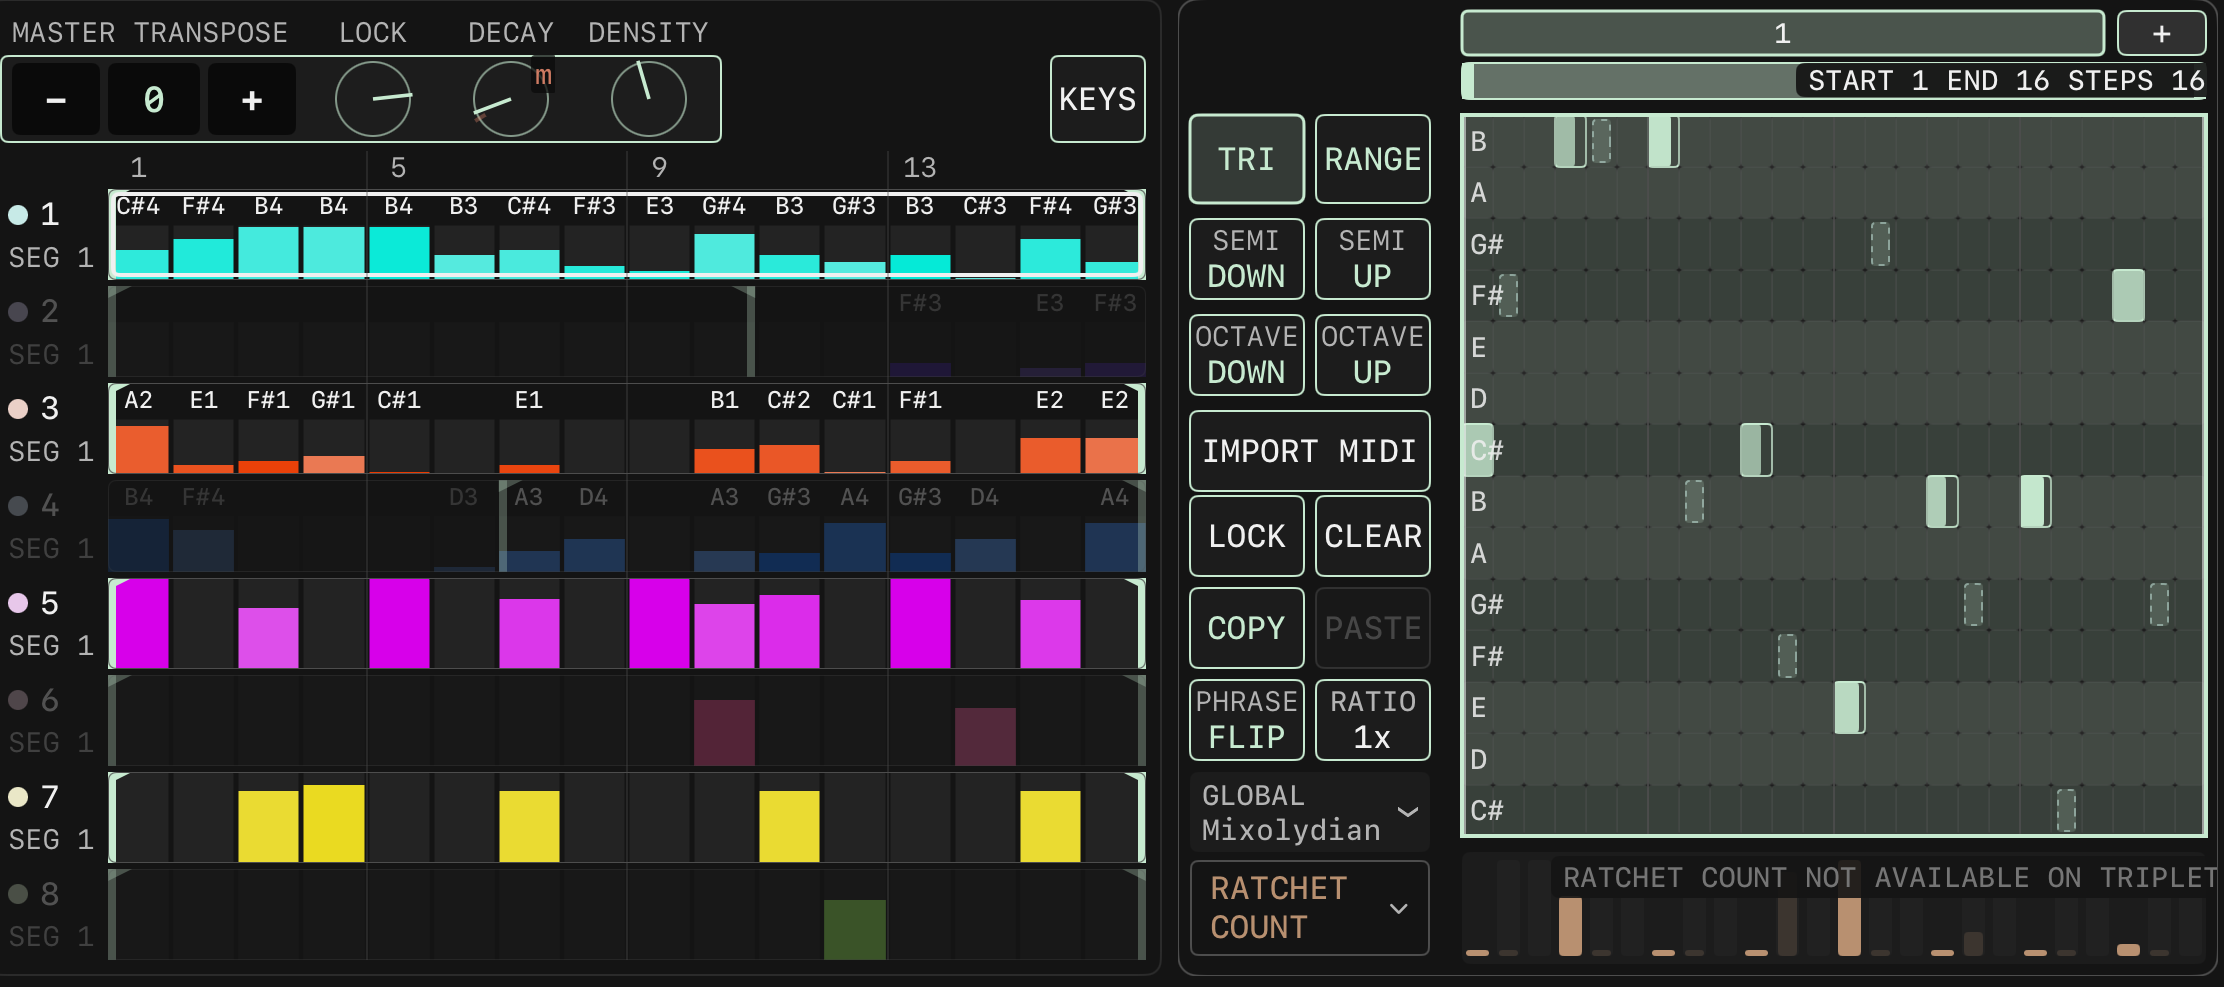
Lanes available on triplet cells: VELOCITY, PROBABILITY, DECAY. PITCH PROBABILITY and the three RATCHET lanes do not apply to triplets; the lane shows "NOT AVAILABLE ON TRIPLET" at its top right, and the straight columns can still be edited.
A new triplet note has velocity 100 and is locked on creation.
Triplet notes are not affected by SWING and have no random pitch or retrigger. They are also silent under MUTE, SOLO and when DENSITY is 0.
Generation neither creates nor clears triplet notes. Deleting a bar deletes its triplets as well.
Triplets are stored with the segment and included in .honki files; files from older versions still load.
TRI on. The bar goes from 16 to 24 columns, and notes on odd straight steps appear as dimmed dashed outlines that cannot be edited.
TRI off. The same phrase back on the 16-column straight grid.
With TRI on and the lane set to RATCHET COUNT, the lane shows RATCHET COUNT NOT AVAILABLE ON TRIPLET at its top right; the straight columns remain editable.
Note grid gestures
Rows are the scale notes within the pitch range; note width is gate and opacity is velocity.
Notes outside the scale show a 2pt warning frame; locked notes show a 4pt frame.
Tap an empty cell to create a note (velocity 100, gate 0.5), locked on creation. Tap a note to delete it; the lock state is kept.
Drag vertically more than 8pt to change pitch; drag horizontally to change gate (0.01 to 16). Up to 4 fingers at once. A drag that starts on an empty cell does not create a note.
Notes across bars: stretch a note to the right edge, hold until the page turns, and keep stretching on the next page. For a long note that starts on the previous page, the part that extends into this page is drawn from the left edge in a lighter colour.
In LOCK mode, notes can only be tapped to toggle their lock.
Manually entered notes are locked by default and are not affected by the LOCK knob or by generation. Locked notes are cleared only by choosing Y after CLEAR.
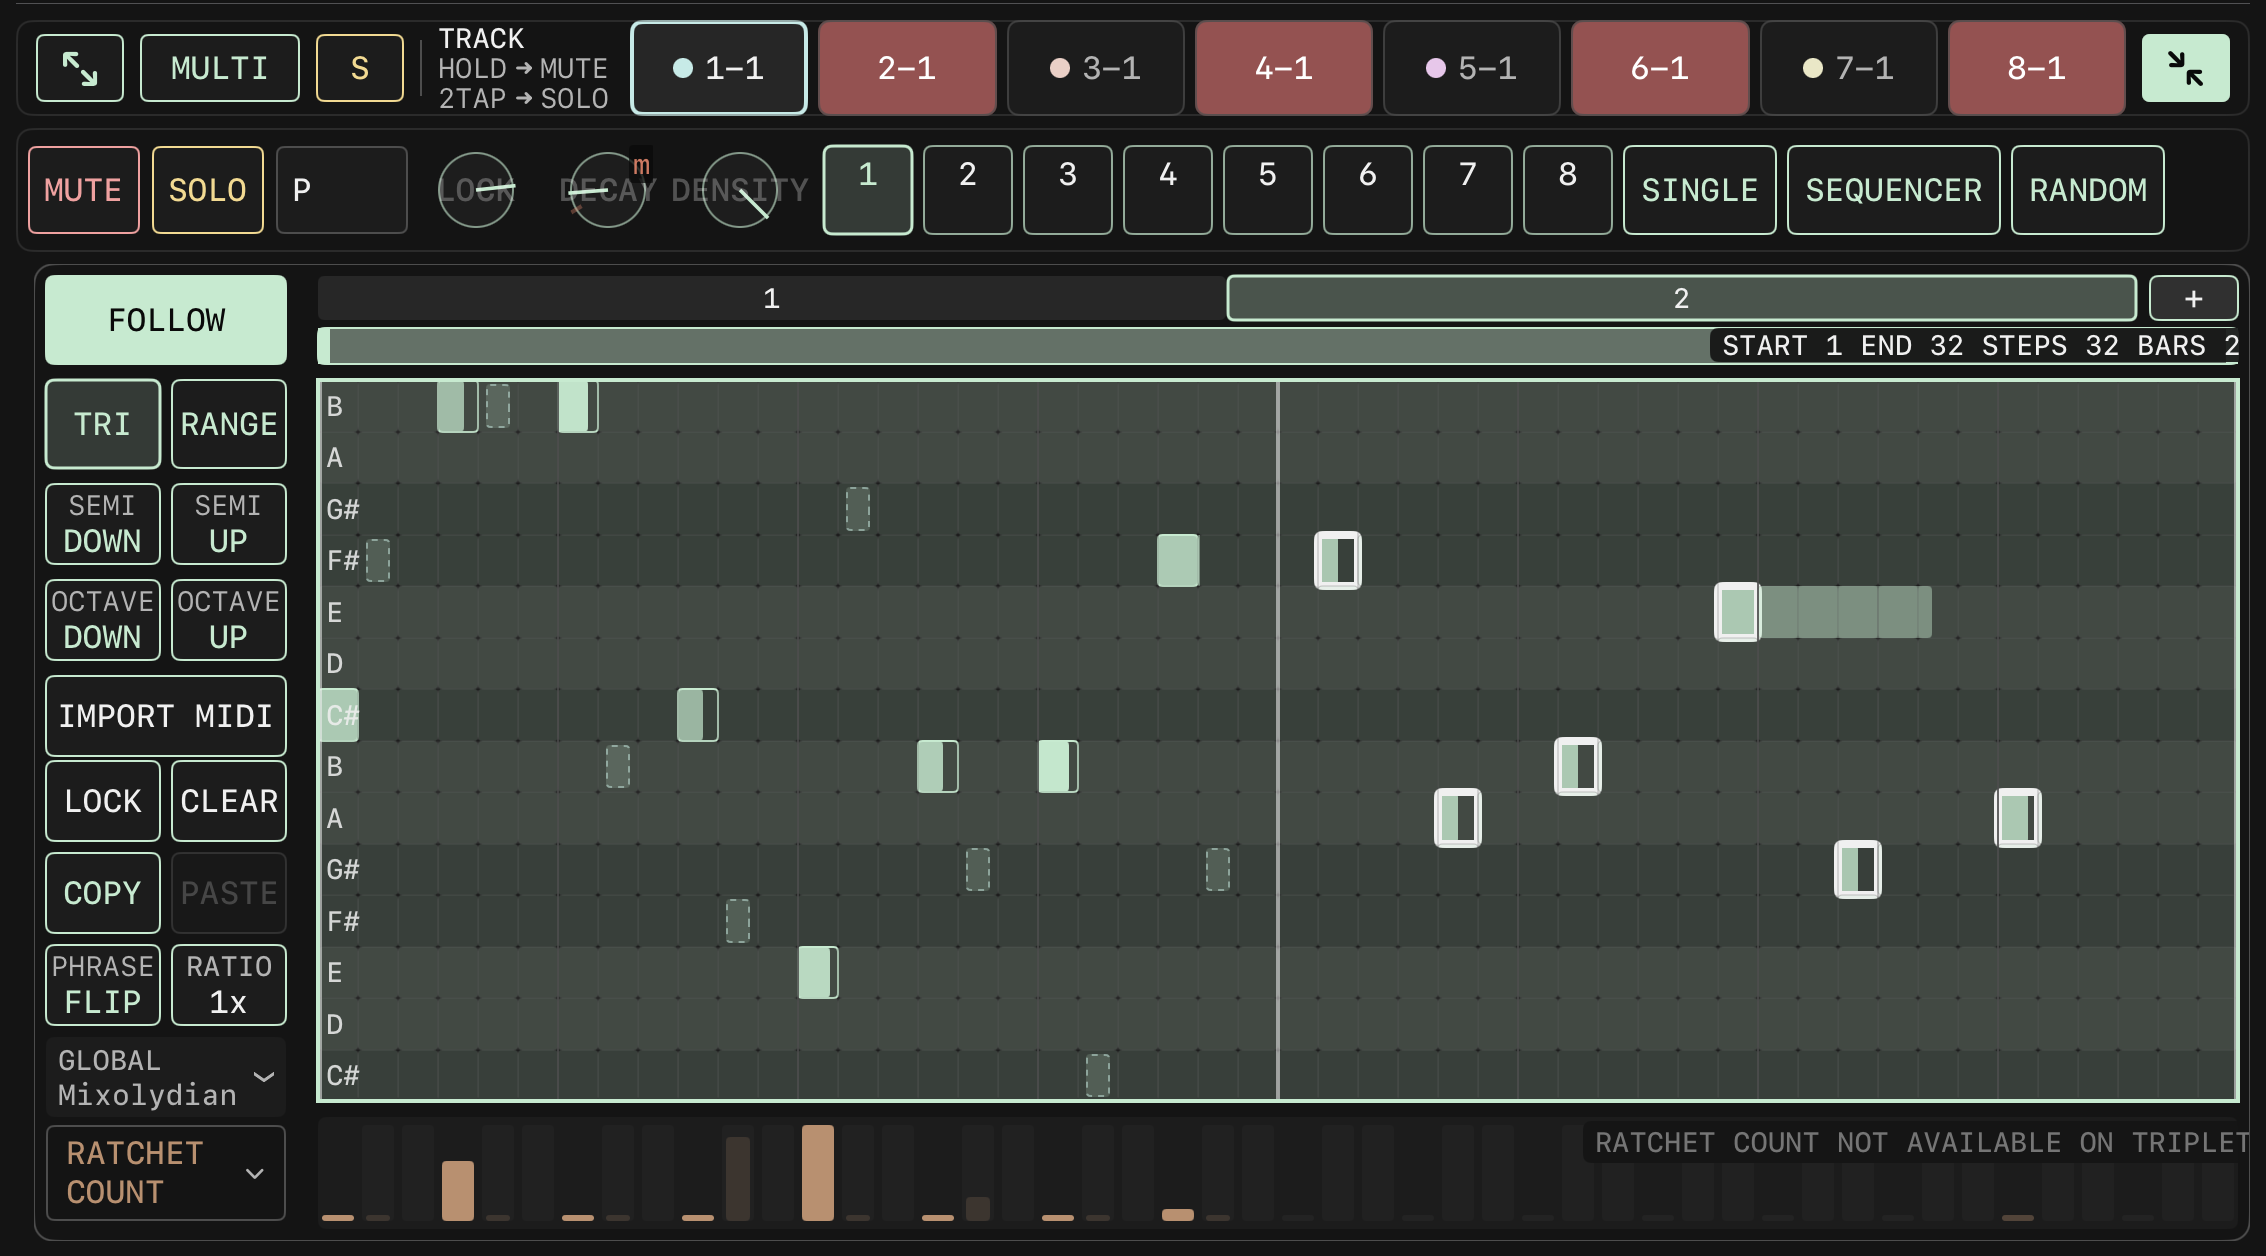
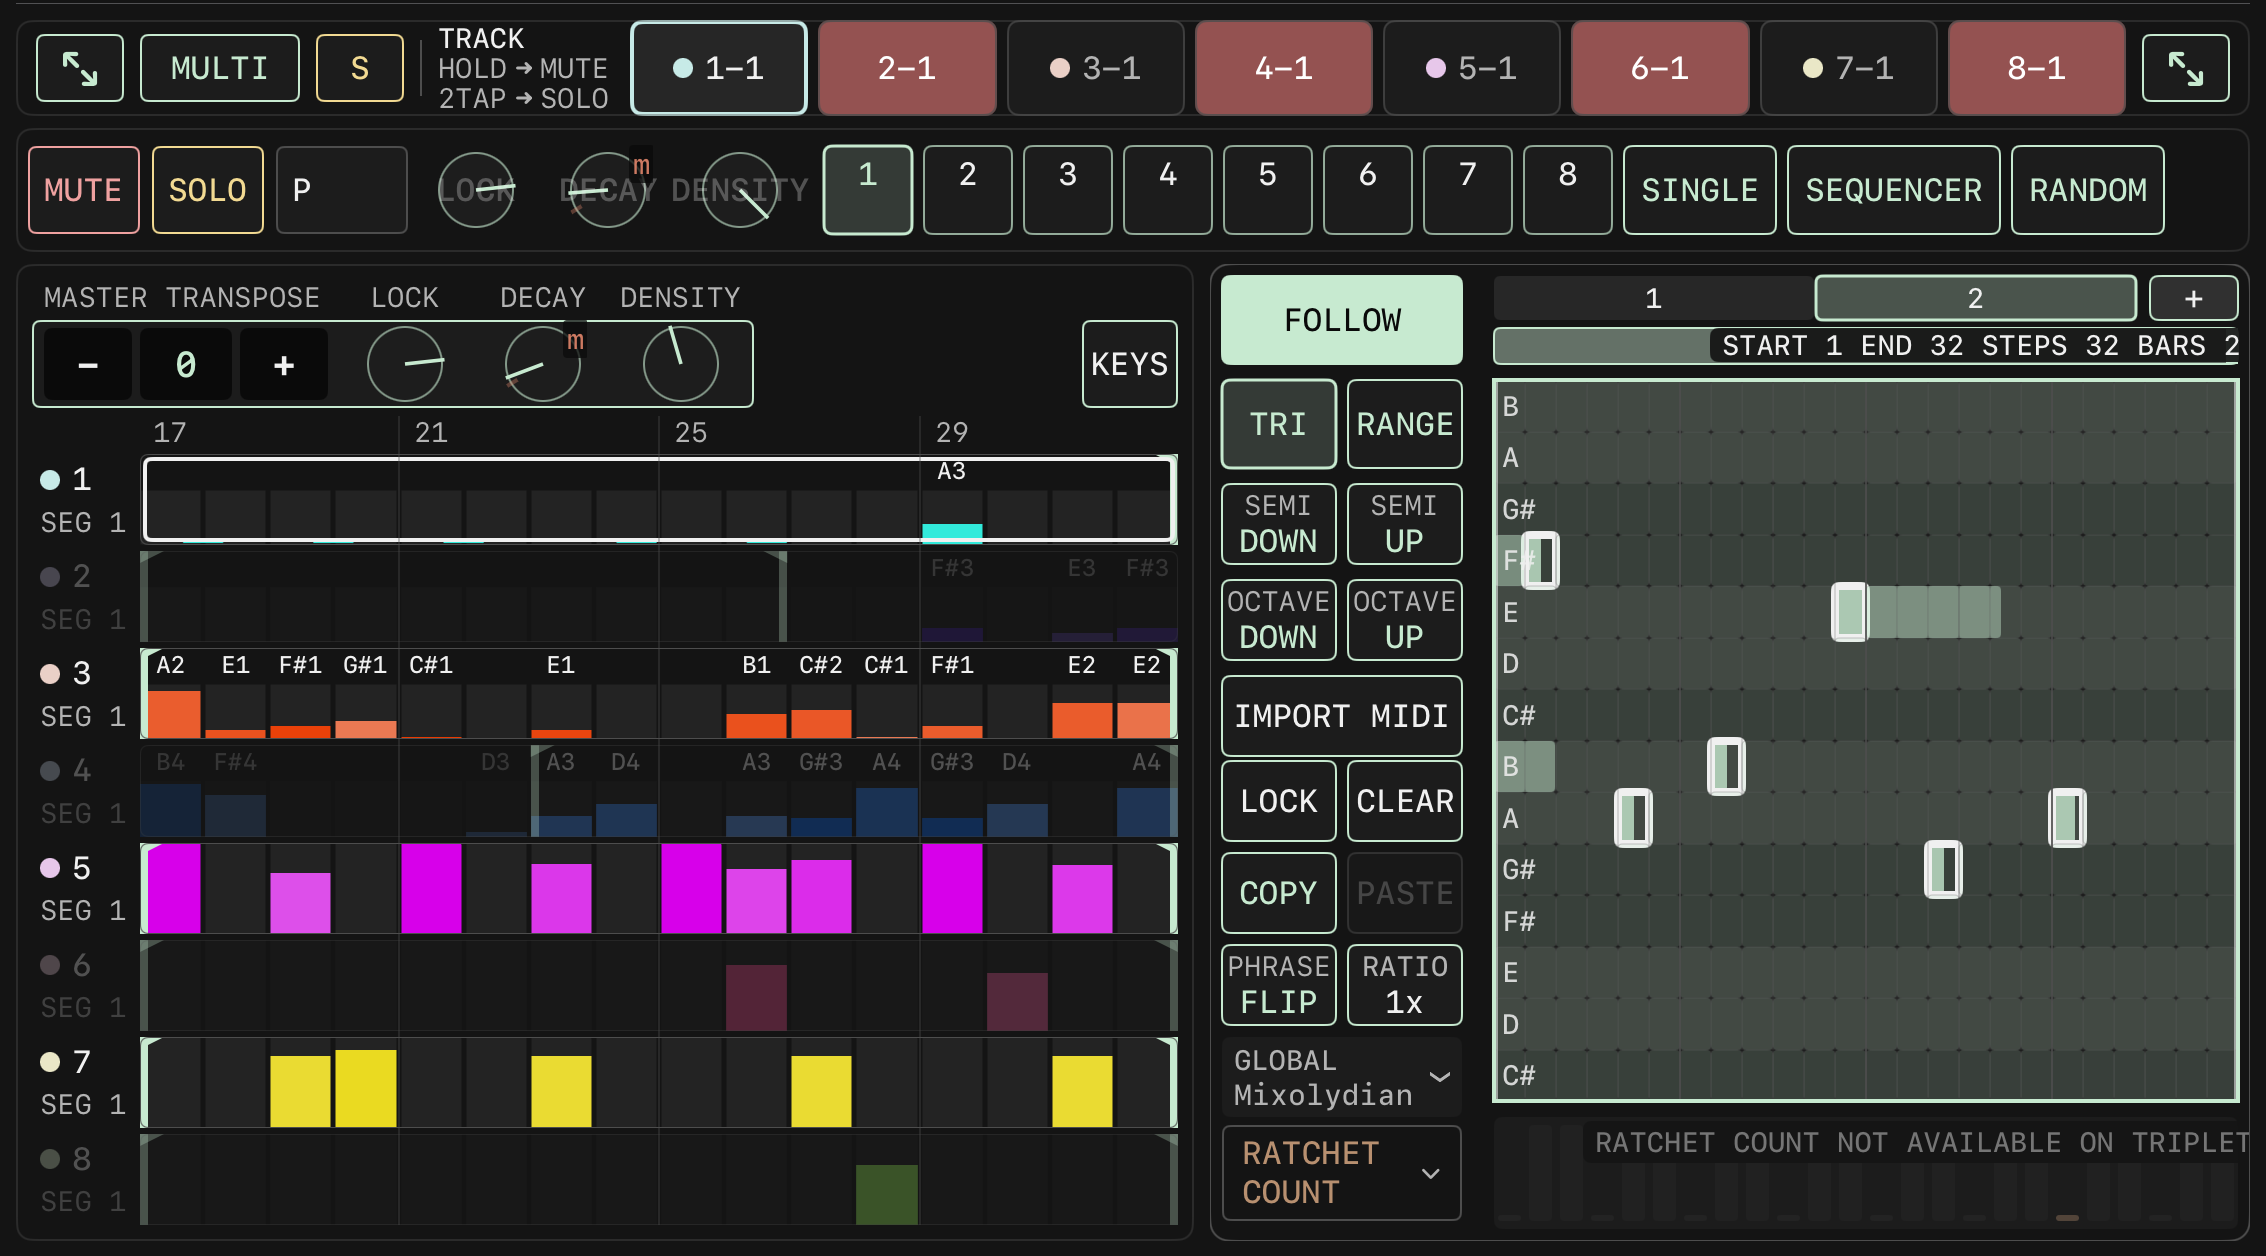
The editor full screen. Two bars are shown at once, the status reads START 1 END 32 STEPS 32 BARS 2, and FOLLOW appears at the top of the button column.
The editor on bar 2, with a long note on the E row spanning several cells. The step ruler on the left track rows follows, showing 17 to 29.
DRUMS editor (TRACK 5 to 8)
Group order
Top to bottom: TRACK 8 LEAD, 7 TIMELINE, 6 GROOVE, 5 FOUNDATION.
Voice rows
TRACK 5: Kick, Low Tom; TRACK 6: Snare, Mid Tom, Clap; TRACK 7: HH Closed, HH Open; TRACK 8: High Tom, Crash. Names change with STYLE.
Pages
The four tracks share bar pages. Full screen shows two bars at once, and edge page turning moves two bars at a time.
Left sliders
VARIATION, REST, GHOST, ACCENT, FILL, each 0 to 1, applied to the target tracks.
Target tracks
Each slider has a 2x2 grid beside it for selecting TRACK 5 to 8. Popover title TARGET TRACK; at least one track remains selected.
LOCK
Toggles lock mode.
CLEAR
First asks WHICH TRACK? (ALL / 8 / 7 / 6 / 5), then CLEAR LOCK? Y / N. N clears only unlocked notes, including triplets; Y clears everything.
COPY / PASTE
Copies and pastes the four tracks as one set. Triplet notes are copied as well.
RATIO
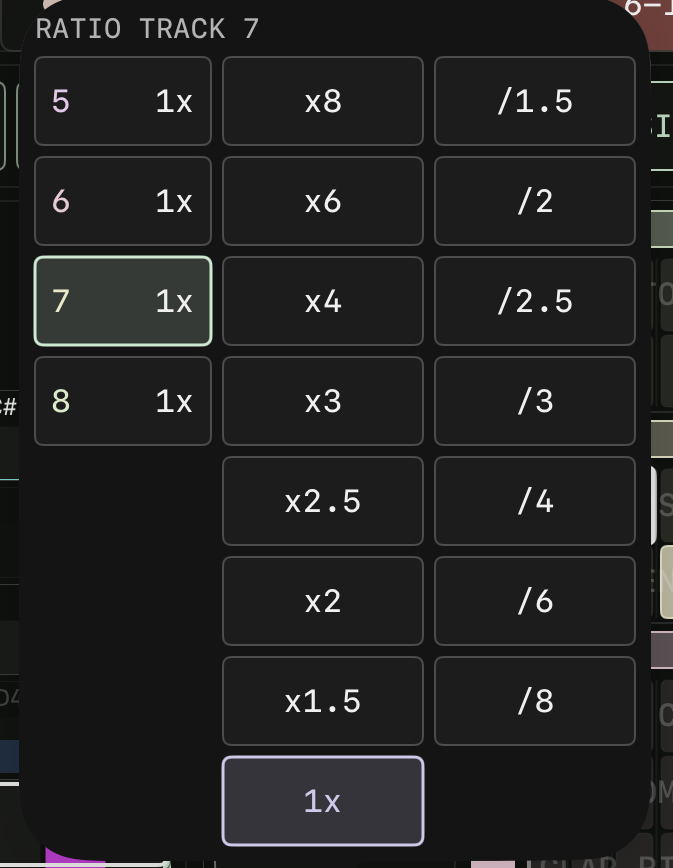
A single button across the row. The right of the button face shows the value shared by the four tracks, or MIXED when they differ. Popover title "RATIO TRACK n": four track buttons 5, 6, 7, 8 on the left, each showing the current value of that track; 15 ratios on the right. The popover stays open after choosing a ratio, so other tracks can be set next; tap outside to close.
TRI
A single button across the row that switches the four tracks together. Pressing it when any track is off turns all four on; pressing it when all four are on turns them all off. It lights only when all four are on. The grid rules are the same as on melody tracks.
Lane dropdown
On the left half of the bottom row of the button column. Six items: VELOCITY, PROBABILITY, DECAY, RATCHET, RATCHET COUNT, RATCHET COUNT PROBABILITY, with the same value definitions as on melody tracks. On drum tracks, DECAY and the three RATCHET values are shared by all voices on the same step. Triplet cells can use only VELOCITY, PROBABILITY and DECAY.
EDIT
On the right half of the same row, beside the lane dropdown. Opens the parameter editor. See "EDIT panel on drum tracks" below.
Style band
One per group; select GLOBAL or a specific style. Can be assigned with MIDI Learn.
Drum grid gestures: tap to toggle a hit (velocity 100); drag vertically more than 8pt to change the value of the current lane; swipe horizontally to paint continuously; in LOCK mode, tap to toggle the lock. The drum grid has no gestures for pitch or note length. Manually entered triplet hits are locked on creation.
The RATIO popover on a drum track, titled RATIO TRACK 7. Tracks 5 to 8 on the left each show their current value; the 15 ratios are on the right.
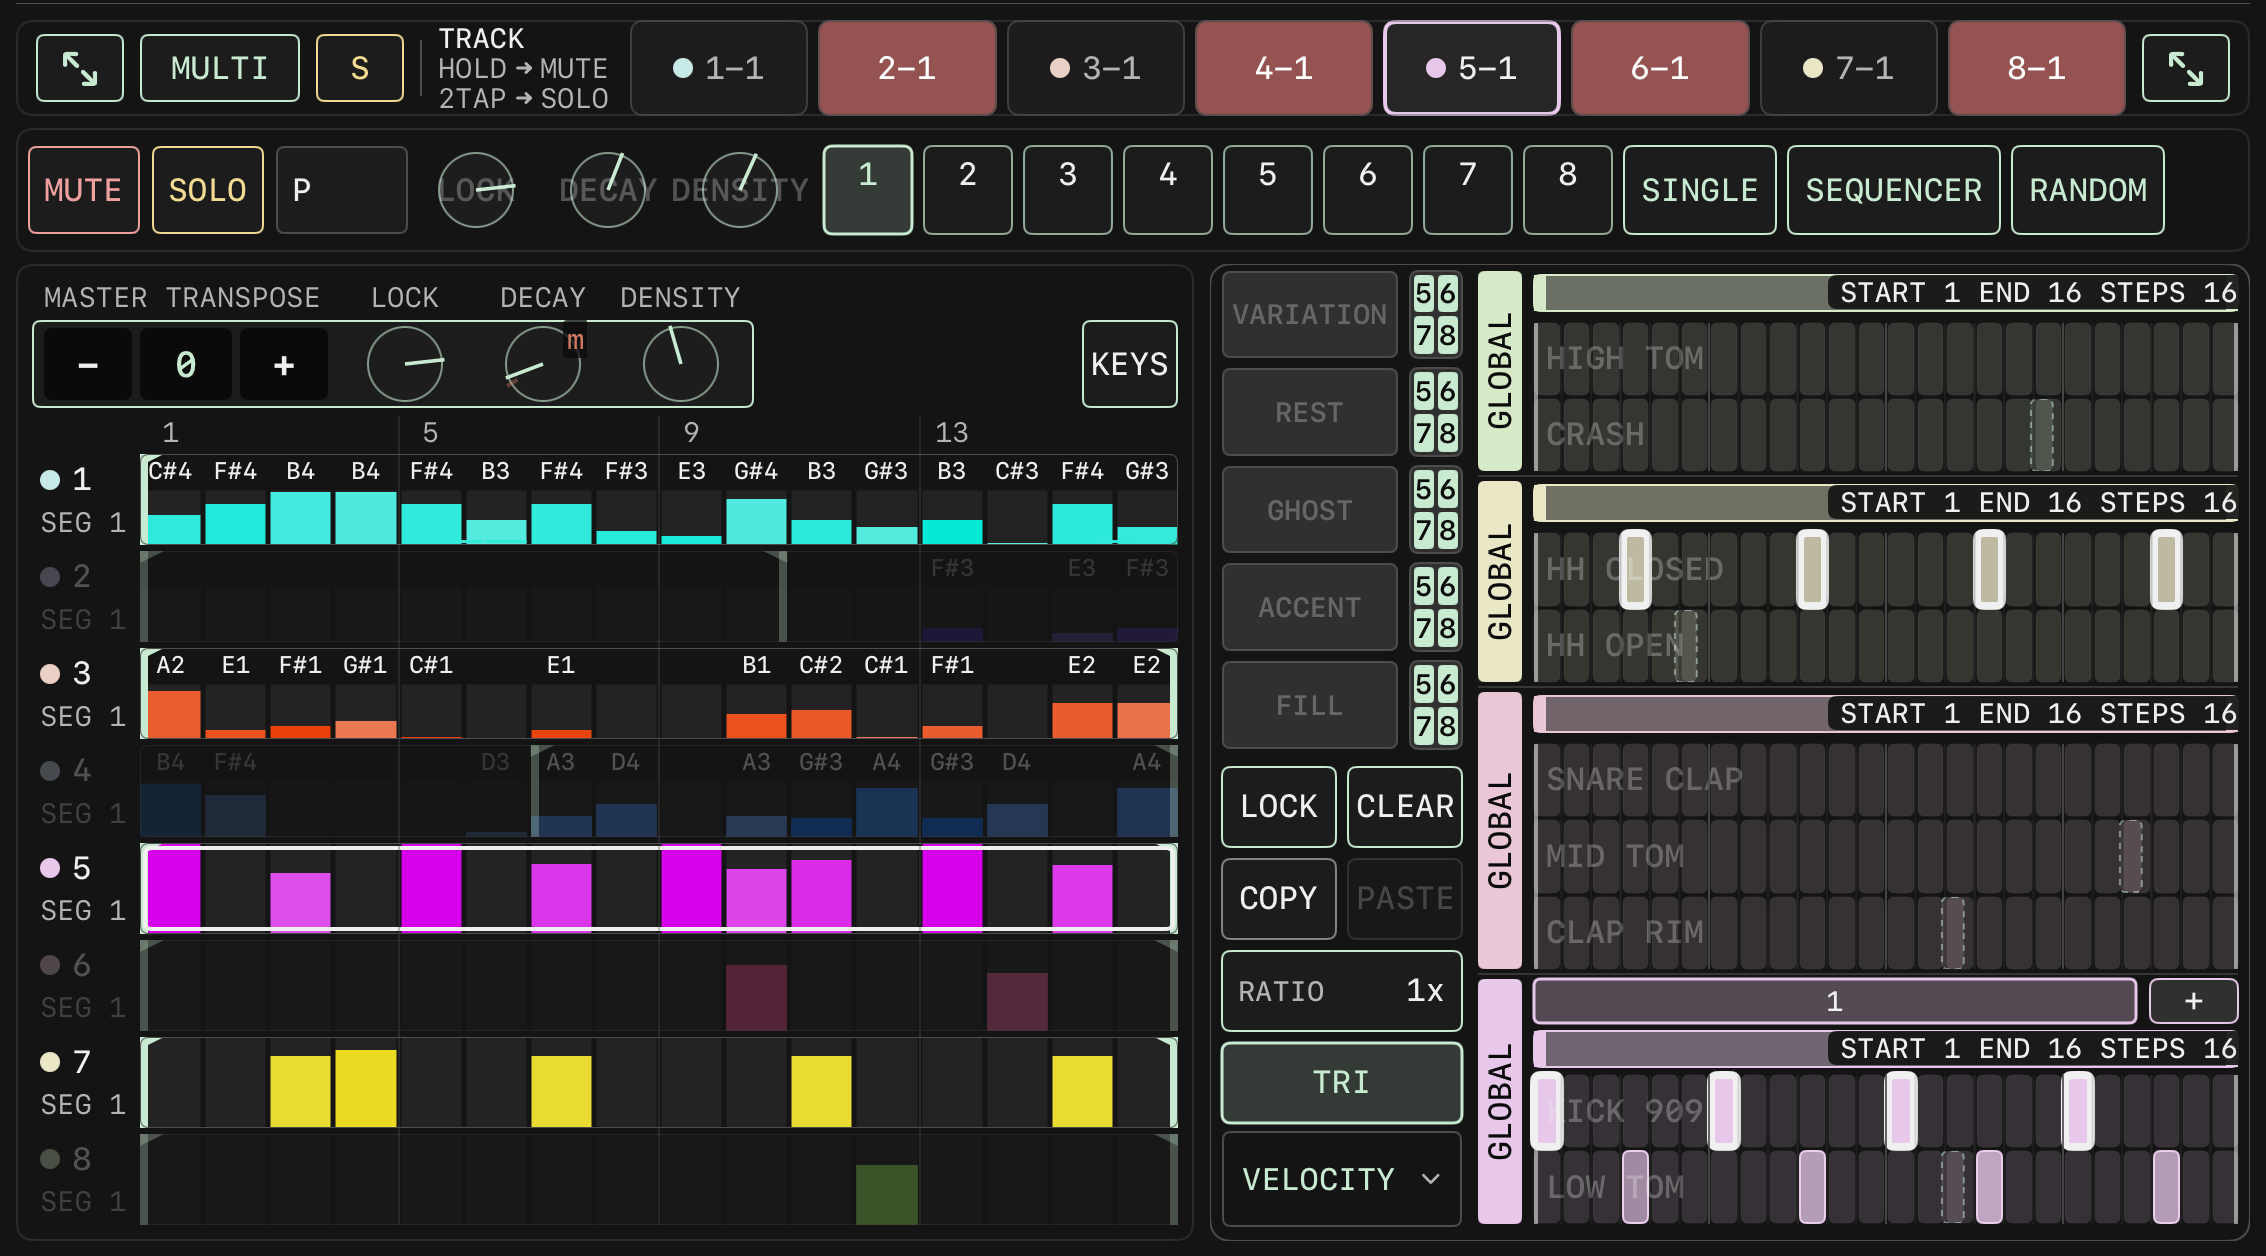
TRI on for the drums. All four tracks switch together, every drum grid goes to the triplet grid, and the lane is VELOCITY.
EDIT panel on drum tracks
With EDIT on, the right side shows only the group of the currently selected track, and its voice rows become taller. The lower half becomes an editing area that alternates one block per voice: the name of the first voice with the name of the current parameter beside it, then the parameter row of that voice, then the name of the second voice and its parameter row, and so on down. The columns of the editing area line up with the columns of the grid above.
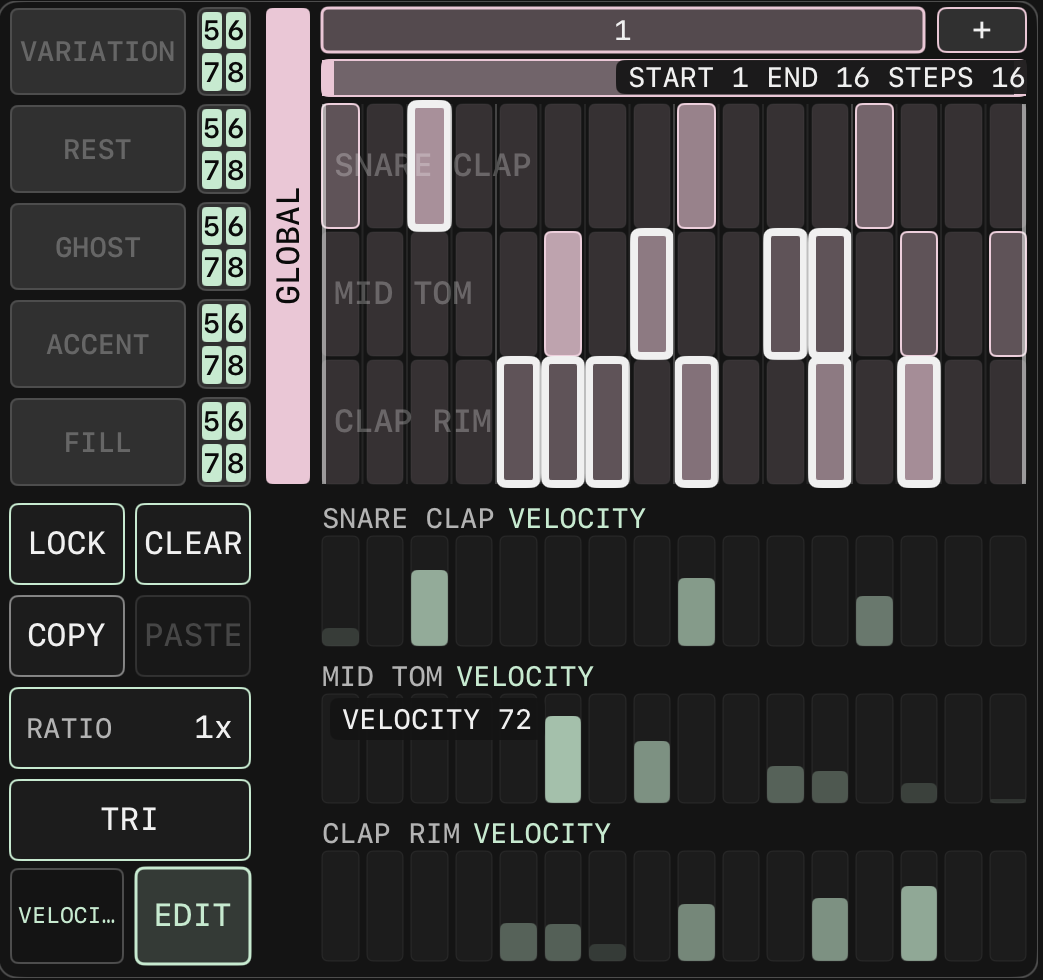
TRACK 6 with EDIT on: only that track's group is shown and its voice rows grow taller; below it the voice name rows and parameter rows alternate, column-aligned with the drum grid above.
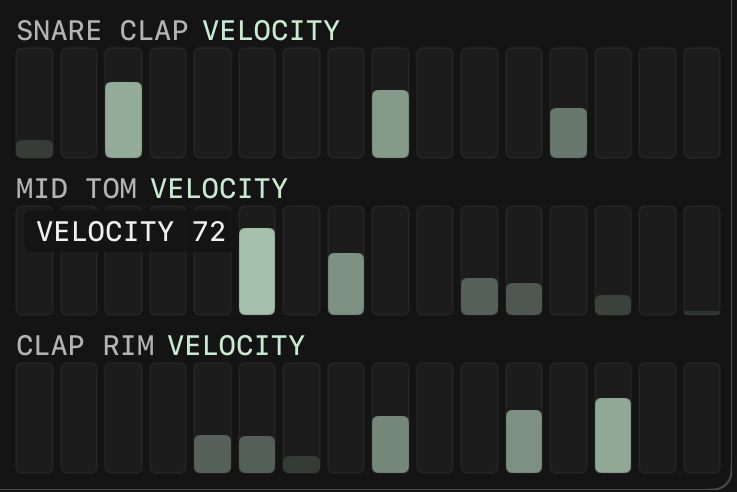
Each column of a parameter row is one bar whose height is the current value. Touching a column sets the value to the height of the finger: the top of the row is the maximum, the bottom is the minimum. This is an absolute position, not a relative drag, so the value goes to wherever the finger lands. The value is shown at the top left of the row while dragging and disappears when the finger is lifted. Up to 4 fingers can drag different columns at once. Steps with no hit stay empty; dragging never creates a note. Columns outside the play window or outside the loop range are drawn dimmer.
Dragging the MID TOM parameter row: the value reads out at the top left of the row as "VELOCITY 72" and disappears on release.
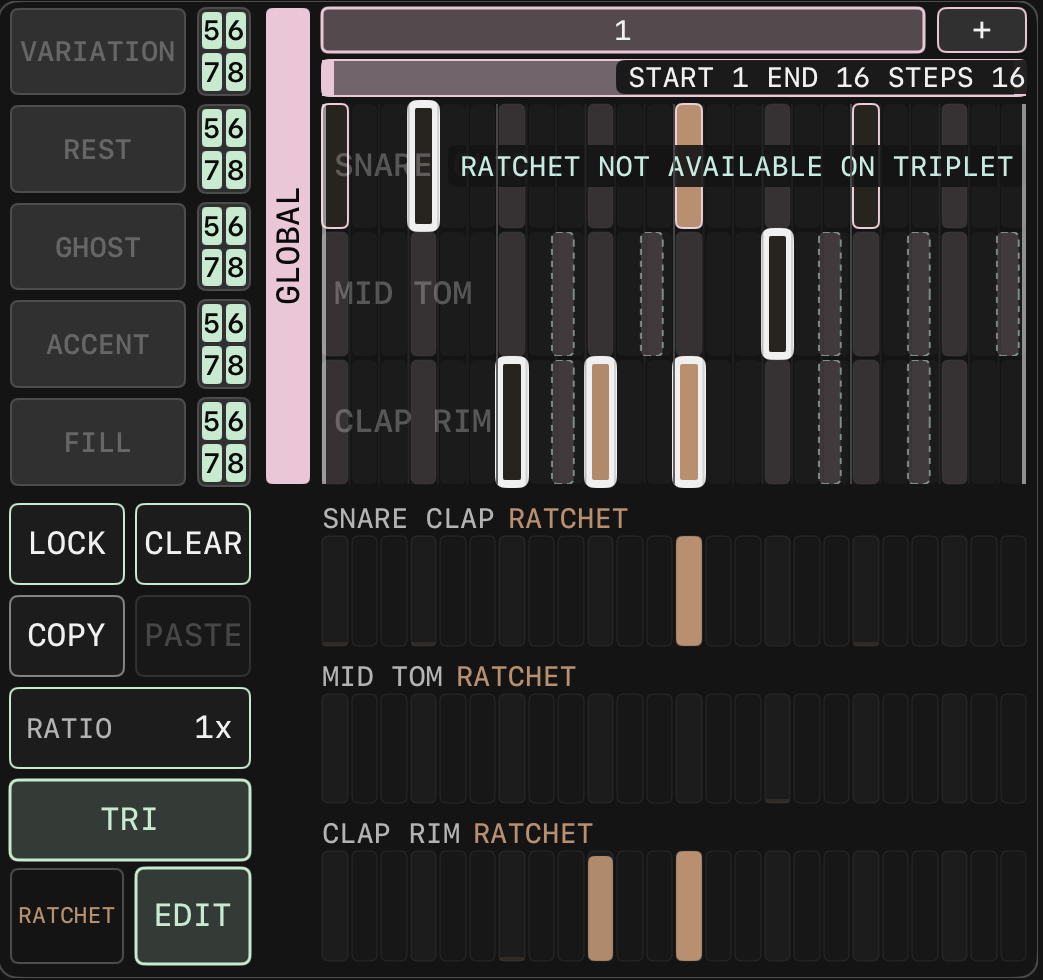
RATCHET, RATCHET COUNT and RATCHET COUNT PROBABILITY do not apply to triplets. With the triplet grid on, the triplet columns of these three parameters are drawn as disabled slots and do not respond to touch; the straight columns still work. VELOCITY, PROBABILITY and DECAY can be edited on triplet columns as well.
Drum track with EDIT on, TRI on and the lane set to RATCHET: the grid shows "RATCHET NOT AVAILABLE ON TRIPLET" and the triplet columns of all three parameter rows are drawn as disabled slots, while the straight columns stay editable.
The bars in the EDIT rows and the vertical drag on the grid cells write the same values; either way the same data is changed. The grid cells keep their relative drag, and only the EDIT rows use absolute position.
KEYS mode
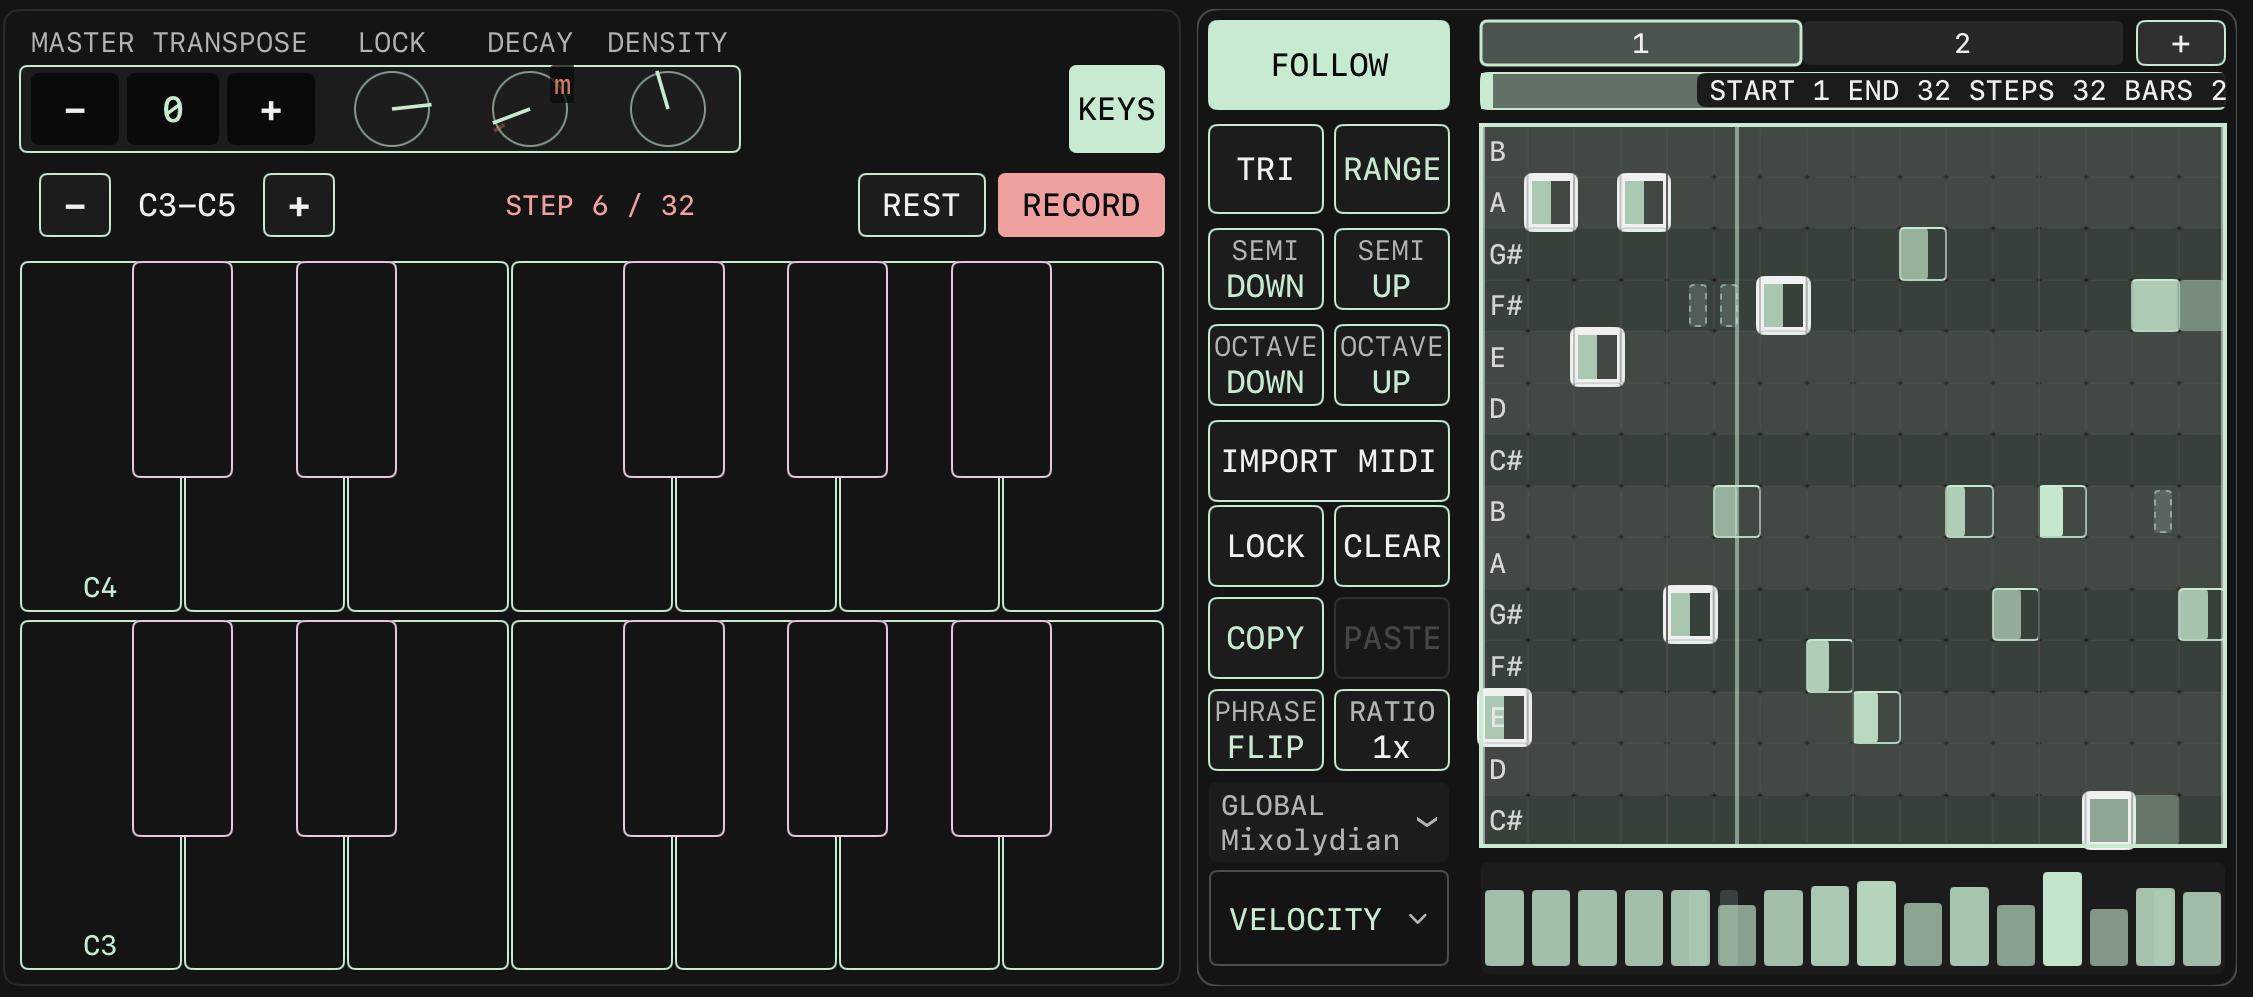
KEYS mode: top left the MASTER TRANSPOSE - 0 + with the LOCK, DECAY and DENSITY knobs, and KEYS lit at the top right. The next row has the octave - and +, the range C3-C5, the step position STEP 6 / 32, REST and RECORD (red while recording). Below are two keyboard sections, the lower labelled C3 and the upper C4. On the right are the editor button column and the piano roll.
OCTAVE - / +
Shifts the octave shown on the keyboard.
Status
STEP n/m, PLAYING, RECORDING, AUDITION.
REST
Enters a rest during step recording.
RECORD
Toggles recording.
Keyboard
Monophonic. Unavailable on drum tracks, where a hint text is shown.
When KEYS is on and playback is stopped, the note grid on the right shows a vertical line at the cell of the step entry position. Keyboard step entry writes straight notes only.
5. VOICE
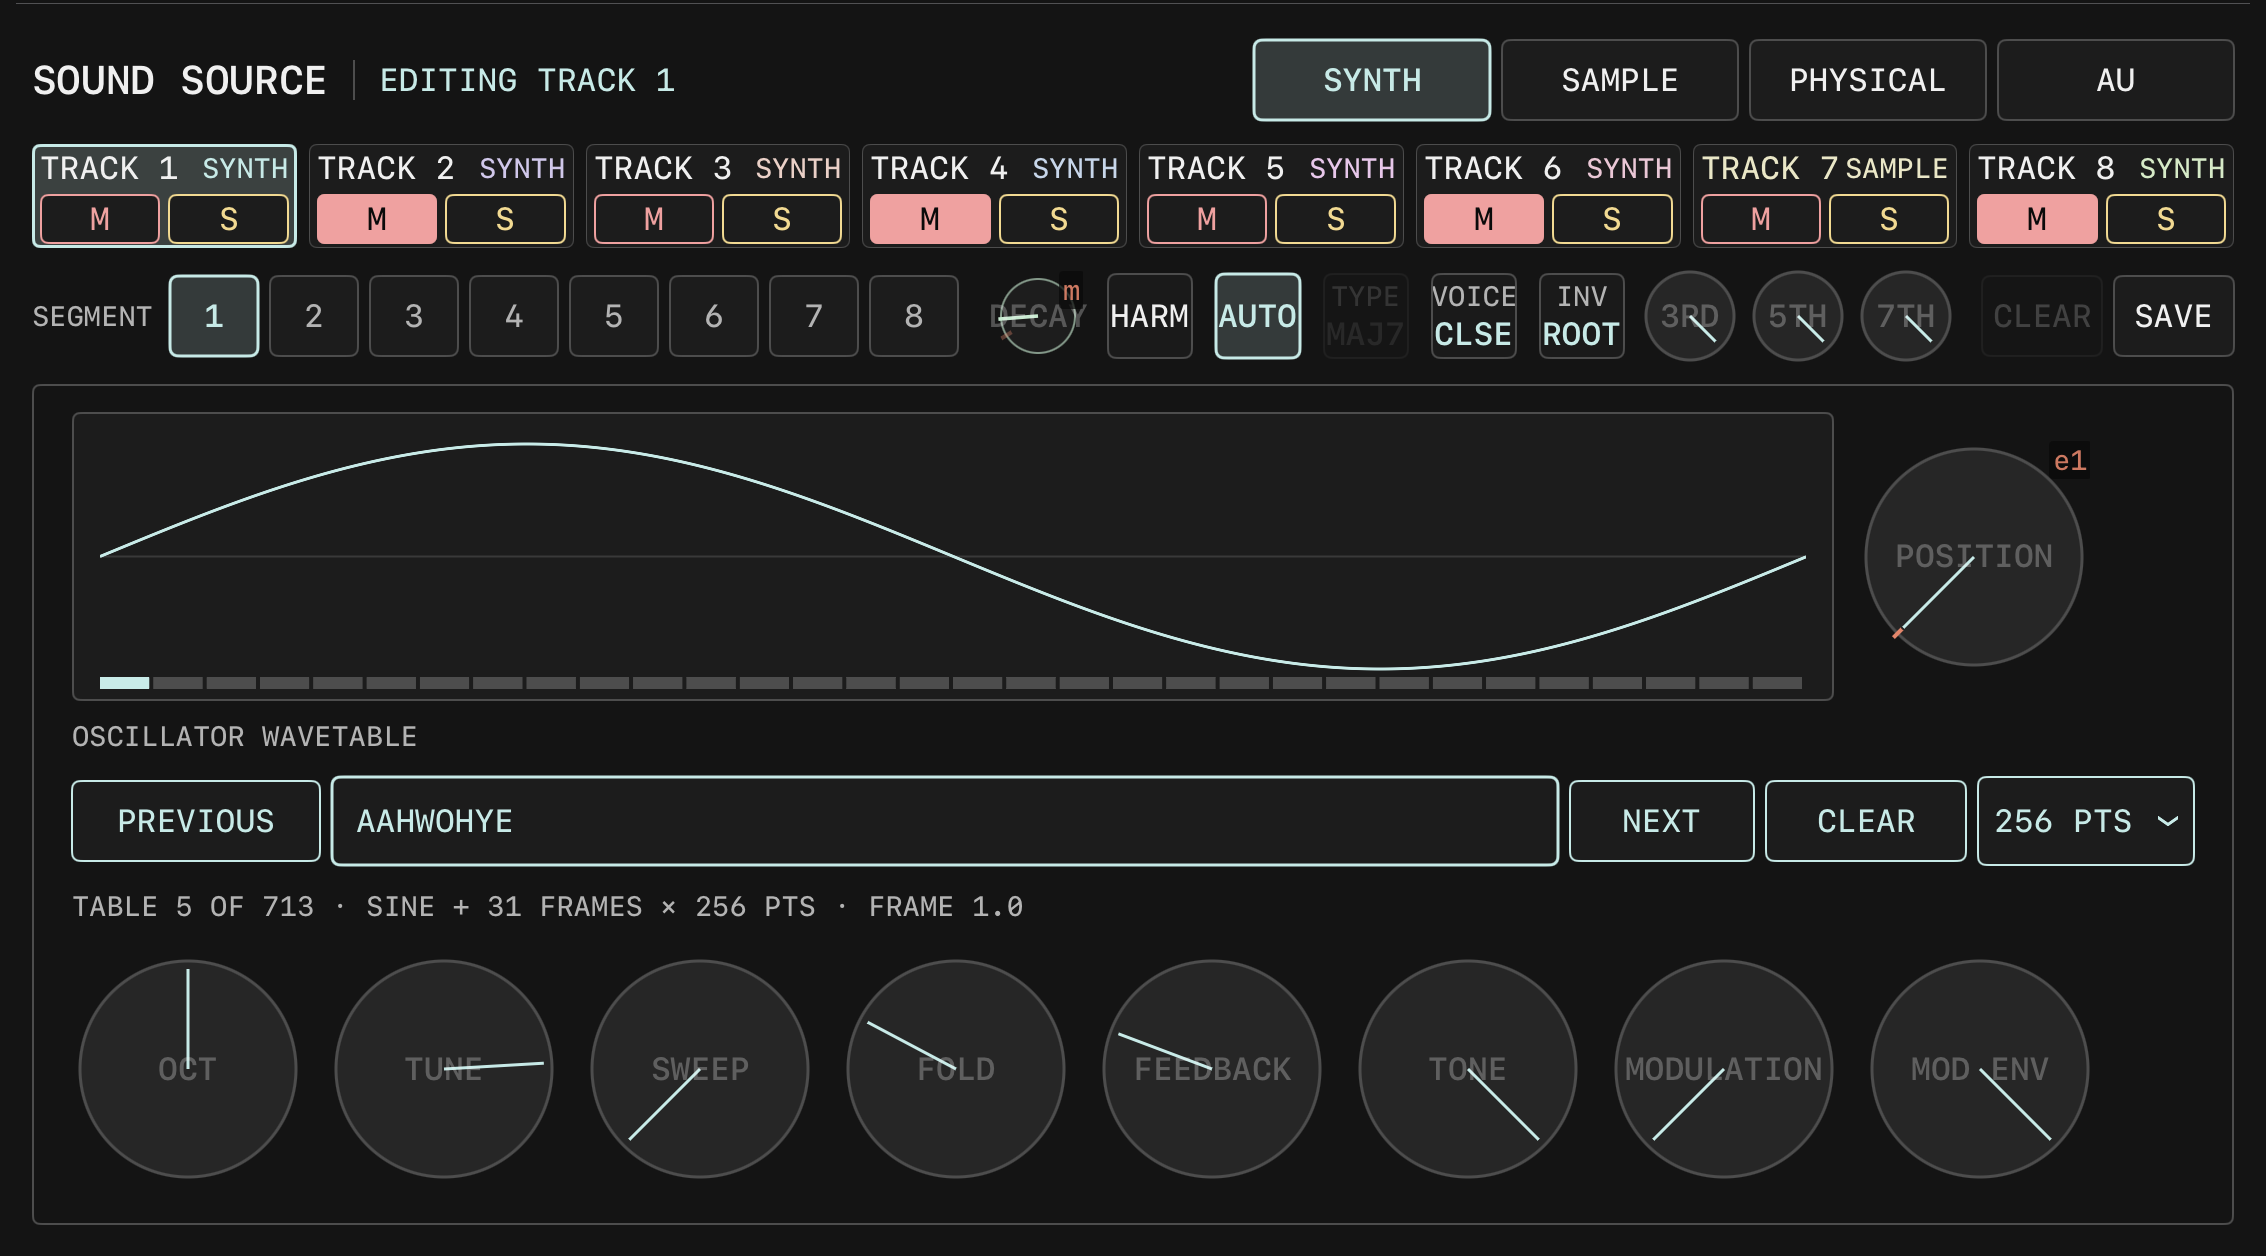
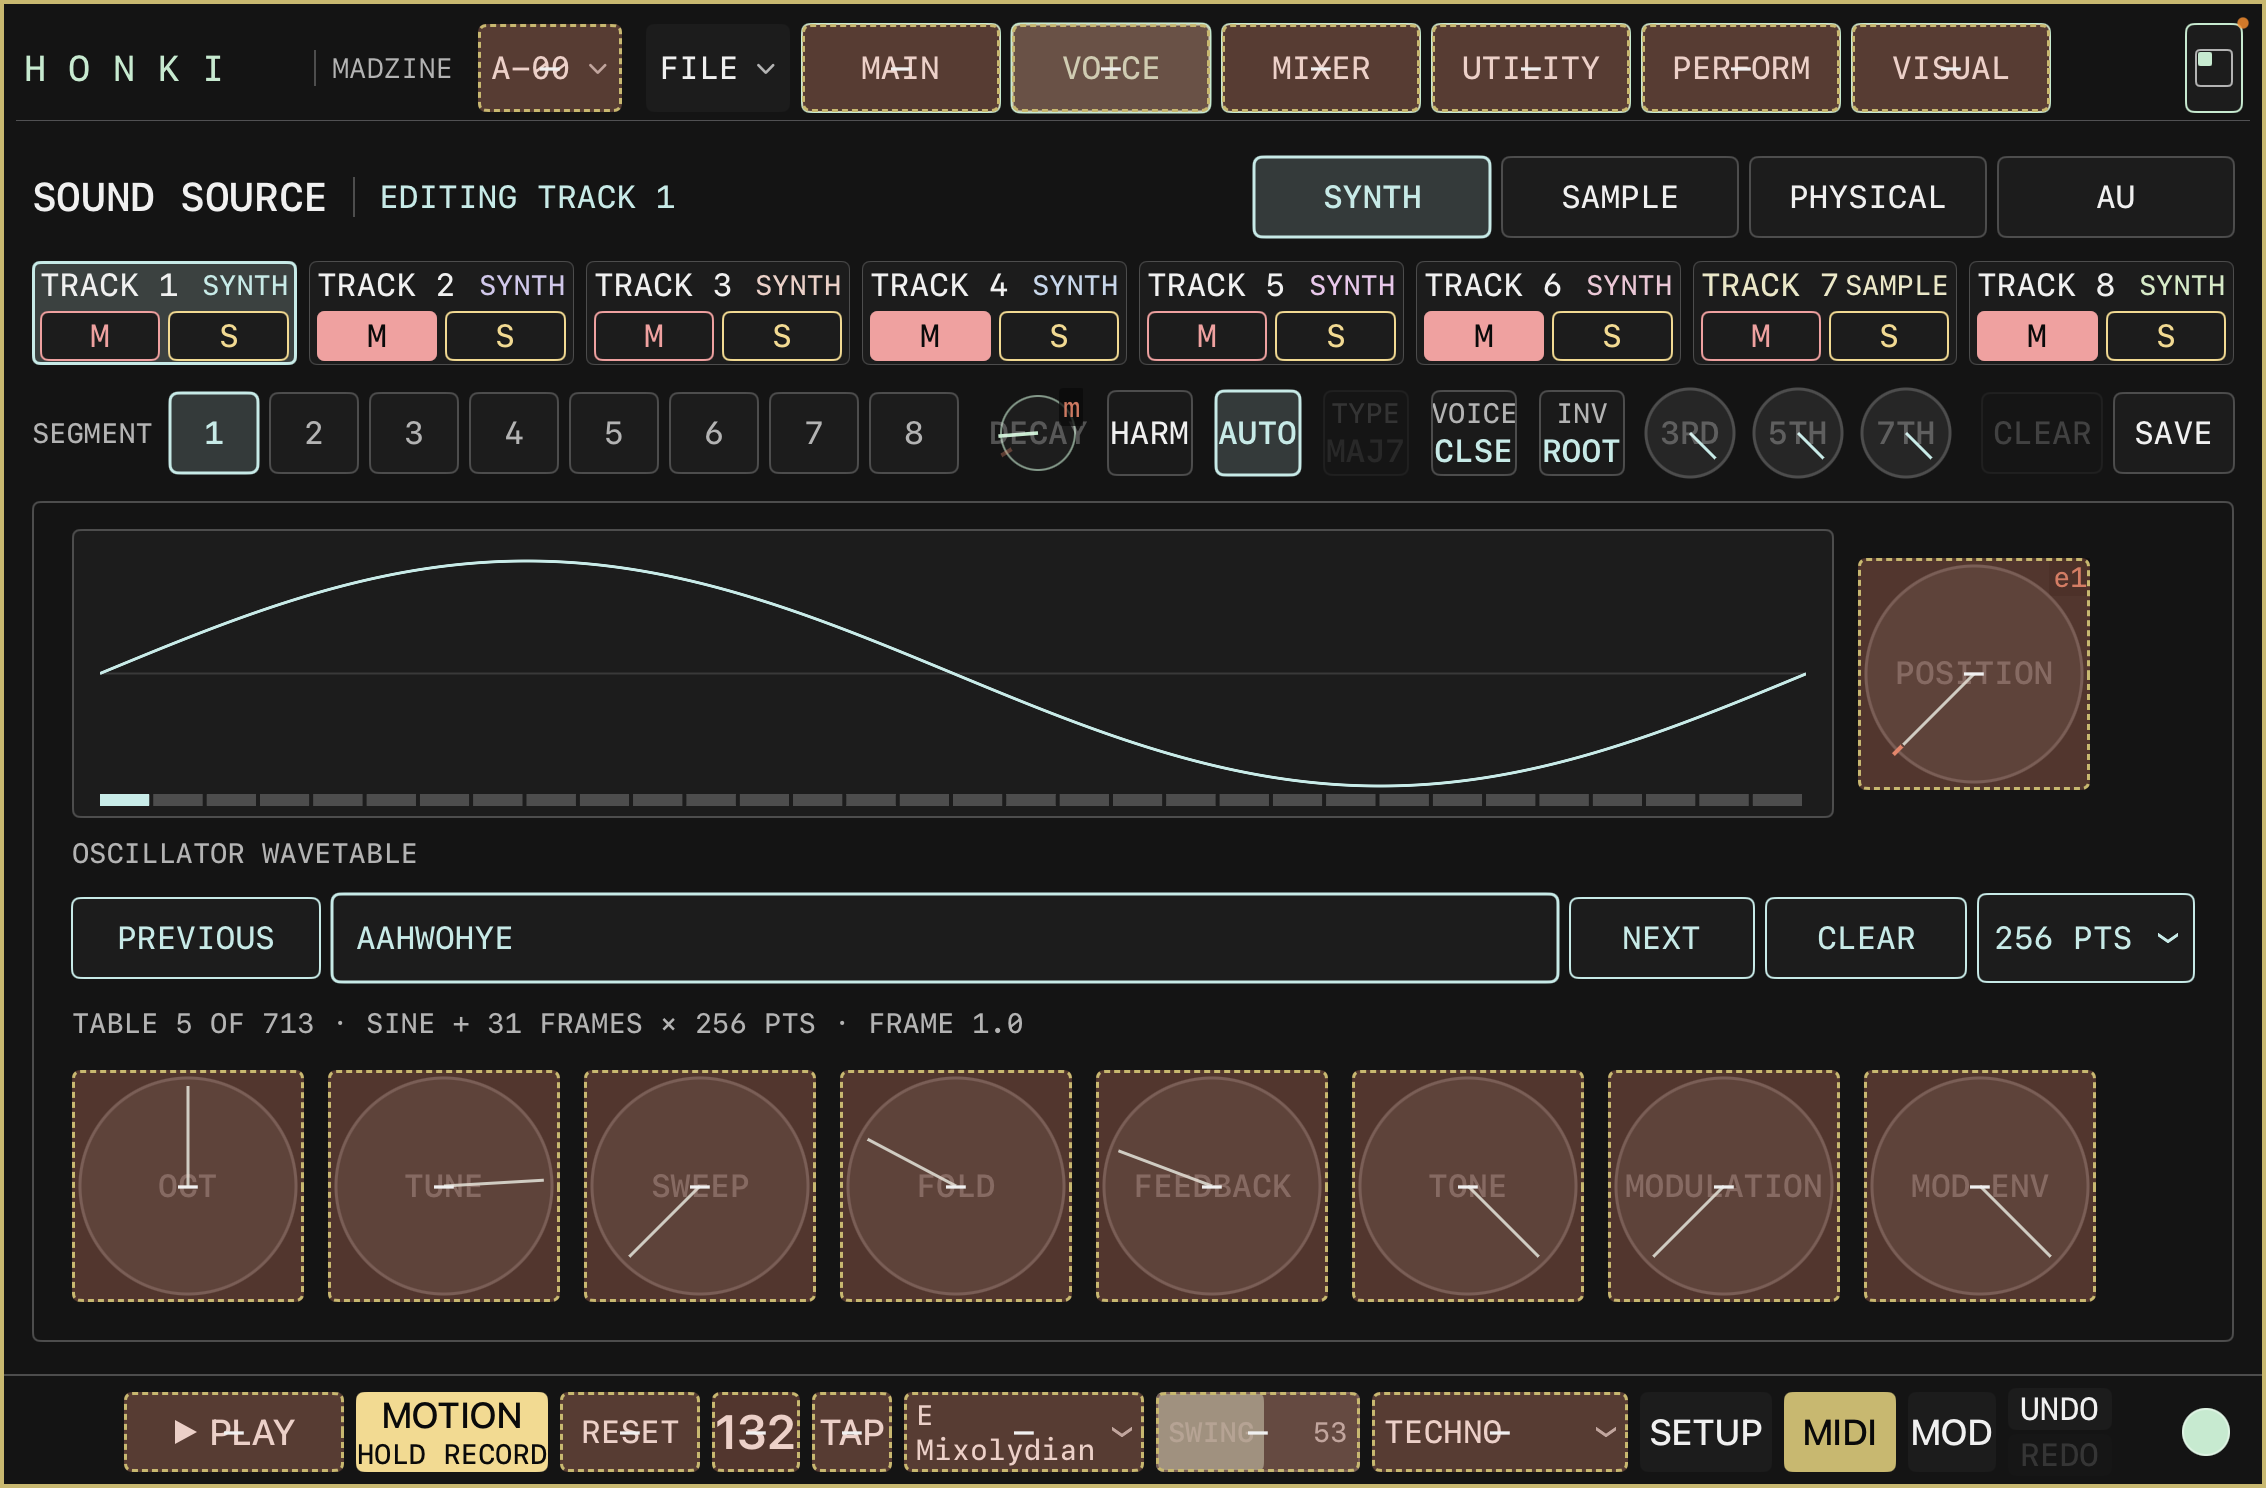
VOICE full page, with TRACK 1 set to the SYNTH source. At the top the header row and the 8 TRACK cells, then the SEGMENT row, the DECAY knob, HARM, AUTO, TYPE, VOICE, INV, 3RD / 5TH / 7TH, CLEAR and SAVE. Below, the SYNTH panel: the waveform display with the POSITION knob, the OSCILLATOR WAVETABLE row (PREVIOUS, the table name, NEXT, CLEAR and the points-per-frame menu), and at the bottom the eight knobs OCT, TUNE, SWEEP, FOLD, FEEDBACK, TONE, MODULATION, MOD ENV.
Header and track cells
Header: SOUND SOURCE, EDITING TRACK 1, the four source buttons SYNTH (selected) / SAMPLE / PHYSICAL / AU. The second row is the TRACK 1 to 8 cells, each showing the source name and M / S. The third row is SEGMENT 1 to 8, DECAY, HARM, AUTO, TYPE, VOICE, INV, 3RD / 5TH / 7TH, CLEAR, SAVE.
Source buttons
SYNTH, SAMPLE, PHYSICAL, AU. One of four.
TRACK cells
Show the track name and source. M mutes; S solos, hold 0.4 seconds for exclusive solo. State is shared with MIXER. When switching tracks, another track in RECORD stops.
SEGMENT 1 to 8
Selects the segment to edit. Segments with a sound memory show a dot.
DECAY
DECAY of the current track, same as on MAIN.
CLEAR
Clears the sound memory of the current segment.
SAVE
Stores the current panel parameters (including the harmonic settings) into the segment memory.
Panel editing rule: when the current segment has a memory, the panel edits the memory; when it has none, the panel edits the track base. Sample loading or recording, the PHYSICAL MODEL and POLYPHONY, and AU loading always apply to the track base. SLICE and MULTI are track-level settings and are mutually exclusive. While editing a segment memory, the panel shows an "EDITING SEGMENT n MEMORY" watermark.
NOTE HARMONIC (sources other than SAMPLE)
HARM
Toggles harmony.
AUTO
Selects the chord type automatically; TYPE is dimmed while on.
TYPE
Tap to cycle the chord type.
VOICE
CLSE, DRP2, DRP3, OPEN.
INV
ROOT, 1ST, 2ND, 3RD.
3RD / 5TH / 7TH
Knobs, each 0 to 1. Can be recorded with MOTION and routed with MOD ROUTE.
SYNTH
TRACK 1 to 5 are wavetable synthesizers, titled "OSCILLATOR WAVETABLE"; TRACK 5 is titled "KICK VOICE WAVETABLE". TRACK 6 to 8 are fixed drum synthesizers; the panel shows "BUILT-IN DRUM SYNTHESIZER WITH FIXED SOUNDS FOR THIS TRACK.".
Oscillator
The carrier oscillator reads the wavetable directly; the PM modulator reads the same frame of the same table. With no wavetable loaded the oscillator runs as a pure sine.
Waveform display
Shows the frame of the current wavetable at the current POSITION. When POSITION is modulated by MOTION, MIDI or PERFORM, the display follows the modulated value in real time.
POSITION
Knob to the right of the waveform display. 0 to 1, default 0. Morph position between frames with linear interpolation: the leftmost position (frame 0) is a pure sine, turning right morphs into the frames of the file. Carrier and modulator follow together. Can be recorded with MOTION. Disabled and dimmed while BYPASS is on or no wavetable is loaded.
BYPASS
TRACK 5 only. While on, FOLD, FEEDBACK, TONE and MODULATION have no effect and the frame size menu is locked.
PREVIOUS / NEXT
Switches to the previous or next wavetable.
Name button
Opens the "SELECT WAVETABLE" popover, with a filter field and a "NO WAVETABLE" entry.
CLEAR
Removes the wavetable; the oscillator returns to a pure sine.
Frame size
Menu labelled "N PTS": 256 / 512 / 1024 / 2048 / 4096, default 2048. Sets the window length used when decoding the file; the table is then resampled to 2048 points per frame. Wavetables with a single cycle shorter than 2048 points need a smaller size to correct the pitch. Changing it reloads the table for that track.
Status text
With no wavetable: "NO WAVETABLE" and that the oscillator runs as a pure sine, with the number of available tables. With a wavetable: table index, frame count, frame size and the current frame (frame 1.0 is the sine).
OCT
-4 to +4.
TUNE
Plus or minus 100 cents.
SWEEP
0 to 1000 Hz; on TRACK 5 an offset of -500 to +500.
FOLD
0 to 10.
FEEDBACK
0 to 1.
TONE
0 to 10.
MODULATION
0 to 10. At 0 the wavetable has no effect.
MOD ENV
0 to 10; on TRACK 5 -5 to +5.
A wavetable holds up to 32 frames including the sine at frame 0; file frames start at 1, and longer files are sampled evenly, always keeping the first and last frame. TRACK 5 follows the STYLE defaults for FOLD, TONE, FEEDBACK and MODULATION until the user touches a parameter.
SAMPLE
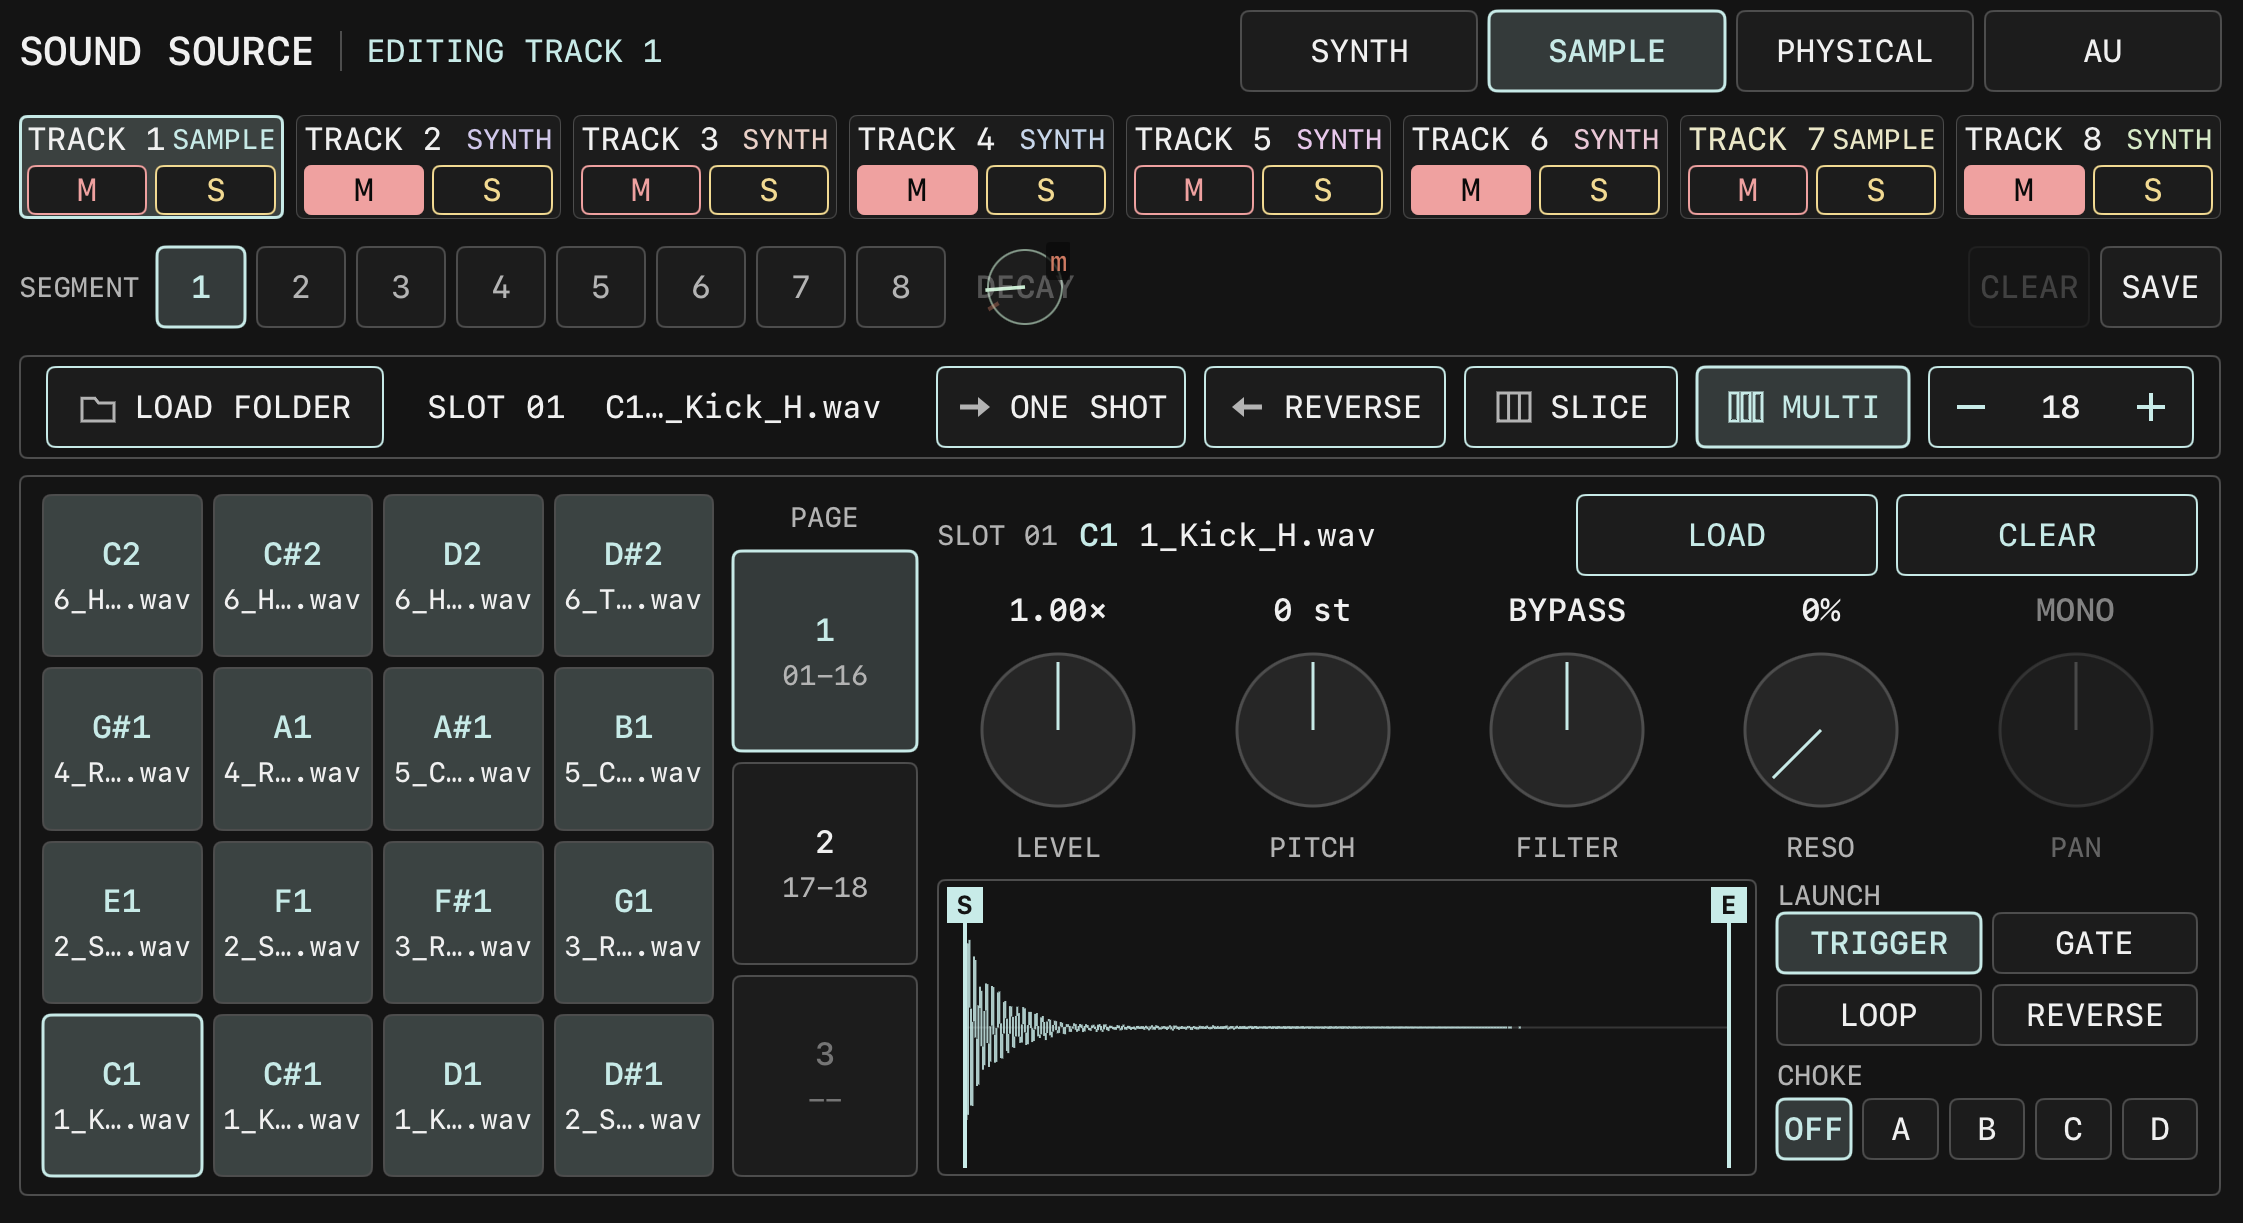
SAMPLE panel in MULTI mode on TRACK 1: the file row LOAD FOLDER, SLOT 01 with the file name, ONE SHOT, REVERSE, SLICE, MULTI (selected), "- 18 +". On the left the 16 pads labeled with note names and file names, C1 (selected) at bottom left; in the middle PAGE 1 (01-16) / 2 (17-18) / 3; on the right the slot parameters LEVEL 1.00x, PITCH 0 st, FILTER BYPASS, RESO 0%, PAN MONO, LOAD and CLEAR, the waveform area showing the loaded sample with the S / E markers, LAUNCH with TRIGGER (selected) / GATE / LOOP / REVERSE, and CHOKE OFF (selected) / A / B / C / D.
File row
LOAD SAMPLE
Loads a single sample (normal and SLICE modes).
RECORD / STOP
Records the master output as a sample, up to 120 seconds, showing "RECORDING x.x s" while recording. Loads automatically after stopping.
File name
Shows the current sample file name, or "NO SAMPLE" when there is none.
LOAD FOLDER
Loads a whole folder in MULTI mode. Supports wav, aif, aiff, mp3, m4a, caf, flac, up to 36 files.
ONE SHOT / LOOP
Switches the playback mode.
REVERSE
Reverse playback.
SLICE
Divides the sample into N equal slices; notes from C1 (24) upward map to the slices. Drum tracks show "DRUM TRACK: SLICE FOLLOWS SETUP MIDI NOTE".
MULTI
Multi-sample pad mode, available on all 8 tracks.
- n +
Slot count in MULTI (1 to 36), slice count in SLICE (2 to 36). Fixed on drum tracks, shown as "PADS n".
Normal and SLICE modes
Waveform
The S / E markers set the start and end points; two fingers can drag both at once. In SLICE mode the slice boundaries are shown. The MOTION of the start and end points is cleared in MOD mode: turn on MOD in the Transport, tap the waveform, and answer Y to CLEAR MOTION? in the panel.
GRAIN SIZE x DENSITY
Main granular synthesis XY pad. GRAIN SIZE 0.005 to 2 seconds; DENSITY 1 to 200 per second, 1 is normal playback. Each axis has - / + and a lock.
SPRAY x JITTER
Granular synthesis detail XY pad, each 0 to 100%.
GRAIN SHAPE
0 to 100%.
PITCH
Plus or minus 48 semitones.
GAIN
0 to 8.
MULTI mode
Pads
16 per page, up to 3 pages for 36 in total. The first slot is at bottom left. Labels are note names (from C1) or drum voice names. Pressing a pad selects it and auditions it.
Drum track pad count
Fixed: TRACK 5 has 2, 6 has 3, 7 has 2, 8 has 2. The panel shows "PAD PER LANE. SETUP MIDI NOTE NOT USED".
PAGE 1 / 2 / 3
Switches the pad page.
LOAD / CLEAR
Loads or clears the sample of the current slot.
LEVEL
0 to 2.
PITCH
Plus or minus 24 semitones.
FILTER
BYPASS, LP n%, HP n%.
RESO knob
To the right of FILTER, 0 to 100%.
PAN
TRACK 1 to 4 show MONO.
Waveform
Shown per slot.
LAUNCH
TRIGGER, GATE, LOOP, REVERSE; drum tracks have only TRIGGER and REVERSE.
CHOKE
OFF, A, B, C, D.
Pad parameters do not support MOTION or MIDI Learn.
PHYSICAL
XY 1
BRIGHTNESS x DAMPING, each 0 to 100%, with - / + and axis locks.
XY 2
POSITION x STRUCTURE, each 0 to 100%, with - / + and axis locks.
MODEL
MODAL, SYM STR, STRING, FM, QUANT, STR&REV.
POLYPHONY
1 / 2 / 4 VOICE.
OCT
Octave.
TUNE
Fine tune, double-tap returns to 0.
EXT to AUDIO IN
ON / OFF, default ON: the external input excites the resonator and is not mixed in dry.
AU
Not loaded
Shows "NO INSTRUMENT LOADED" and LOAD.
Loading
Shows "LOADING" and CANCEL.
Loaded
Shows the name with CHANGE, OPEN EDITOR, UNLOAD.
OPEN EDITOR
Opens the AU's own interface in full screen, with CLOSE at the top.
List popover
Titled "INSTALLED AUDIO UNIT INSTRUMENTS", grouped by vendor, with FILTER BY NAME at the top.
The AU runs in a separate process and is silent until loading completes.
MACRO KNOBS 1 to 8
Arranged 4x2. Hold 0.6 seconds or tap an unbound knob to start binding; tap the name to open the "MACRO n PARAMETER" popover, which contains CLEAR BINDING. Unbound knobs show ASSIGN PARAMETER; when binding is not possible they show UNAVAILABLE. Bindings are stored in the bank and can be PERFORM targets.
GLIDE
Sends CC5 and CC65.
MOD
Sends CC1.
SUSTAIN
Sends CC64.
The GLIDE, MOD and SUSTAIN values are kept only for the current session. They can be assigned with MIDI Learn.
6. MIXER
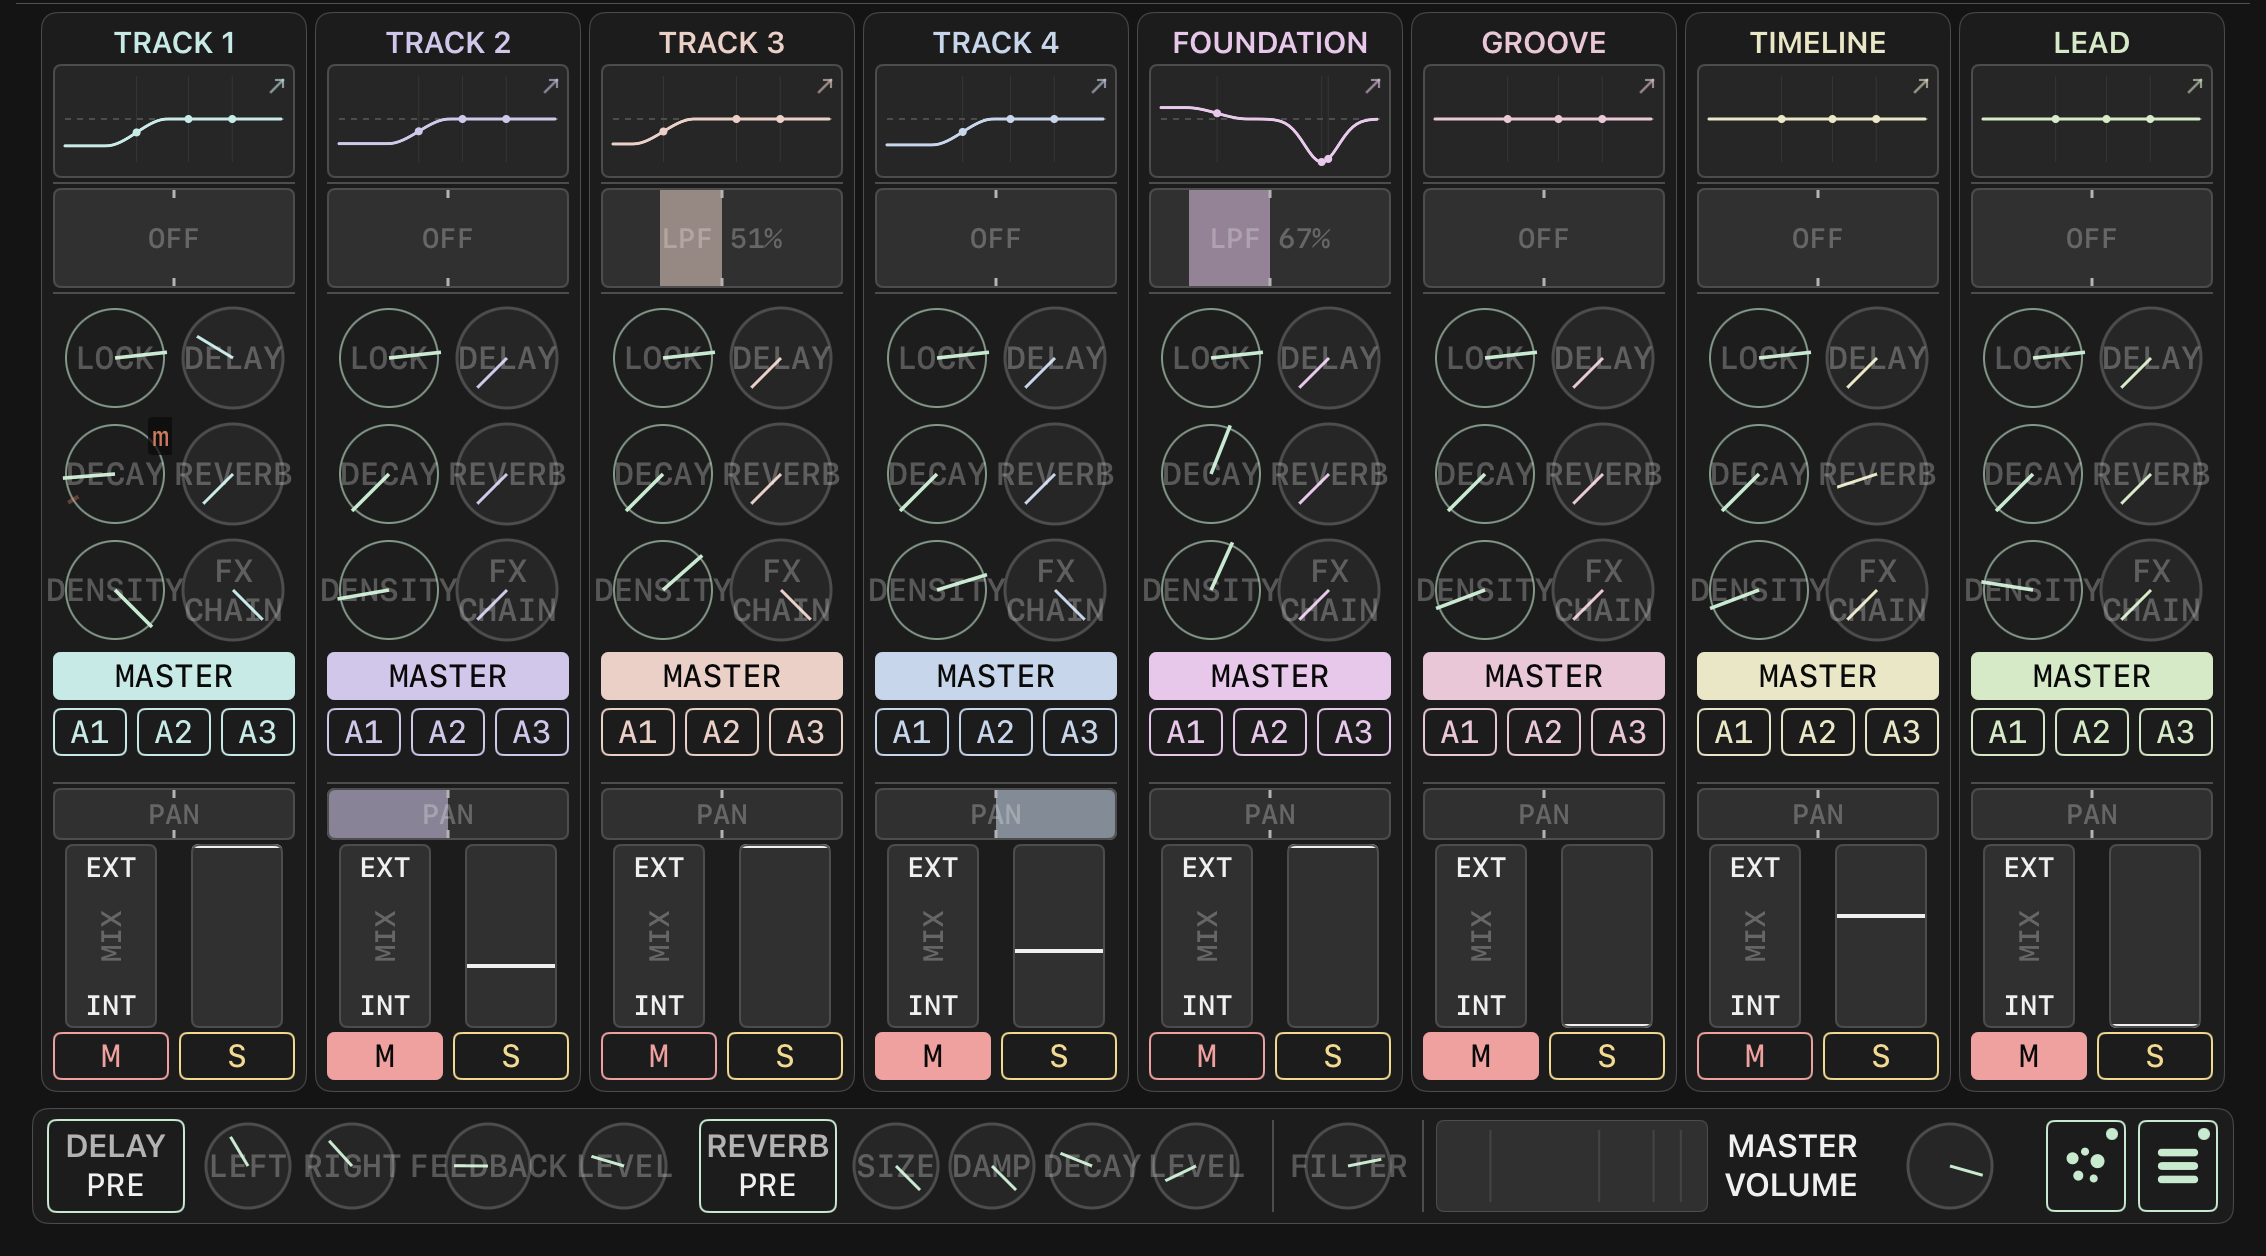
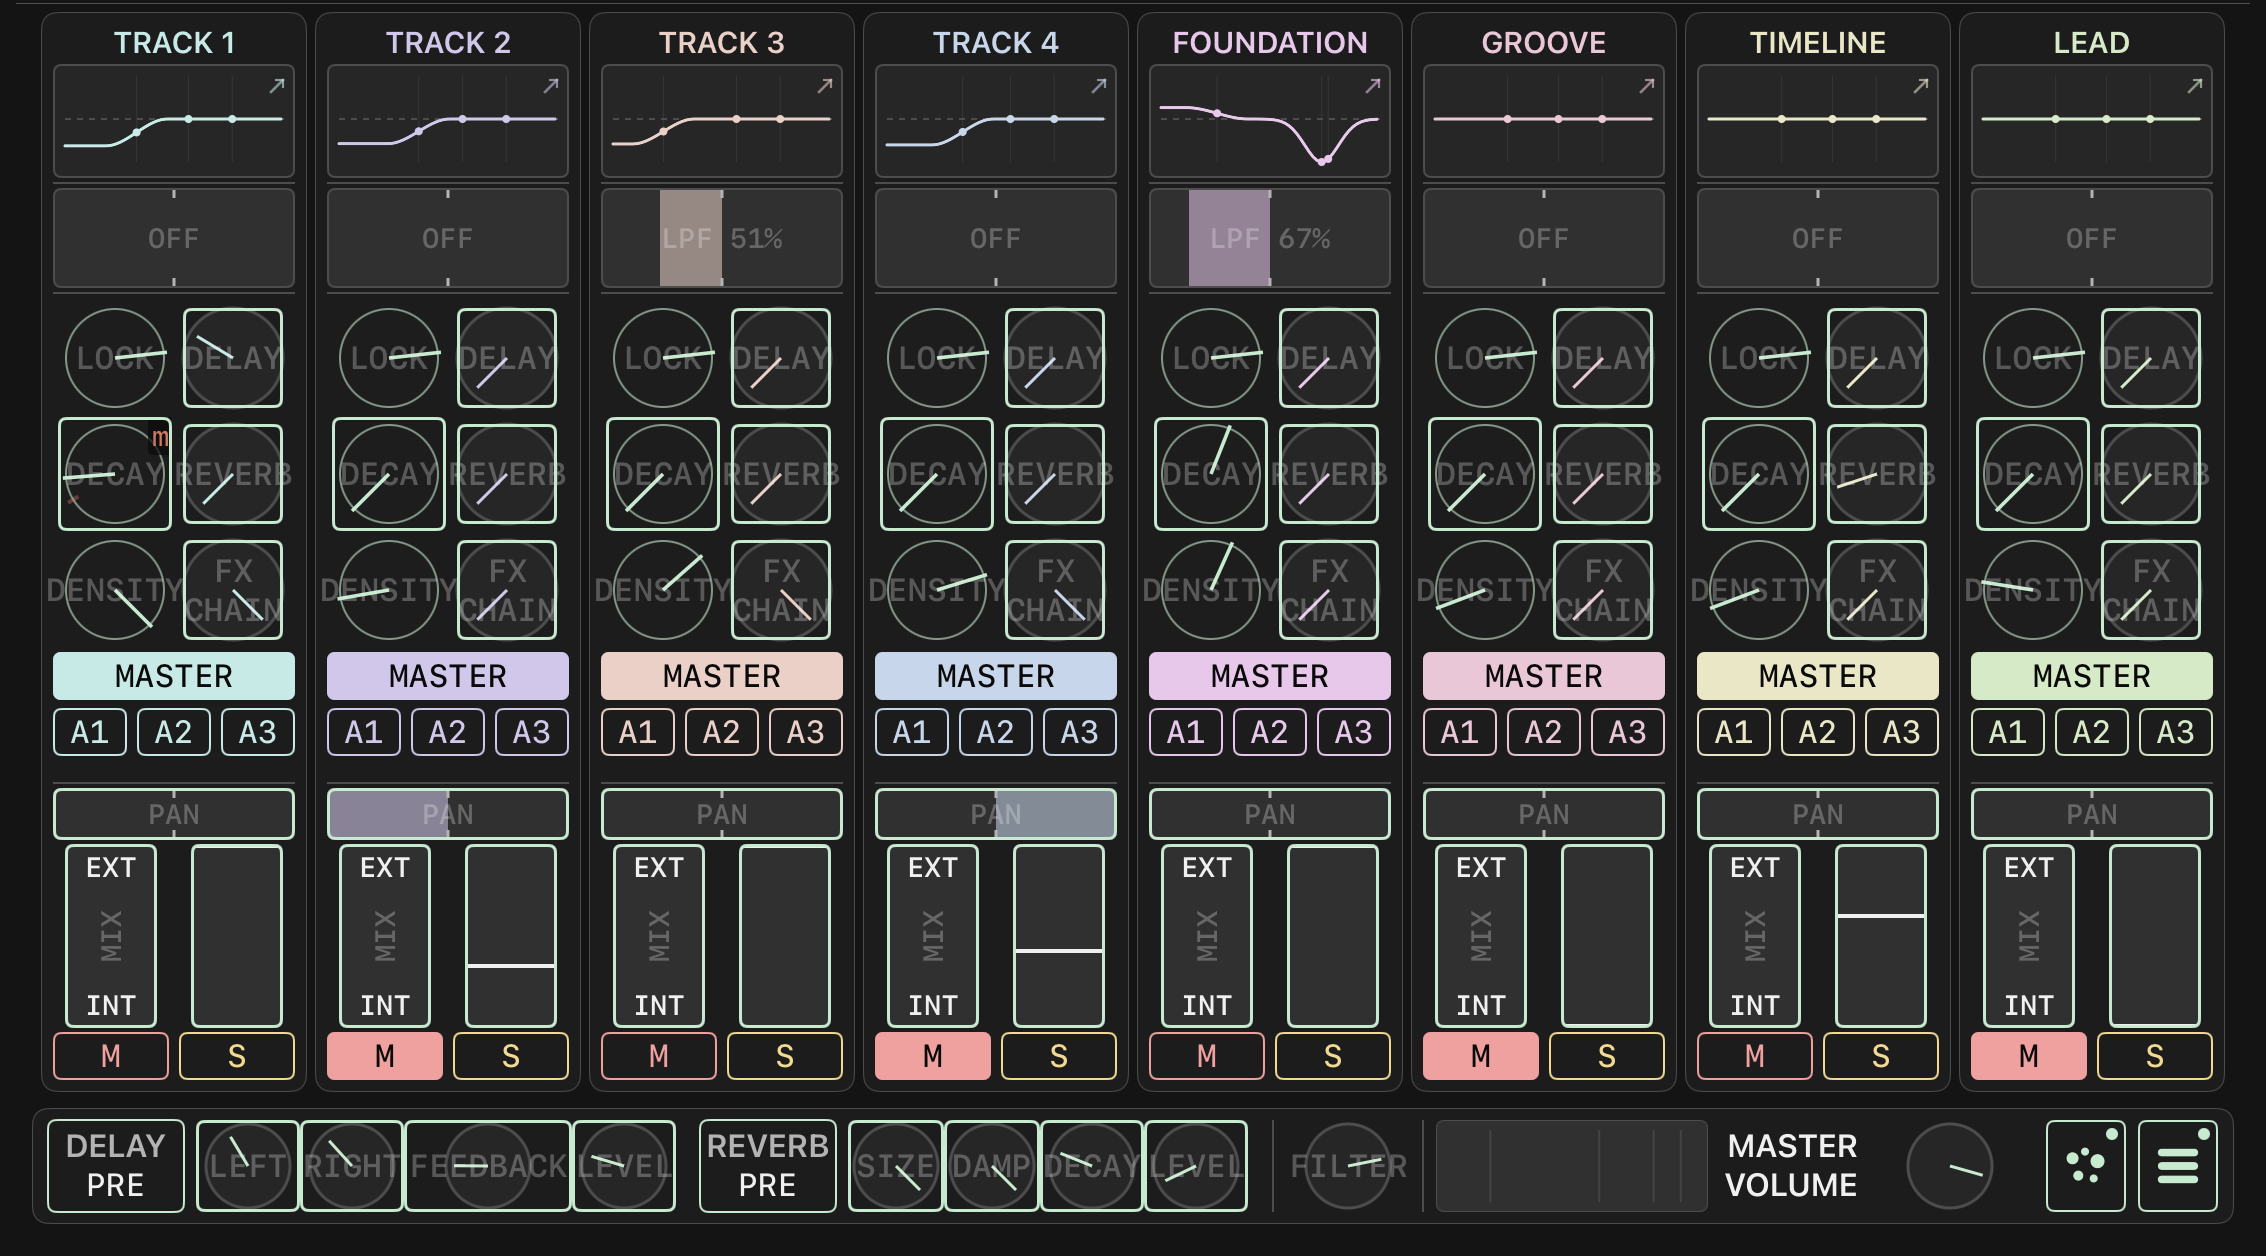
MIXER full page. Eight strips, left to right: TRACK 1 to 4, FOUNDATION, GROOVE, TIMELINE, LEAD, each with an EQ thumbnail, a FILTER bar, six knobs, a BUS row, a PAN bar, the MIX and LEVEL faders and M / S. The EFFECT row at the bottom: DELAY PRE, REVERB PRE, SIZE / DAMP / DECAY / LEVEL, FILTER, L / R meters, MASTER VOLUME, the dot icon and the three-line icon.
Strip
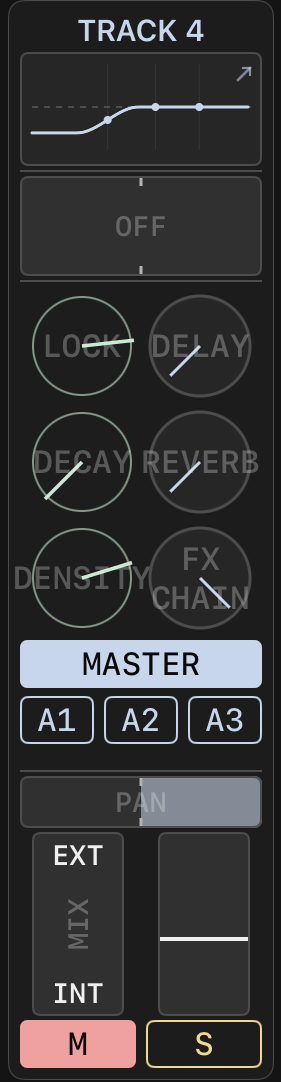
The TRACK 4 strip, top to bottom: name, EQ thumbnail, FILTER bar (OFF), six knobs LOCK / DELAY, DECAY / REVERB, DENSITY / FX CHAIN, the BUS row (MASTER and A1 / A2 / A3), PAN bar, vertical MIX (EXT / INT) fader and vertical LEVEL fader, M / S.
Name
TRACK 1 to 4; drum tracks are FOUNDATION, GROOVE, TIMELINE, LEAD.
EQ thumbnail
Shows the EQ curve; tap to open the EQ popover.
FILTER
OFF at the centre; low-pass to the left (20 kHz down to 80 Hz), high-pass to the right (20 Hz up to 8 kHz). Snaps within 0.04 of the centre; double-tap to return to 0.
LOCK / DECAY / DENSITY
The same as the parameters of the same names in MAIN.
DELAY / REVERB / FX CHAIN
Three effect send amounts, each 0 to 1; double-tap to return to 0.5. Can be modulated with MOD ROUTE.
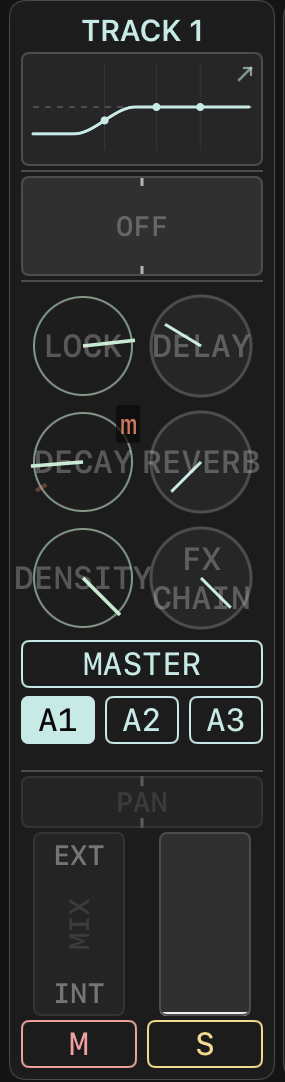
BUS select
Four buttons MASTER / A1 / A2 / A3 below the six-knob area, selecting the bus that the LEVEL fader currently edits. The selected button is shown filled in the track colour. This selection is not saved and returns to MASTER when the app restarts. With A1 to A3 selected, the LEVEL fader writes the send amount to that aux bus (0 to 2, default 0), and PAN and MIX are disabled; M / S are not affected. The aux signal is mono, tapped after COMPRESSOR and sidechain compression and before the fader and PAN, and does not pass through the effect returns or main output processing; TRACK 5 to 8 use the average of left and right.
A1 to A3 outputs
The physical channels of the three aux buses are assigned in the AUX BUS section of the AUDIO tab in SETUP. Unassigned is OFF; channels already used for other purposes are marked IN USE.
PAN
Equal-power pan on TRACK 1 to 4, left-right balance on 5 to 8. Snaps at the centre; double-tap to return to 0. Supports MOTION, MOD ROUTE and MIDI Learn.
MIX
Crossfade between EXT and INT; 0 is INT.
LEVEL
0 to 2, default 1. The two meters beside it are pre-fader and post-fader; their source is the trigger envelope, not the audio. With BUS set to A1 to A3, it becomes the send amount to that aux bus.
M / S
M in red is mute; S in yellow is solo, and a 0.4-second long press is exclusive solo.
Signal order: mute, EQ, FILTER, COMPRESSOR, sidechain compression, effect send points, aux tap, fader, PAN, main output. The send points of DELAY, REVERB and FX CHAIN can each be set to PRE or POST. Main output: effect returns (including FX CHAIN), main FILTER, MASTER VOLUME, soft clip.
The strip for TRACK 1: the curve and effect fields, the six knobs LOCK / DELAY / DECAY / REVERB / DENSITY / FX CHAIN, the bus buttons MASTER and A1 / A2 / A3 (A1 selected here), then PAN, EXT-MIX-INT, the fader and M / S.
EQ popover
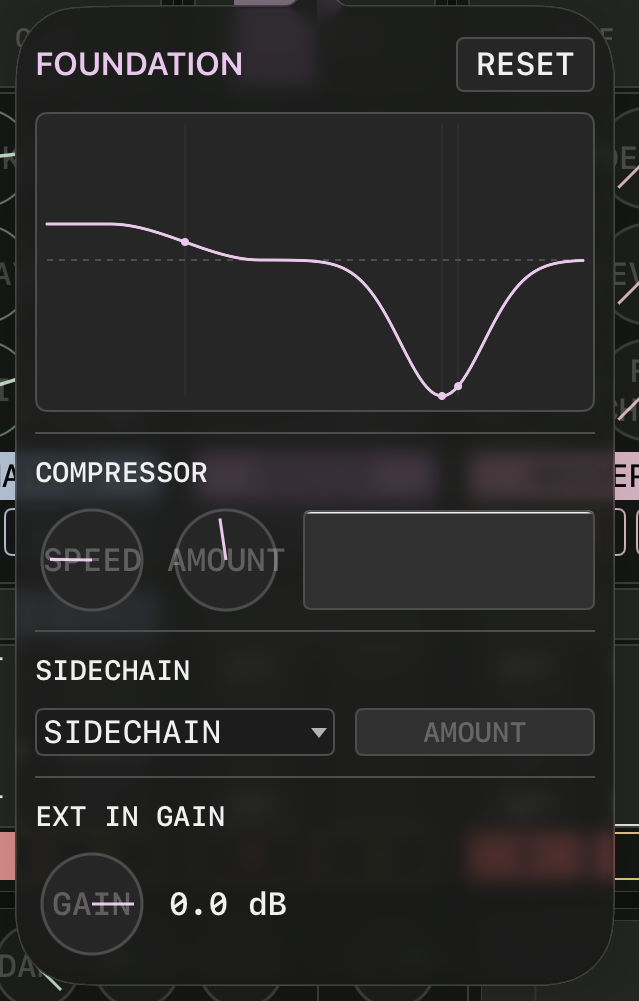
The FOUNDATION EQ popover: the title FOUNDATION with RESET, the EQ curve with two draggable points, the COMPRESSOR SPEED / AMOUNT knobs with the compression display, the SIDECHAIN drop-down with the AMOUNT bar, and the EXT IN GAIN knob (0.0 dB).
RESET
Gain returns to 1.0, frequencies to 200 / 1000 / 4000 Hz.
EQ curve
Three points: LOW 40 to 500 Hz, MID 200 to 5000 Hz, HIGH 1000 to 16000 Hz. Gain 0 to 2. Up to 3 fingers can drag at once.
COMPRESSOR SPEED
0 to 1, default 0.5.
COMPRESSOR AMOUNT
0 to 1, default 0.
SIDECHAIN
Sidechain source drop-down; any of the other 7 tracks.
SIDECHAIN AMOUNT
Sidechain compression amount.
EXT IN GAIN
External input gain, -60 to +12 dB.
EFFECT row
DELAY PRE / POST
Switches the delay send point.
DELAY LEFT / RIGHT
The left half is free time from 5 ms to 5 s; the right half is 16 tempo-synced values (1/1 to 1/32, including dotted and triplet).
DELAY FEEDBACK
0 to 0.95, default 0.35.
DELAY LEVEL
0 to 1.5, default 0.8.
REVERB PRE / POST
Switches the reverb send point.
SIZE / DAMP / DECAY
Each 0 to 1, default 0.5.
REVERB LEVEL
0 to 1.5, default 0.8.
FILTER
Main output filter knob.
Meters
L / R, two colours, -60 to 0 dBFS, peak hold 0.8 seconds.
MASTER VOLUME
0 to 1.
Dot icon
Opens the FX CHAIN panel. Shown in the accent colour when the FX CHAIN send of any track is above 0 and the DRY WET of at least one position is above 0.
Three-line icon
Opens MASTER FX.
FX CHAIN panel
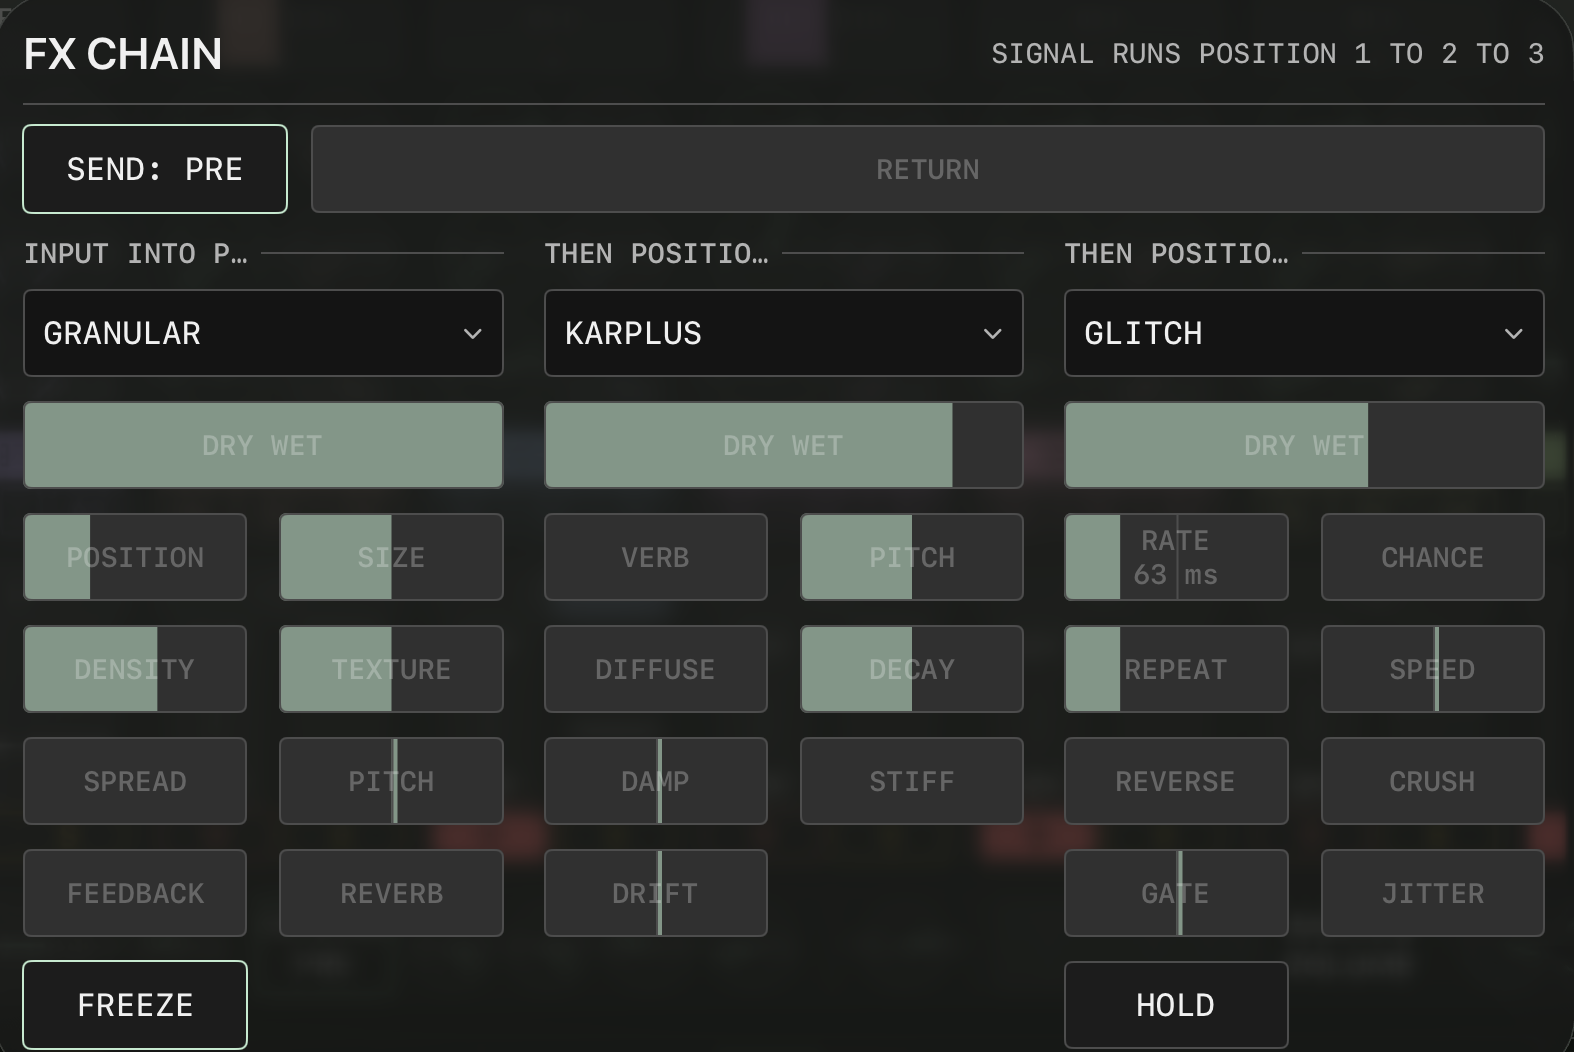
FX CHAIN is a send effect chain with three positions; the signal passes through position 1, 2 and 3 in order. The panel title is FX CHAIN, with the subtitle "SIGNAL RUNS POSITION 1 TO 2 TO 3".
SEND
"SEND: PRE" or "SEND: POST"; switches the send point.
RETURN
Return amount of the whole chain, 0 to 1.5, default 0.8.
Three positions
Three columns with the headers "INPUT INTO POSITION 1", "THEN POSITION 2" and "THEN POSITION 3 OUTPUT".
Effect menu
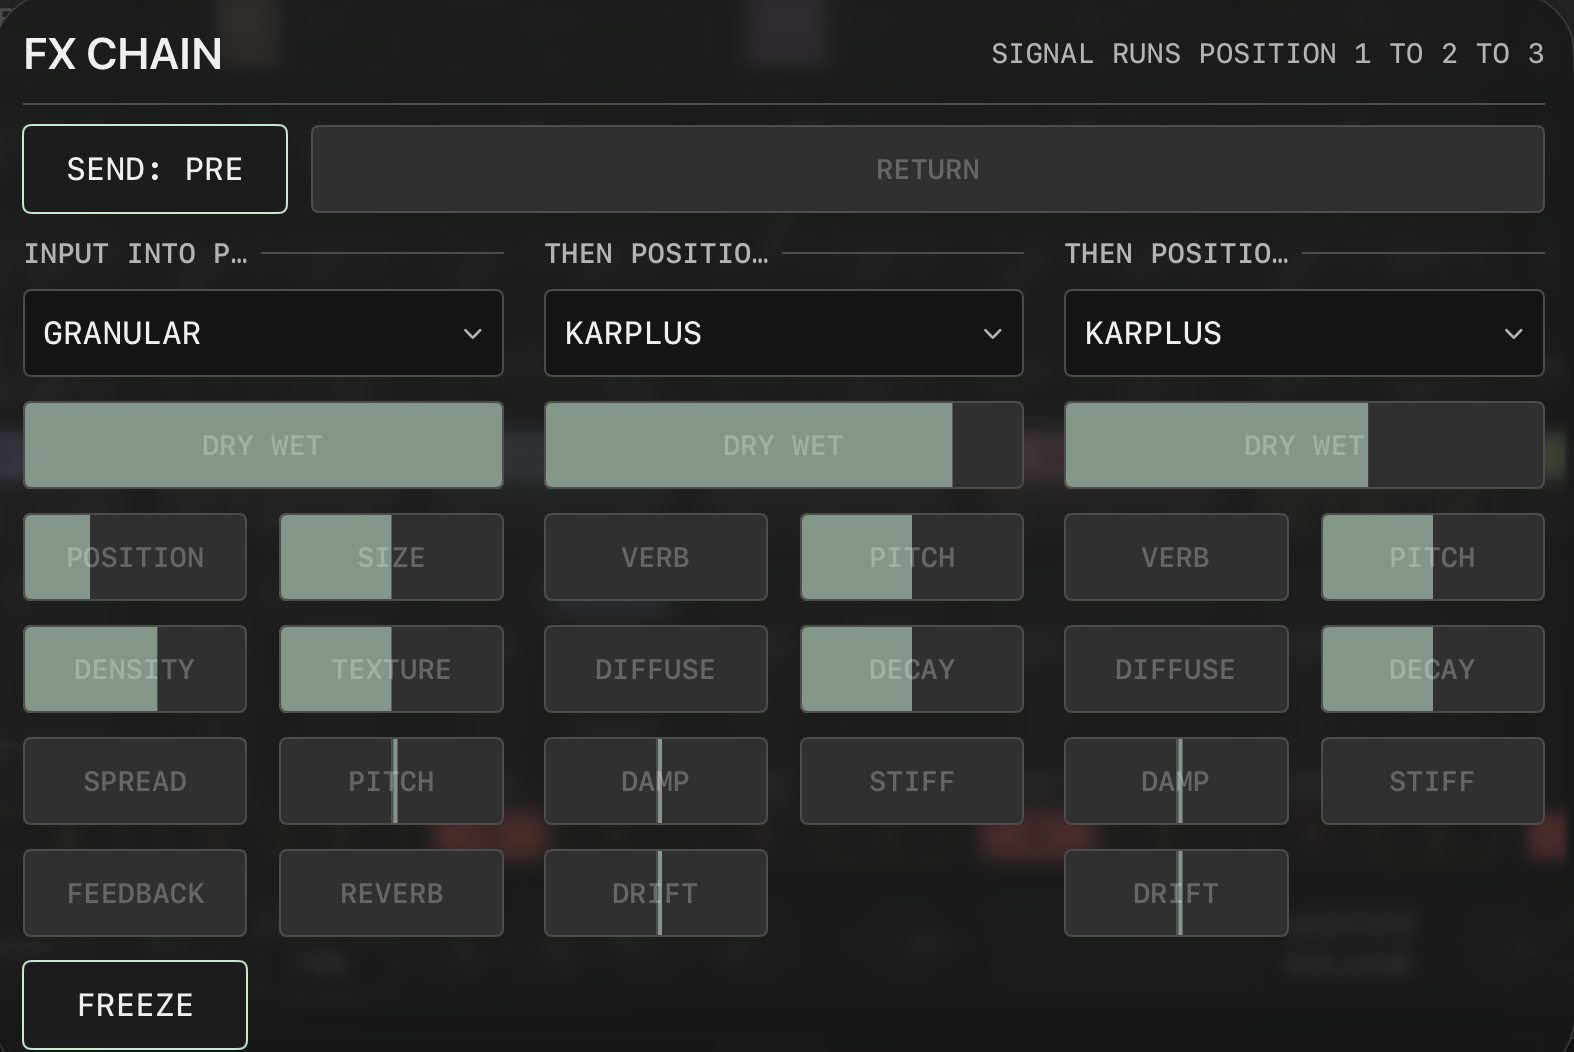
Each position selects one of GRANULAR, KARPLUS, GLITCH. There is no empty option and there are no move up / move down buttons; to change the order, choose different effects in the menus of the positions. The same effect can be placed in more than one position.
DRY WET
0 to 1 per position. At 0, DRY is added to the column header, the column becomes semi-transparent, and that position does not process the signal.
Factory state
Position 1 is GRANULAR with DRY WET 1; position 2 is KARPLUS with DRY WET 0; position 3 is GLITCH with DRY WET 0.
Changing an effect
The parameters of that position return to their defaults, FREEZE turns off, and the existing MOTION data and MIDI bindings of that position are cleared; DRY WET is kept. The sound switches with a short fade out and fade in.
Parameter bars show the name only. The parameters, DRY WET and RETURN support MOTION, MOD ROUTE and MIDI Learn; the effect menu, FREEZE and HOLD support MIDI Learn only. TEXTURE settings in older projects map to position 1.
The FX CHAIN panel: SEND: PRE and RETURN, the three positions set to GRANULAR, KARPLUS and GLITCH, and SIGNAL RUNS POSITION 1 TO 2 TO 3 at the top right.
The same panel with position 3 changed to KARPLUS, so positions 2 and 3 show the same set of parameters.
GRANULAR
POSITION / SIZE
Read position and grain length of the granular engine.
DENSITY / TEXTURE
Grain density and texture.
SPREAD
Spread.
PITCH
±24 semitones, 0 at the centre.
FEEDBACK / REVERB
Feedback and reverb amount.
FREEZE
ON / OFF.
KARPLUS
Six coupled strings, three on the left and three on the right.
VERB
At 0 the strings are independent; at 1 it approaches a reverb.
PITCH
String length.
DIFFUSE
Diffusion amount.
DECAY
0.05 to 20 seconds; self-oscillates above 0.9.
DAMP
0 at the centre; low-pass in the negative direction, high-pass in the positive direction.
STIFF
String dispersion.
DRIFT
0 at the centre; pitch offset between the left and right channels, and random drift.
GLITCH
A slice repeat effect.
RATE
The left half is free time from 2 ms to 2 s; the right half is 16 tempo-synced values, the same as DELAY. The bar shows the time or the division name.
CHANCE
Probability of triggering a repeat.
REPEAT
Number of repeats, 1 to 16, default 5.
SPEED
0 at the centre; 0.25x to 4x.
REVERSE
Probability of reverse playback.
CRUSH
Bit crush amount.
GATE
0 at the centre.
JITTER
Timing jitter amount.
HOLD
Active only while held; not saved.
MASTER FX
Title
Shows "1 EFFECT" or "N EFFECTS". Shows "NO MASTER EFFECTS" when there are none.
Effect slots
Each slot has bypass, name, OPEN, move up, move down, and remove X.
ADD EFFECT
Lists the available Audio Unit effects grouped by manufacturer.
7. UTILITY
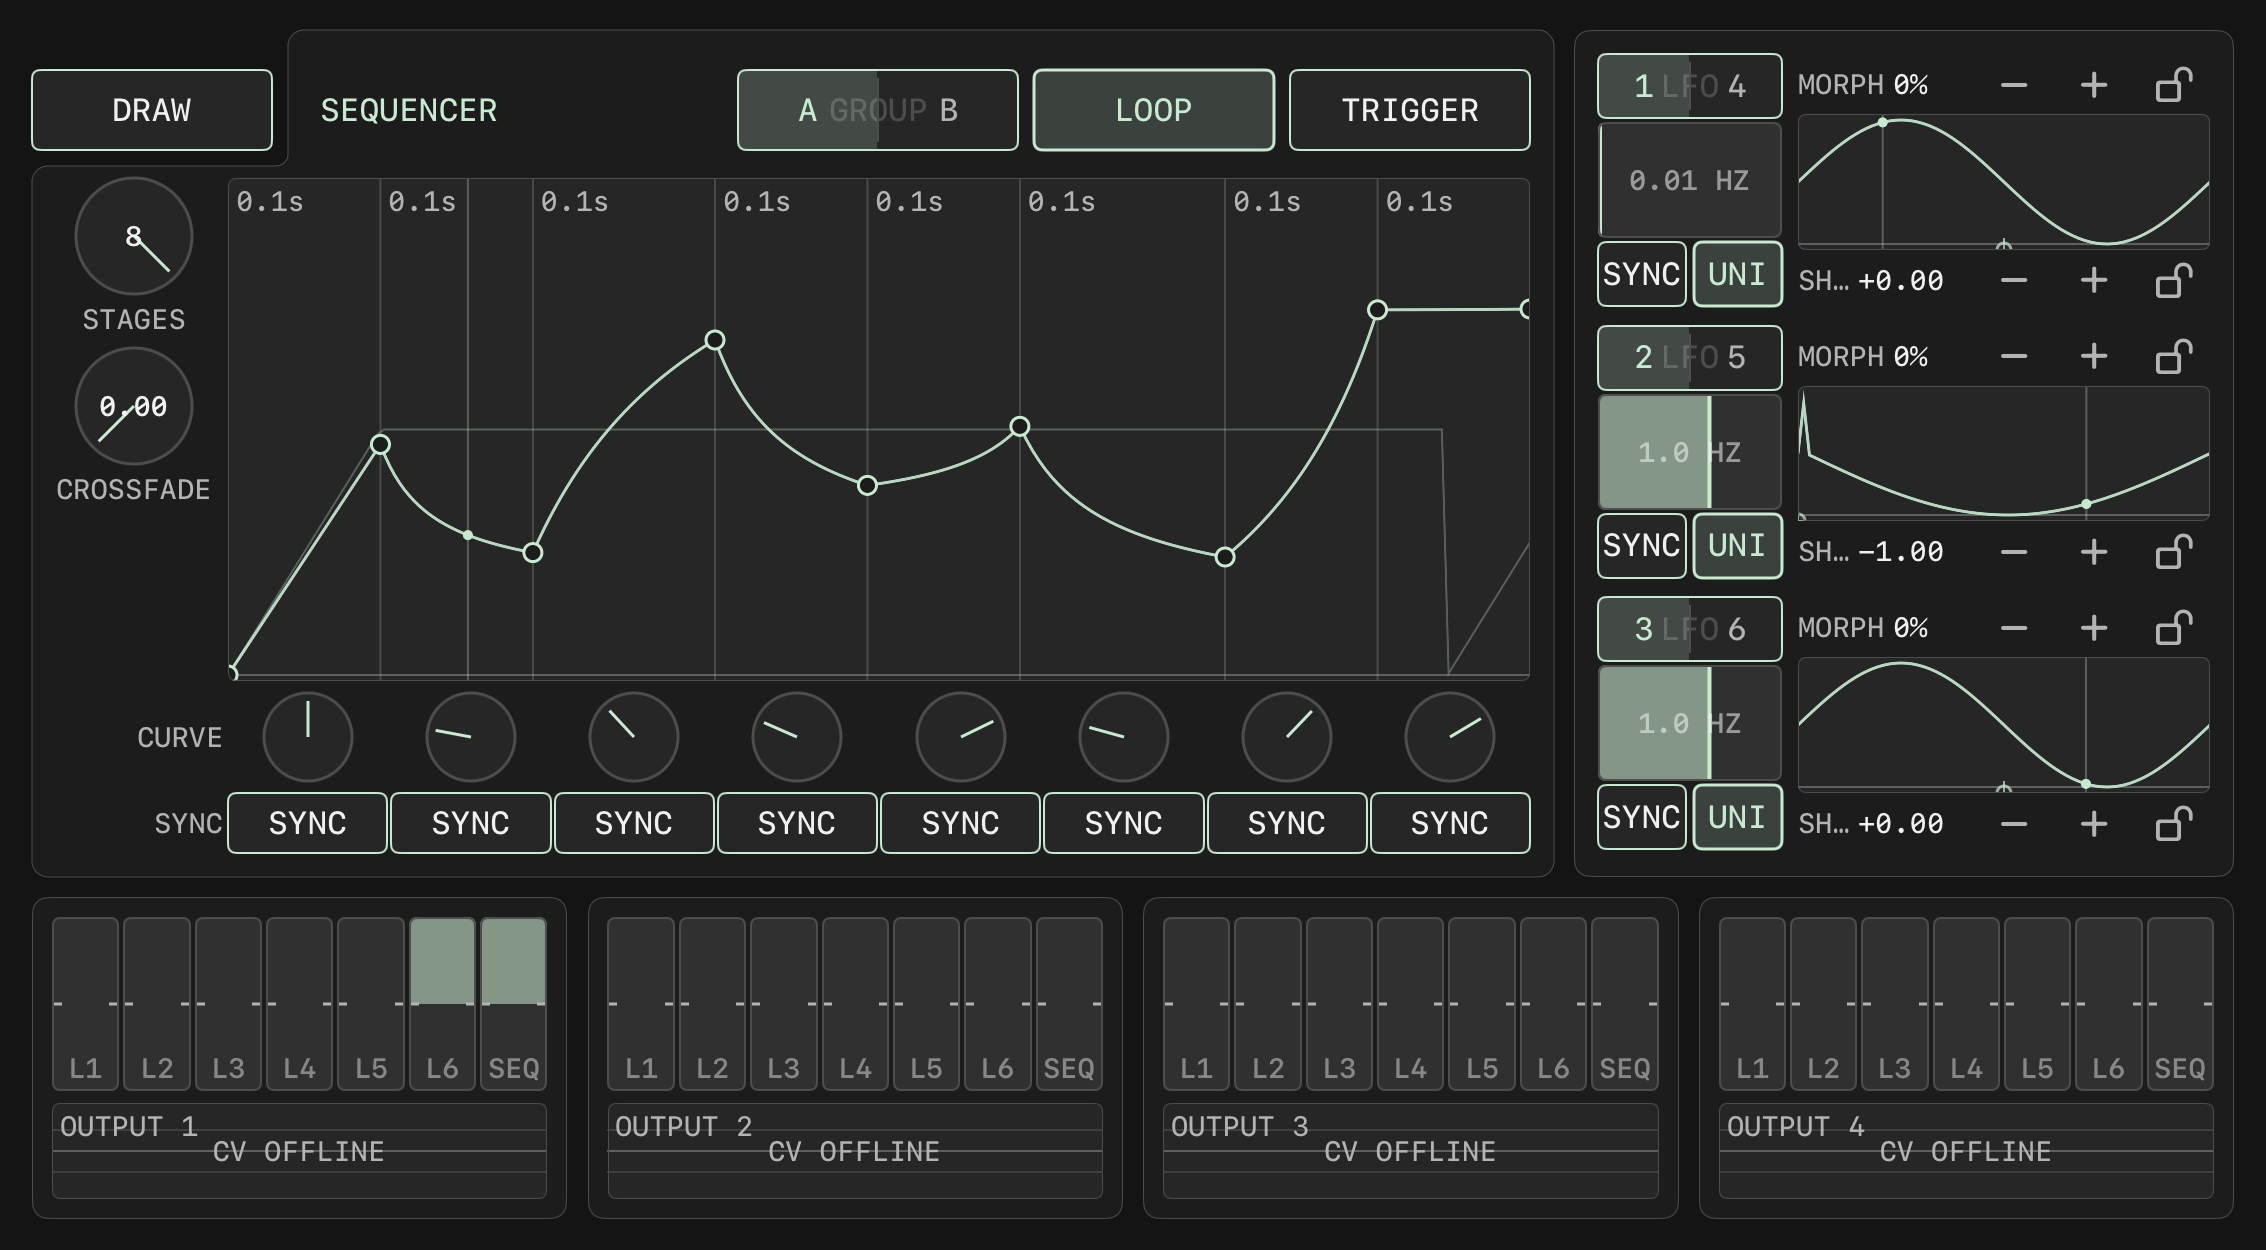
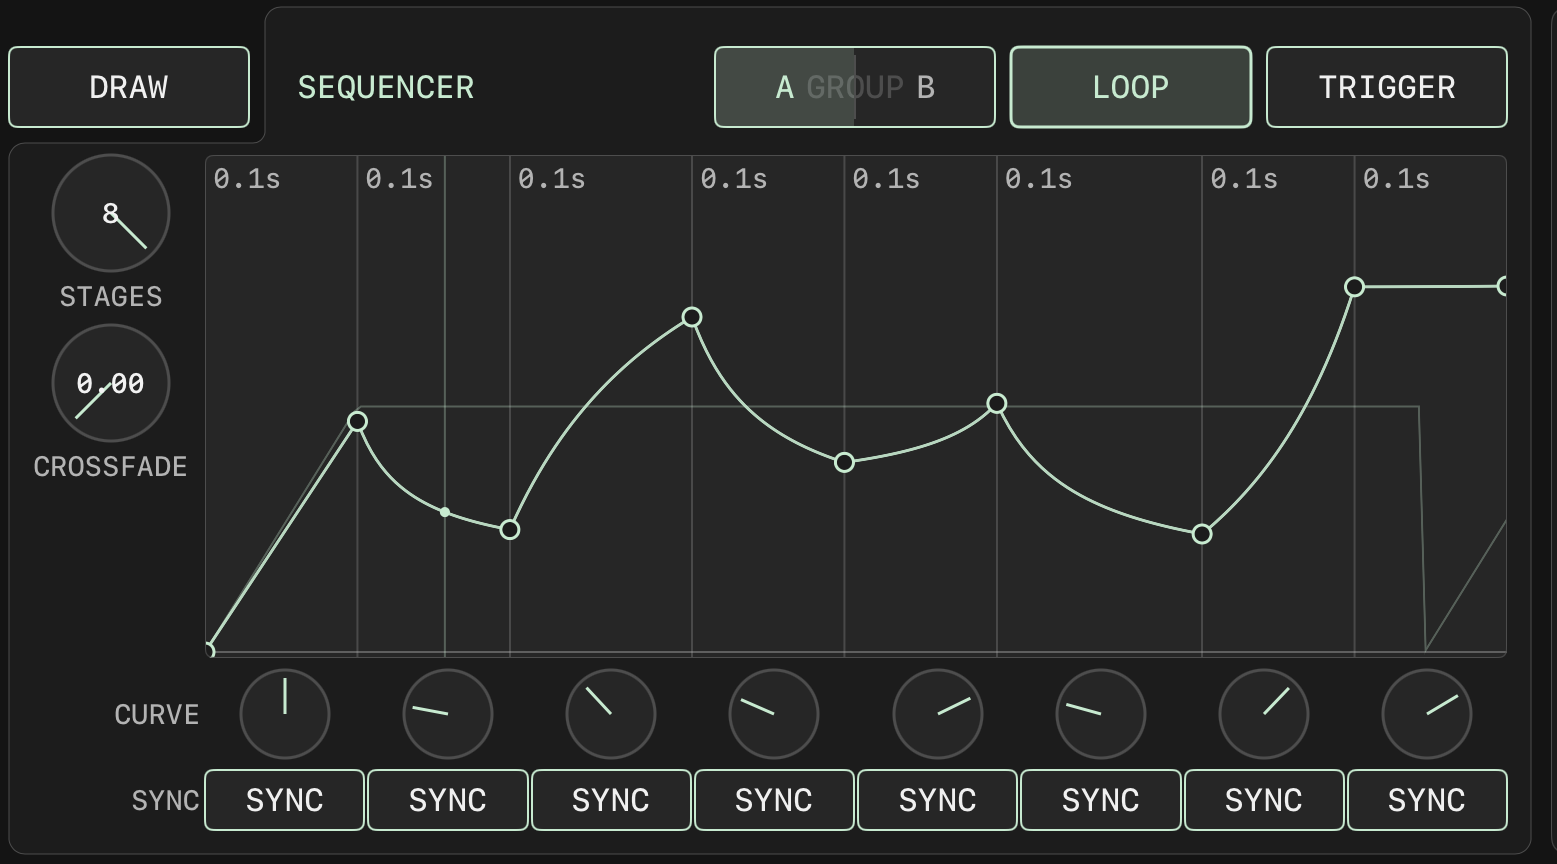
UTILITY full page. Top left is the SEQUENCER: DRAW set into the notch at the panel corner, then A GROUP B, LOOP (on), TRIGGER, the STAGES knob (8) and the CROSSFADE knob (0.00), the envelope editing area with stage time labels and the curve of the group being edited, and below it the eight CURVE knobs and eight SYNC buttons. Top right is the LFO column: three slots 1 LFO 4, 2 LFO 5, 3 LFO 6, each with an HZ fader, SYNC / UNI, the MORPH and SHAPE values with - / + and lock icons, and the waveform display. At the bottom OUTPUT 1 to 4, each with the seven faders L1 to L6 and SEQ and a scope area, showing CV OFFLINE in the image.
SEQUENCER (8-stage envelope)
SEQUENCER area: DRAW in the notch at the panel corner, the top row A GROUP B, LOOP, TRIGGER; on the left STAGES 8 and CROSSFADE 0.00; the top edge of the editing area labels each stage time (0.1s for every stage in the image), the solid line is the group being edited and the thin line is the other group; below, the eight CURVE knobs and eight SYNC buttons.
DRAW
Page-wide toggle set into the top-left corner of the SEQUENCER panel. Press to turn on; the button then reads FINISH. Drawing mode does not end by itself after a stroke; it stays on until you press FINISH, and it is not kept when you leave the page. While on, you can draw freehand in the SEQUENCER curve area (sampled at the 8 breakpoint positions; stages the stroke did not reach keep their old level) and also draw waveforms on the three LFO pads.
A GROUP B
Switches the editing group between A and B. STAGES, START, LOOP and TRIGGER are shared by both groups; the curve, CURVE and SYNC are independent per group.
LOOP
Loop playback. When off, holds at the level of the last stage.
TRIGGER
Trigger mode.
STAGES
Stage count 1 to 8.
CROSSFADE
0 to 1, the blend between A and B.
Editing area
The horizontal axis is time proportion, the vertical axis is 0 to 10 V. Drag a breakpoint vertically to change LEVEL, horizontally to change DURATION (0.001 to 10 seconds; the last stage can extend to 600 seconds). The start handle is at the far left. Up to 4 fingers at once. Shows the editing group as a solid line, the other group as a thin line, the blended result as a thick line, and the playback position.
CURVE
Eight knobs, each -1 to +1, double-tap returns to 0. Stages beyond STAGES are shown at 0.55 opacity and can still be adjusted.
SYNC
Eight buttons that switch a stage length to tempo sync, with 17 ratios from 1/16 to 16.
LFO
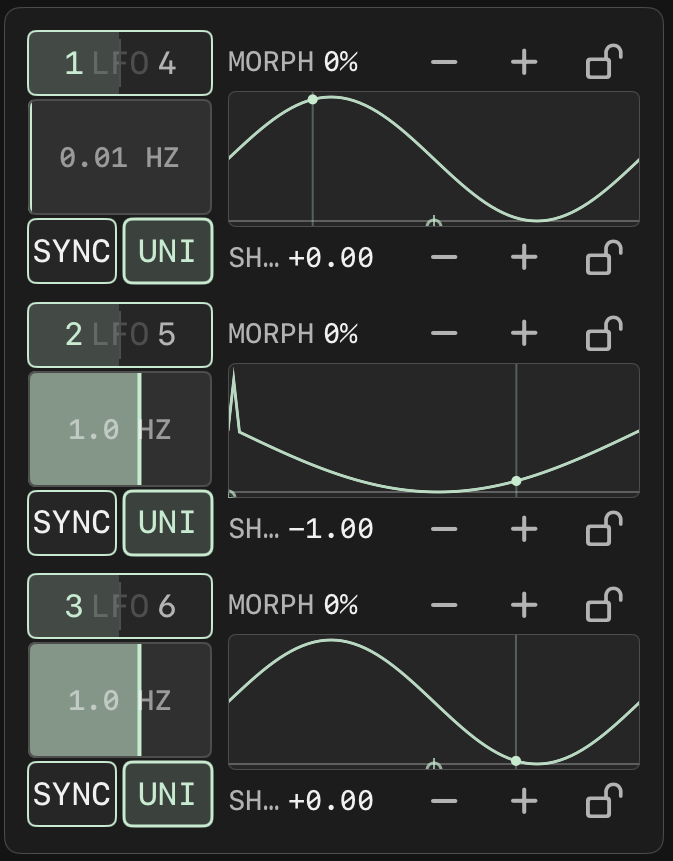
The three LFO slots: 1 LFO 4 (0.01 HZ), 2 LFO 5 (1.0 HZ), 3 LFO 6 (1.0 HZ). Each slot has an HZ fader, the SYNC / UNI buttons, the MORPH percentage and SH value (each with - / + and a lock icon), the waveform display and the playback position.
Slot buttons
The three slots switch between LFO 1 / 4, 2 / 5 and 3 / 6. LFOs not shown keep running.
HZ
0.01 to 20 Hz, logarithmic, double-tap returns to 1 Hz. Can be recorded with MOTION.
SYNC
Tempo sync, 11 divisions from /16 to x16.
UNI / BI
Unipolar or bipolar output.
MORPH
0 to 100%, - / + step by 1%.
SHAPE
-1 to +1, step 0.02.
Lock icon
Locks that axis.
XY pad
SHAPE horizontally, MORPH vertically. Double-tap resets to MORPH 0.5, SHAPE 0. The waveform display draws 72 points and the playback position, showing the actual modulated values.
Drawn waveform
With DRAW on, draw one stroke on the pad; lifting your finger writes it as that LFO's 128-point custom waveform (left to right is one cycle, top is +1, bottom is -1; gaps between drawn points are interpolated, the ends are extended with the nearest drawn value). Only the LFO currently shown in a slot can be drawn. With a custom waveform the LFO reads the table by phase, MORPH and SHAPE have no effect on the output, XY dragging is disabled, no crosshair is shown, and the display shows the custom waveform. The waveform is saved with the modulation settings.
S&H / T&H
With a custom waveform, the top row becomes a mode button and a step count. Tap the button to switch between S&H and T&H (default S&H); - / + change the step count by 1, from 0 to 32, and 0 shows OFF meaning no sample and hold. S&H holds the value read at the start of each step; T&H follows the waveform for the first half of each step and holds the mid-step value for the second half. Neither changes the drawn waveform itself.
RESET
With a custom waveform, the bottom row becomes RESET. Clears the custom waveform, returns the rows to MORPH / SHAPE and re-enables XY dragging. The step count and the S&H / T&H setting are kept.
OUTPUT 1 to 4
OUTPUT 1 to 4, each with seven faders (L1 to L6 and SEQ) and a scope area below. In the image the CV engine is not running and the scope area shows CV OFFLINE.
Faders
Order L1, L2, L3, SEQ, L4, L5, L6, each -1 to +1, snapping at center, double-tap returns to 0.
Scope area
Shows the output waveform and reading within plus or minus 10 V. Shows "CV OFFLINE" when the CV engine is not running; shows a flat 0 V line when no channel is assigned.
Output ranges
Matrix plus or minus 10 V, SEQ 0 to 10 V, LFO plus or minus 5 V.
The iPad CV engine must be enabled in SETUP. The physical channel of each OUTPUT is assigned in the MOD OUTPUT section of SETUP.
8. PERFORM
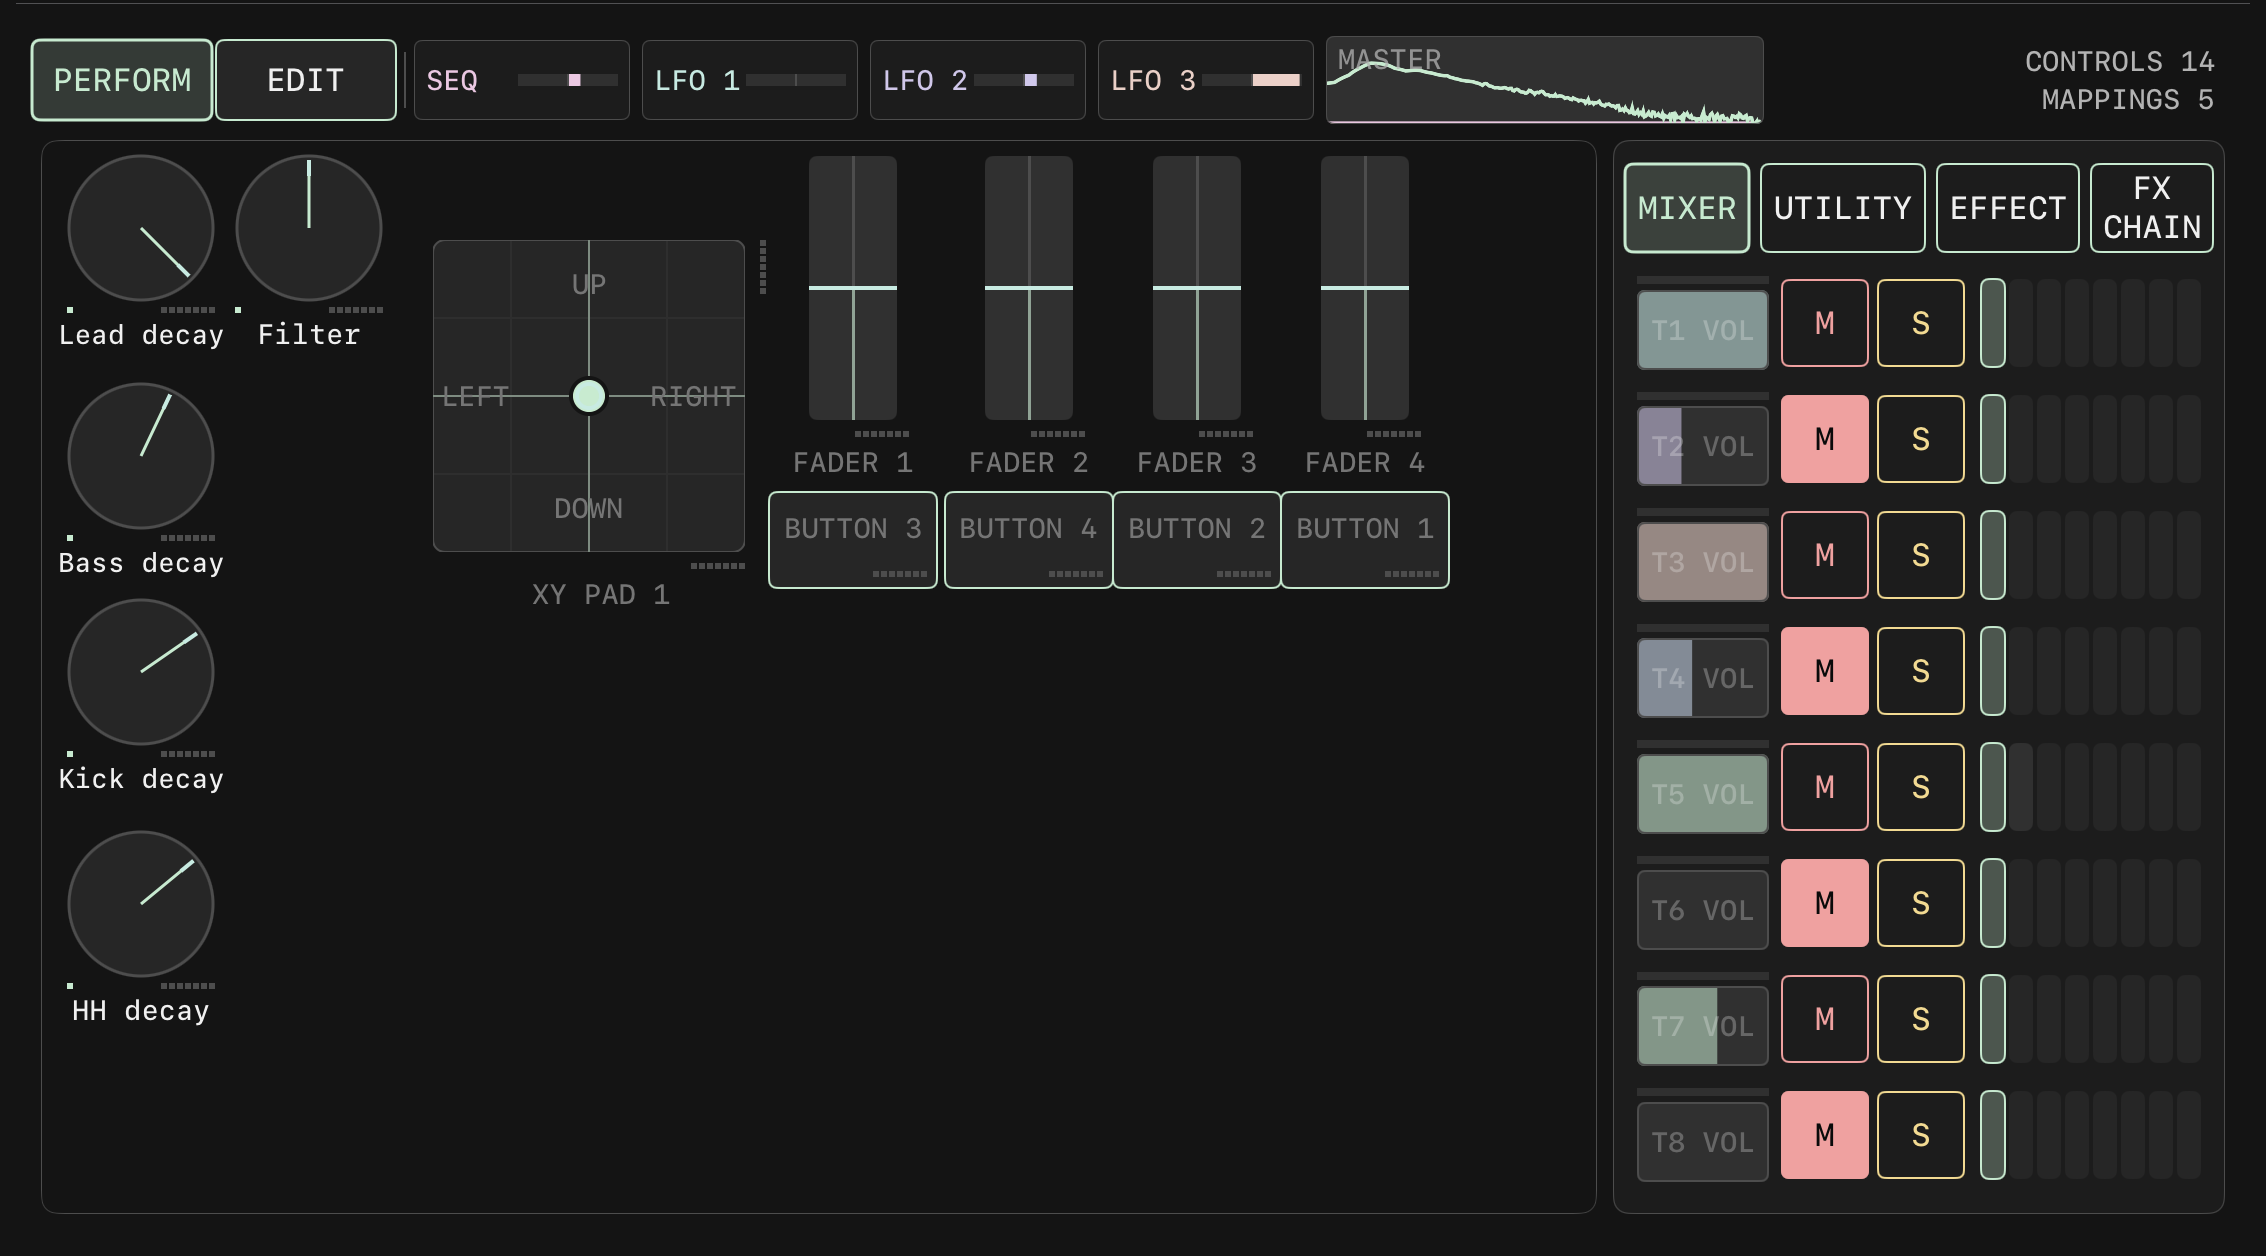
PERFORM full page. Toolbar at the top: PERFORM (selected) / EDIT, SEQ and LFO 1 to 3 level bars, MASTER spectrum, CONTROLS 14 / MAPPINGS 5. The canvas holds five named knobs (Lead decay, Filter, Bass decay, Kick decay, HH decay), XY PAD 1, FADER 1 to 4 and four BUTTONs. The side panel tabs are MIXER, UTILITY, EFFECT, FX CHAIN; the MIXER page is open here and shows VOL, M, S, meters and segment bars for T1 to T8.
Toolbar
Toolbar: PERFORM / EDIT switch, SEQ, LFO 1, LFO 2, LFO 3 level bars, MASTER spectrum, and CONTROLS 14 and MAPPINGS 5 at the right end.
PERFORM / EDIT
Switches between perform mode and edit mode.
SEQ, LFO 1 to 3
Live levels of the modulation sources.
MASTER
Main output spectrum. Tap to open the MASTER SPECTRUM panel.
CONTROLS / MAPPINGS
The number of controls and mappings on the canvas.
MASTER SPECTRUM panel
Spectrum
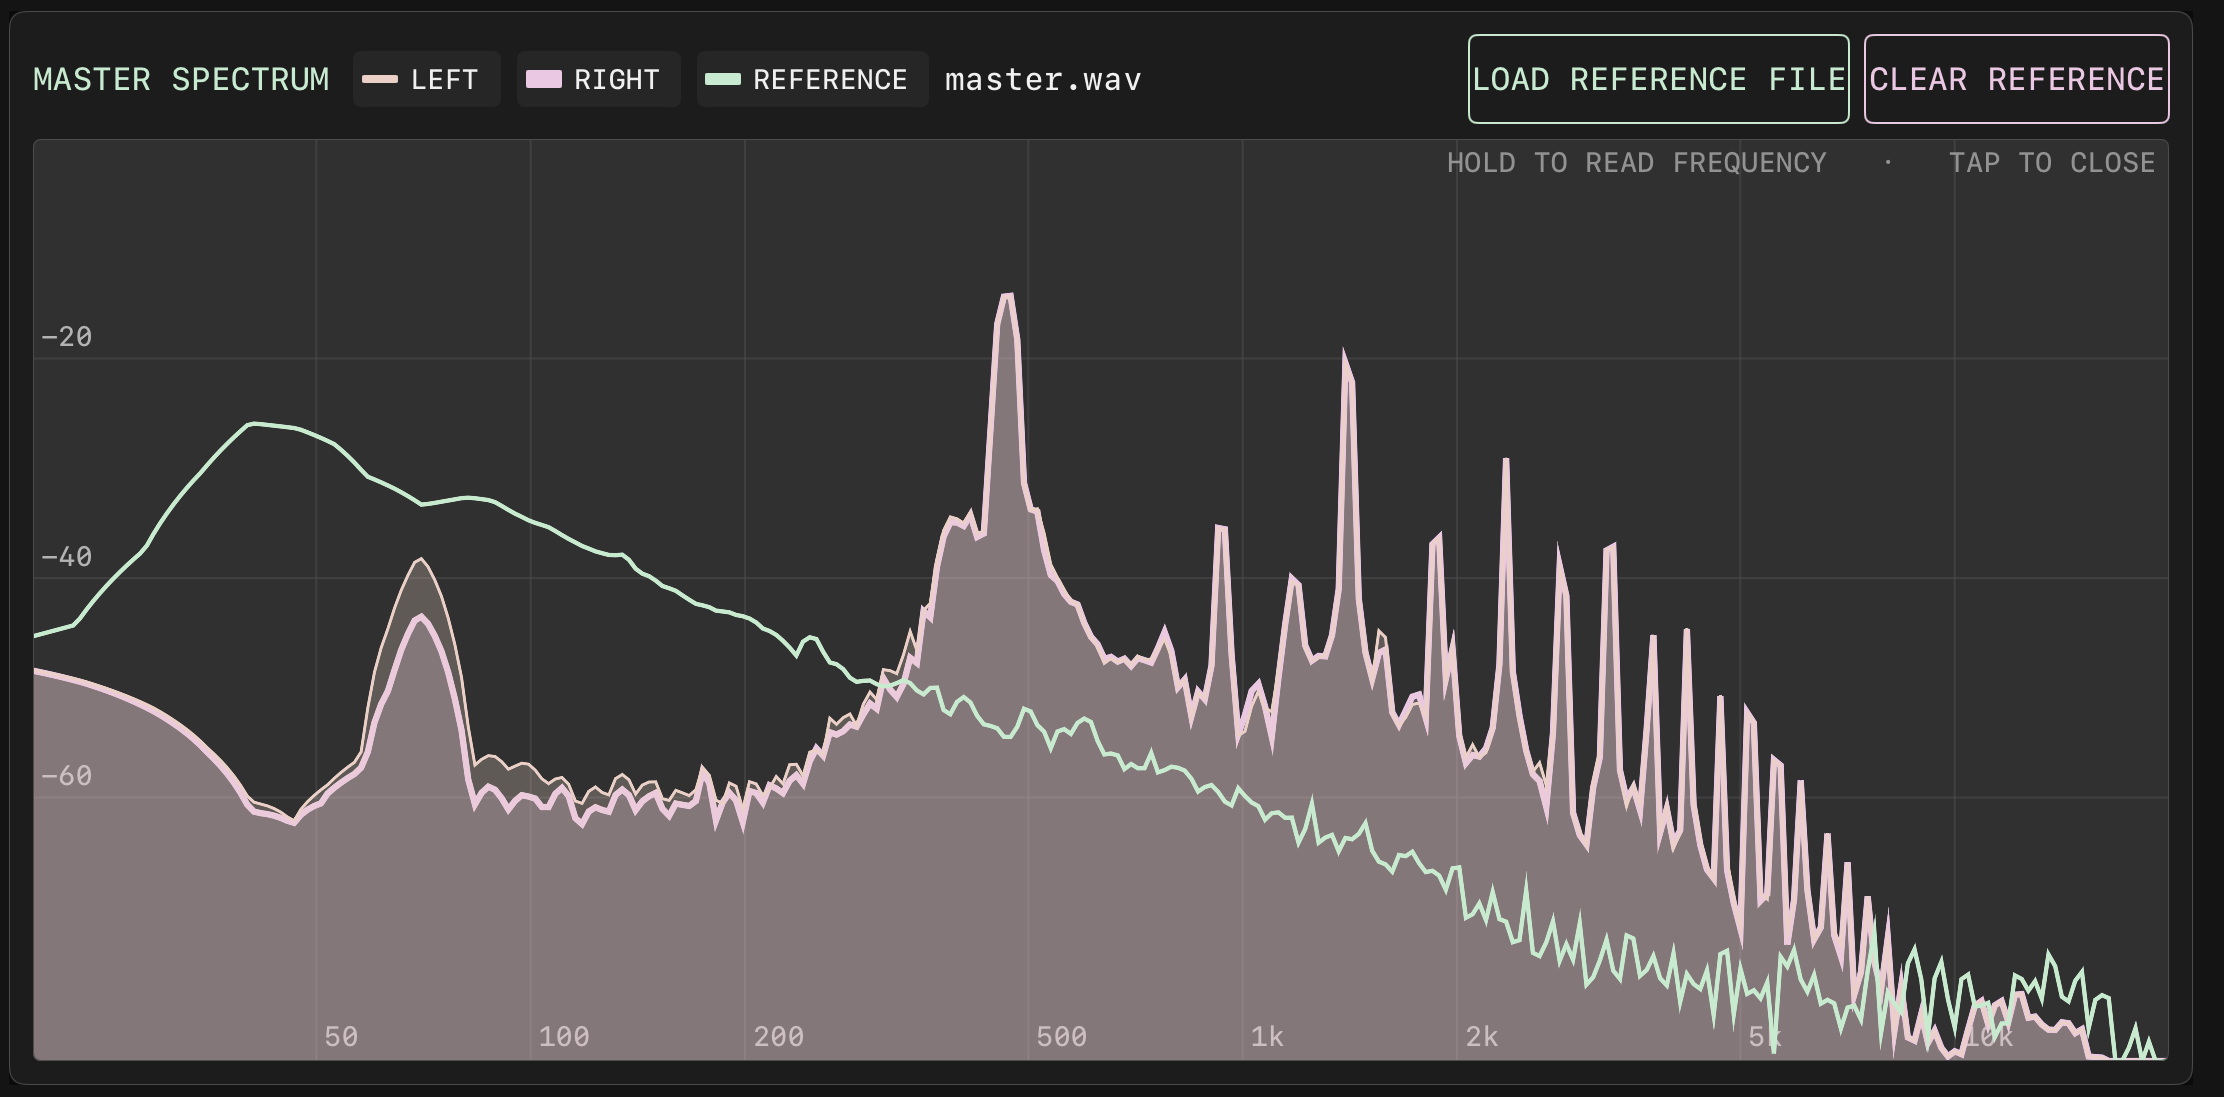
An enlarged main output spectrum with the legend LEFT, RIGHT, REFERENCE. Hold to read the frequency at that position; a short tap closes the panel. Switching PERFORM / EDIT also closes it.
LOAD REFERENCE FILE
Opens the system file picker to choose an audio file as a reference. Shows "ANALYSING REFERENCE FILE" during analysis and the file name when done; shows "REFERENCE FILE FAILED TO LOAD" on failure. Shows "NO REFERENCE FILE LOADED" when none is loaded.
Reference line
The loudest section of the file is analysed and drawn as a static accent-colour curve over the spectrum; it is also shown on the MASTER spectrum in the toolbar. The reference line and file name are kept and remain after the app restarts.
CLEAR REFERENCE
Clears the reference line.
The MASTER SPECTRUM panel: the LEFT, RIGHT and REFERENCE curves, with LOAD REFERENCE FILE and CLEAR REFERENCE at the top right. The reference loaded here is master.wav.
Controls
KNOB
Knob.
BUTTON
LATCH or MOMENTARY.
FADER
VERTICAL or HORIZONTAL. A return SPRING can be set: OFF, MIN, CENTER, MAX.
PAD (TWO AXIS)
Two-axis mode. X and Y each have - / + buttons and a lock icon. A locked axis does not accept finger drags or - / +; MOTION, MOD ROUTE and MIDI are not affected by the lock. The return spring is set with SPRING X and SPRING Y in the MAPPING panel (OFF, MIN, CENTER, MAX) and is off when the pad is added.
PAD (FOUR WAY)
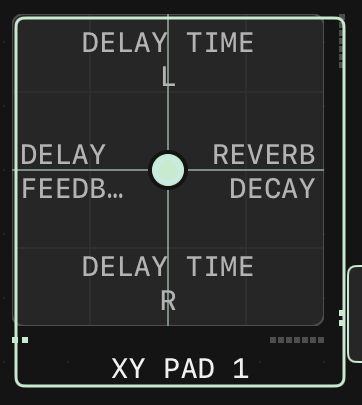
Four-way mode. The whole pad is a touch surface with no - / + and no lock, a crosshair at the centre, and the target name of each direction shown on the four sides. With the finger at the centre all four directions are 0; pushing to the edge in a direction gives 1; on a diagonal, horizontal and vertical are calculated separately. Button-type targets trigger when pushed past halfway. The return spring has a single switch, SPRING TO CENTER.
Indicator dots
The number of small dots below each control is its number of mappings, up to 8.
The canvas of a new project is empty, with no default controls. When there are no controls, an empty-state hint and an ENTER EDIT MODE button are shown. The 30 controls in the image are the layout at the time of the screenshot.
Side panel
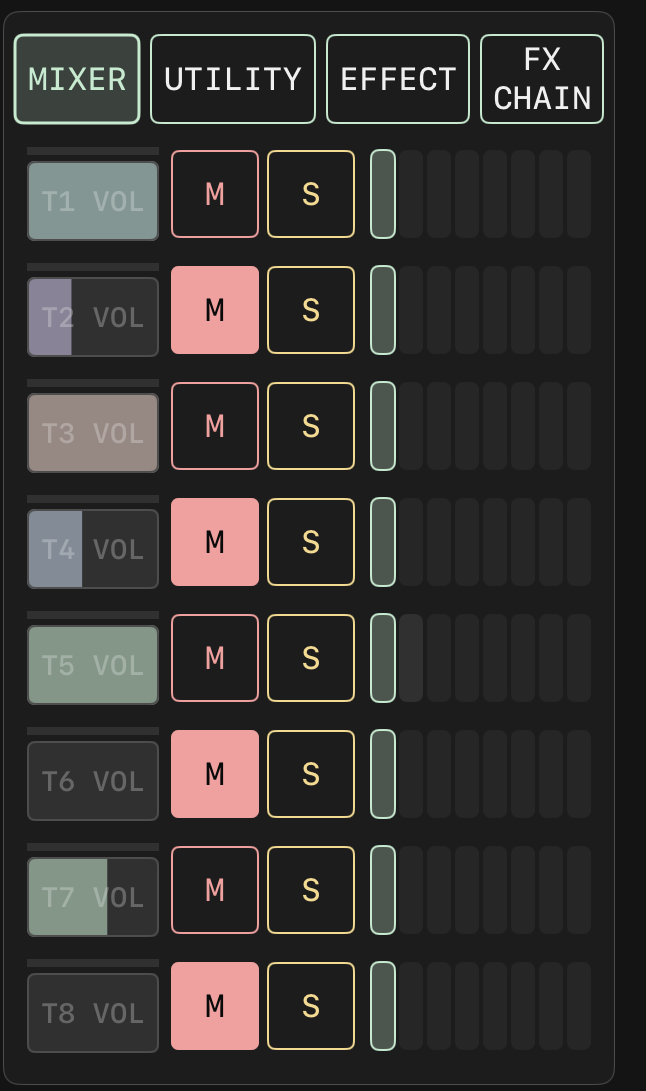
Side panel: the tabs at the top are MIXER, UTILITY, EFFECT, FX CHAIN, with the MIXER page open; each row T1 to T8 has a VOL bar, M, S, a vertical meter and an 8-cell segment bar.
MIXER
T1 to T8 each have a meter, VOL (0 to 2), M, S (long press for exclusive solo) and an 8-cell segment bar with the play position. Tap a cell to select that segment and lock the track to it; tap again to release. VOL, M and S on this page can be assigned with MIDI Learn and do not support MOD ROUTE.
UTILITY
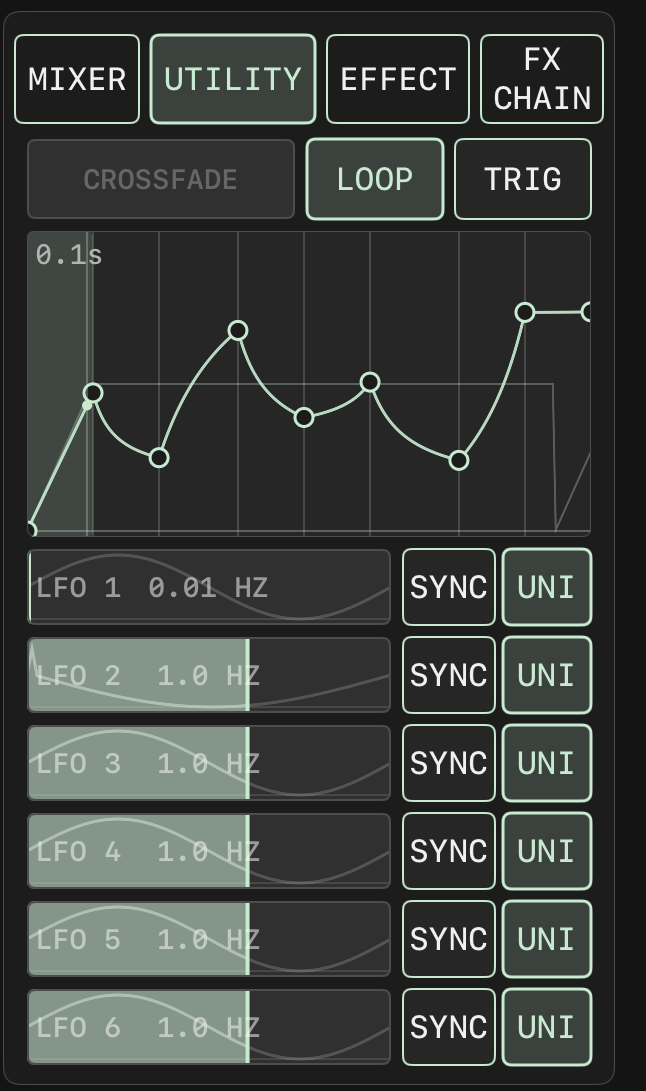
The first row has the CROSSFADE bar, LOOP and TRIG. The curve area edits group A only, with group B shown as a faded line. One row each for LFO 1 to 6: SPEED bar (Hz when SYNC is off, tempo divisions when on), SYNC, UNI / BI. SHAPE and MORPH are display only on this page. SPEED supports MIDI Learn, MOTION and MOD ROUTE.
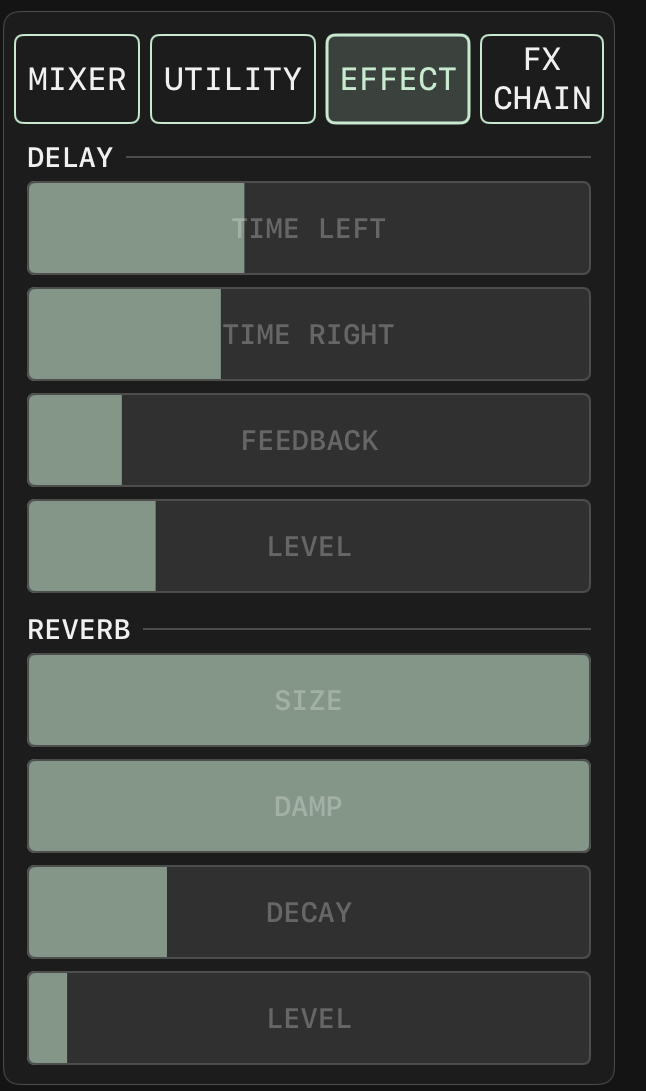
EFFECT
DELAY TIME LEFT, TIME RIGHT, FEEDBACK, LEVEL; REVERB SIZE, DAMP, DECAY, LEVEL.
FX CHAIN
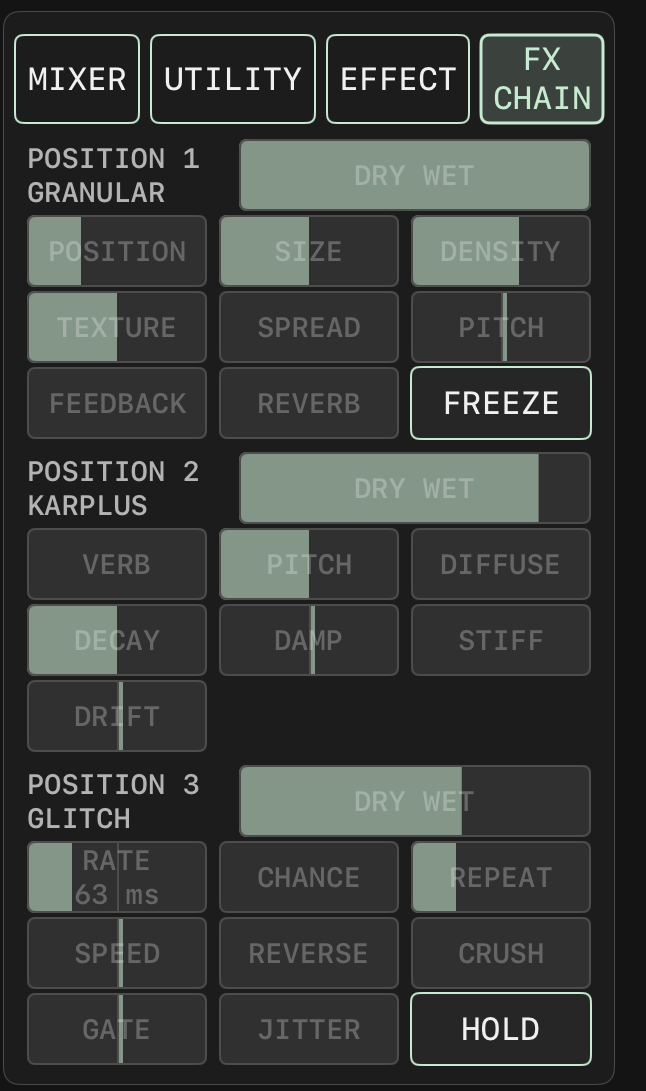
Each of the three positions shows POSITION n and the effect name, DRY WET and the parameters of that effect; GRANULAR also has FREEZE and GLITCH also has HOLD. The effect type cannot be changed on this page and there is no RETURN; effects are changed in the FX CHAIN panel of MIXER.
The UTILITY tab of the side panel: CROSSFADE / LOOP / TRIG, the eight-stage envelope curve, and LFO 1 to 6 with their rate bars, SYNC and UNI.
The EFFECT tab of the side panel: TIME LEFT, TIME RIGHT, FEEDBACK and LEVEL for DELAY, then SIZE, DAMP, DECAY and LEVEL for REVERB.
The FX CHAIN tab of the side panel: DRY WET and the parameters for each position, with GRANULAR at position 1, KARPLUS at position 2 and GLITCH at position 3.
EDIT mode
+ KNOB / + BUTTON / + FADER / + PAD
Adds a control. + PAD adds a PAD in two-axis mode.
MAPPING
Opens the mapping panel. Available only when a single control is selected; double-tapping a control on the canvas also opens it.
DELETE
Two-stage: one press changes it to "DELETE?", and a second press within 2 seconds deletes the selected controls.
UNDO / REDO
For layout editing only, 32 steps.
TEMPLATE
Three built-in layouts: SEGMENT VOICE, LEVEL AND TRIGGER, SENDS. "SAVE CURRENT LAYOUT" saves the current layout; "MANAGE USER TEMPLATES" renames or deletes user layouts, and deletion asks for confirmation.
SNAP GRID
Grid snap switch.
Select and drag
Tap a control to add it to or remove it from the selection; multiple selection is possible. Drag to move; with multiple selection the whole group moves.
The toolbar in EDIT mode: PERFORM / EDIT, + KNOB, + BUTTON, + FADER, + PAD, MAPPING, DELETE, UNDO, REDO, with TEMPLATE and SNAP GRID on the right.
An XY pad set to FOUR WAY. Each direction shows its assignment: DELAY TIME L up, DELAY TIME R down, DELAY FEEDBACK left and REVERB DECAY right.
MAPPING panel
Header
The MAPPING title, the control kind, the name field and CLOSE; tapping the panel background also closes it. BUTTON has MODE (MOMENTARY / LATCH); FADER has ORIENTATION (VERTICAL / HORIZONTAL) and SPRING; PAD has TWO AXIS / FOUR WAY and the spring settings.
Mapping slots
The left column SLOTS, 8 per control. Each slot has the target name, CLEAR SLOT, REVERSE RANGE, a range bar and a bar for the current effective value. On a two-axis PAD the 8 slots are shared by both axes, and the X / Y buttons of each slot choose the axis.
DIRECTIONS
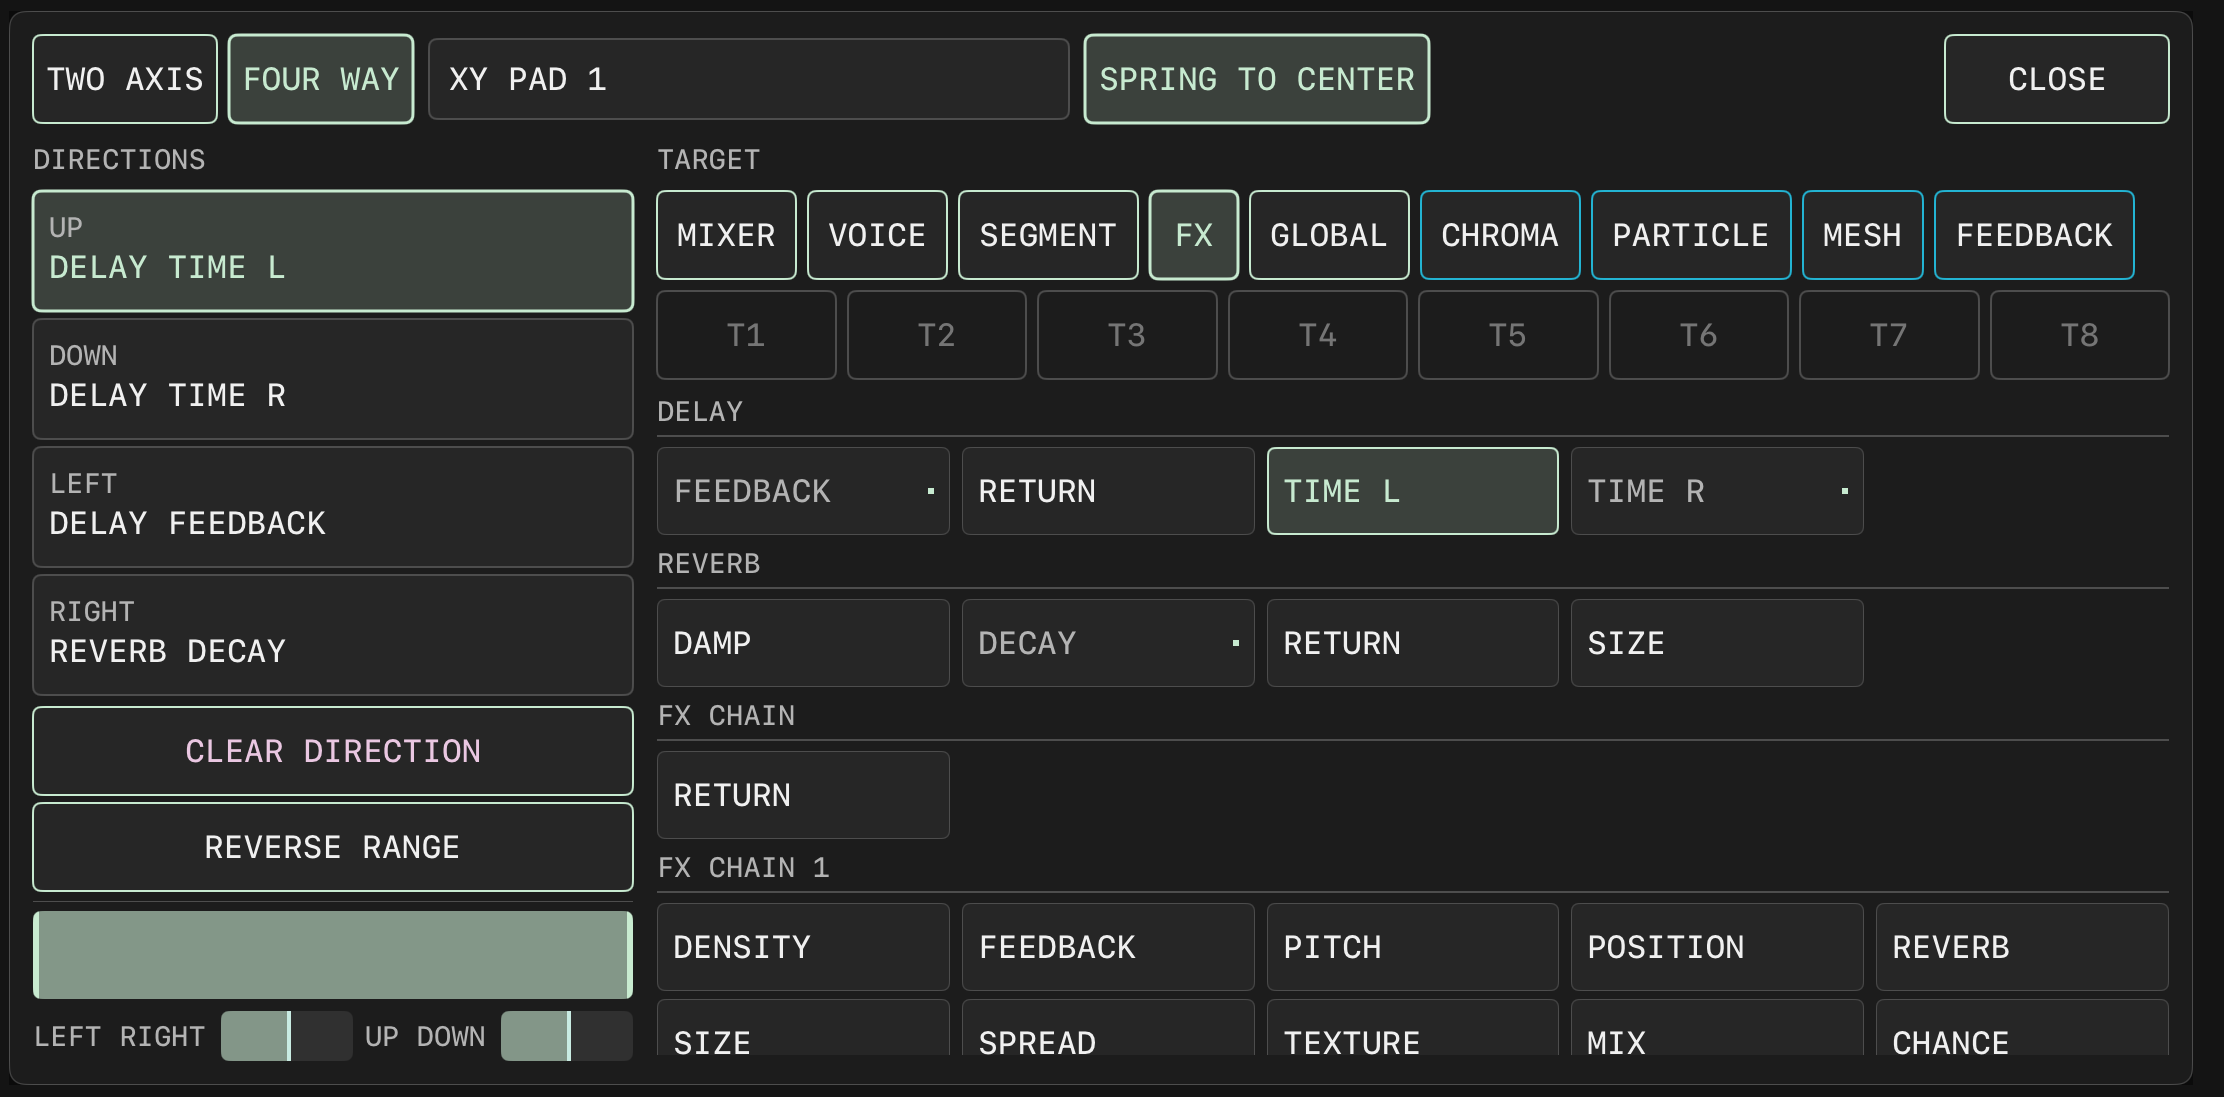
On a four-way PAD the column becomes four rows, UP, DOWN, LEFT, RIGHT, with one mapping per direction; assigning again replaces the previous one, and an unassigned direction shows EMPTY. Each row has CLEAR DIRECTION, REVERSE RANGE and a range bar.
TWO AXIS / FOUR WAY
Switches the PAD mode. When the PAD already has mappings, the first tap shows a confirmation label and a second tap within 2 seconds switches. Switching clears all mappings of the PAD and can be reverted with UNDO; the name is kept. Switching to FOUR WAY returns the value to the centre and turns the spring on; switching back to TWO AXIS turns the spring off.
Target groups
MIXER, VOICE, SEGMENT, FX, GLOBAL, CHROMA, PARTICLE, MESH, FEEDBACK. Below the groups are the track buttons T1 to T8, which are dimmed for global groups. Targets already used on the same control are marked.
MIXER group
Per track: MUTE, SOLO, A1 to A3 LEVEL, LEVEL, MIX, PAN, sidechain amount, the three effect sends, FILTER.
FX group
DELAY, REVERB, FX CHAIN (RETURN), FX CHAIN 1, FX CHAIN 2, FX CHAIN 3 and PRE / POST. Each FX CHAIN position contains the parameters of the three effects, MIX, and EFFECT, FREEZE and HOLD. Each trigger of EFFECT changes to the next effect in the order GRANULAR, KARPLUS, GLITCH; HOLD is active while held.
A KNOB cannot select SEQUENCER, RANDOM or the PRE / POST switches. Mappings have no modulation amount field; modulation amounts are set in MOD ROUTE: turn on MOD in the Transport, then tap the control. MOD ROUTE on PERFORM controls has only 7 sources, SEQ and LFO 1 to 6; ENV is unavailable. On two-axis and four-way PADs, each of the two axes has its own set of modulation amounts. All control kinds can be assigned with MIDI Learn; the label shows the CC number, N number or PB, and takeover uses pickup. In MIDI Learn mode a PAD shows two corners: the top-left corner is the vertical axis and the bottom-right corner is the horizontal axis.
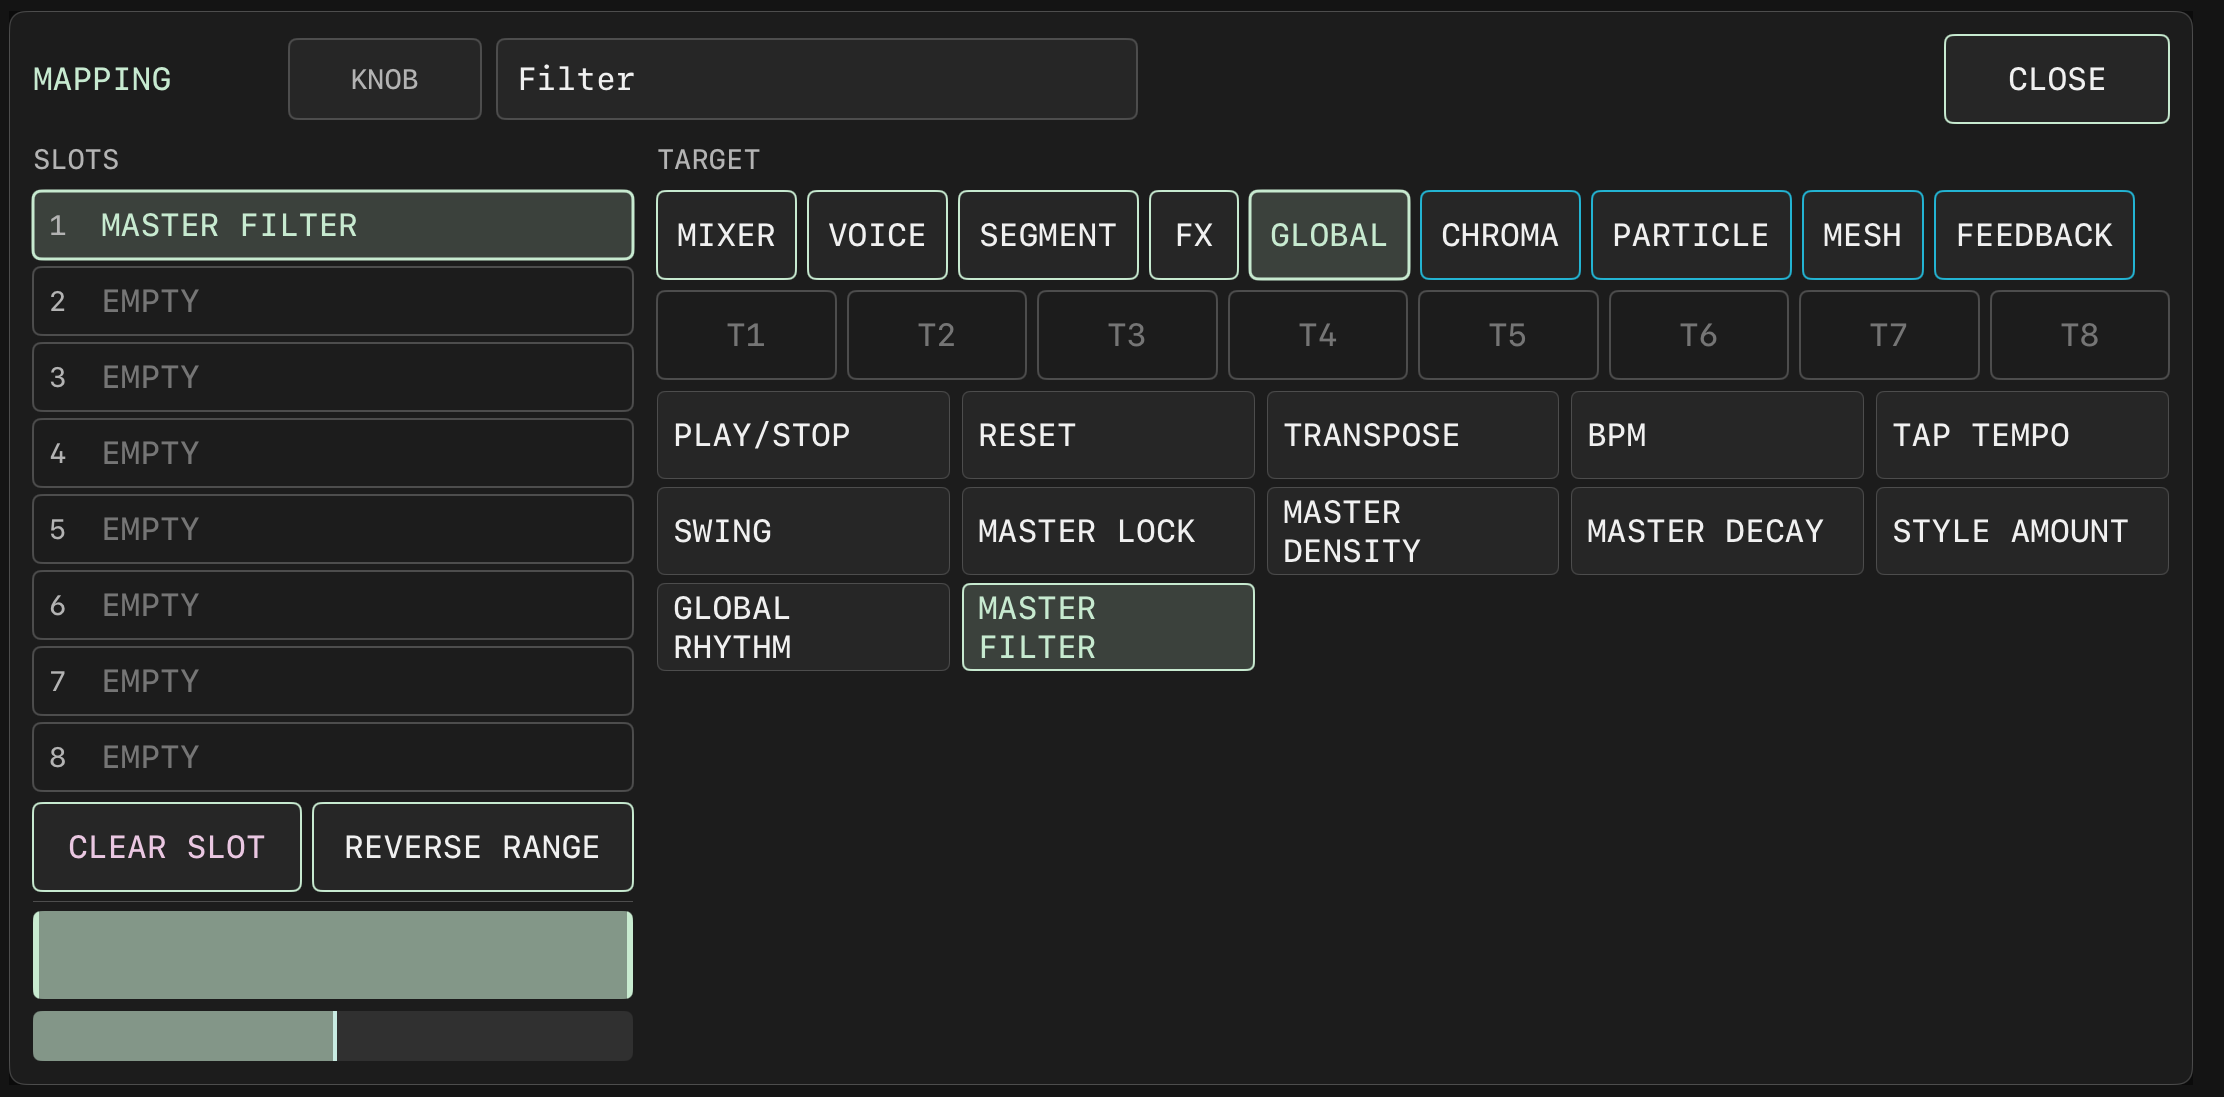
The MAPPING panel for a knob: the eight slots on the left (slot 1 is MASTER FILTER here) with CLEAR SLOT and REVERSE RANGE, the TARGET categories and parameters on the right, and the range bars at the bottom.
The MAPPING panel for an XY pad: TWO AXIS or FOUR WAY at the top, the UP / DOWN / LEFT / RIGHT directions and their assignments on the left, plus SPRING TO CENTER, CLEAR DIRECTION and REVERSE RANGE.
9. MOD ROUTE
MOD ROUTE lets one parameter receive several modulation sources at once. While a finger is on a control, the manual value replaces MOTION playback; MOD ROUTE keeps working and is added to MOTION. MOD ROUTE keeps working when playback is stopped.
Opening
Press MOD in the Transport to enter MOD mode. Controls that can be modulated show a solid accent outline.
Tap an outlined control to open the MOD ROUTE panel of that parameter, with haptic feedback. The value of the control does not change.
Press MOD again to leave. MOD mode and MIDI Learn mode are mutually exclusive; MOD is off every time the app launches.
The long-press method of older versions has been removed.
The MIXER page with MOD on in the transport. Every control that can be modulated gets an outline.
Where modulation is available
DECAY in the MAIN parameter row.
VOICE source parameters, and the sample start point, end point and GRAIN SHAPE.
MIXER per track: DELAY, REVERB and FX CHAIN sends, sidechain amount, PAN, MIX, LEVEL, and the A1 to A3 send amounts. FILTER, LOCK, DENSITY, M, S and DECAY on the MIXER page are not supported.
MIXER EFFECT row: DELAY LEFT, RIGHT, FEEDBACK, LEVEL; REVERB SIZE, DAMP, DECAY, LEVEL; FX CHAIN RETURN, the parameters of each position and DRY WET.
UTILITY LFO speed and the XY pad.
All controls on the PERFORM canvas; the bars of the side panel EFFECT and FX CHAIN pages, and LFO SPEED on the UTILITY tab. VOL on the side panel MIXER page is not supported.
VISUAL MIX and parameter bars.
Panel
Title
MOD ROUTE; the axis name is added for the XY pad.
Source buttons
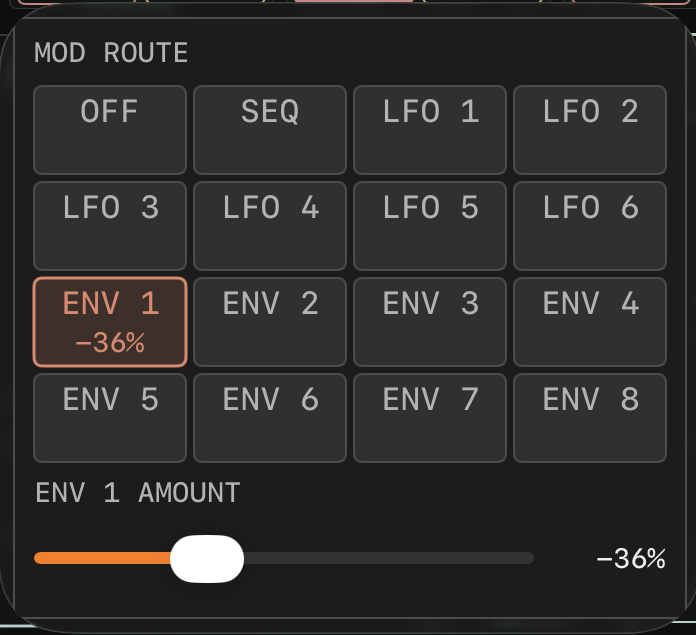
16 in four rows: OFF, SEQ, LFO 1 to 6, ENV 1 to 8. OFF clears everything.
Button logic
Tapping a selected source with a non-zero amount: the amount returns to 0 and the source stays selected. Selected with amount 0: set to +50%. Unselected with a non-zero amount: selected. Unselected with amount 0: selected and set to +50%.
AMOUNT
-100 to +100%. The title shows "source name AMOUNT", or "SELECT A SOURCE" when no source is selected.
CLEAR MOTION?
A Y / N row shown when the parameter has MOTION data.
Closing
Tap outside the panel, answer Y / N, or turn MOD off. MOD mode stays on after the panel closes.
The MOD ROUTE panel: OFF, SEQ, LFO 1 to 6 and ENV 1 to 8. ENV 1 is selected here and ENV 1 AMOUNT below reads -36%.
Sources
SEQ
UTILITY envelope output, 0 to 1.
LFO 1 to 6
Unipolar or bipolar according to the UNI / BI setting.
ENV 1 to 8
The trigger envelope of each track, 0 to 1, read according to the current source of that track (SYNTH, SAMPLE, PHYSICAL, AU). A track may modulate its own parameters. ENV is not a column of the UTILITY OUTPUT matrix. ENV is unavailable on PERFORM controls, where the buttons are dimmed.
A parameter with routing shows source marks at its top right: m for MOTION, s for SEQ, 1 to 6 for LFO, e1 to e8 for ENV; with too many sources the list is truncated with "+".
Relation to MIDI Learn
MOD and MIDI cannot be on at the same time; turning one on turns the other off.
MIDI bindings can only be removed in SETUP; learning again replaces the old binding.
10. VISUAL
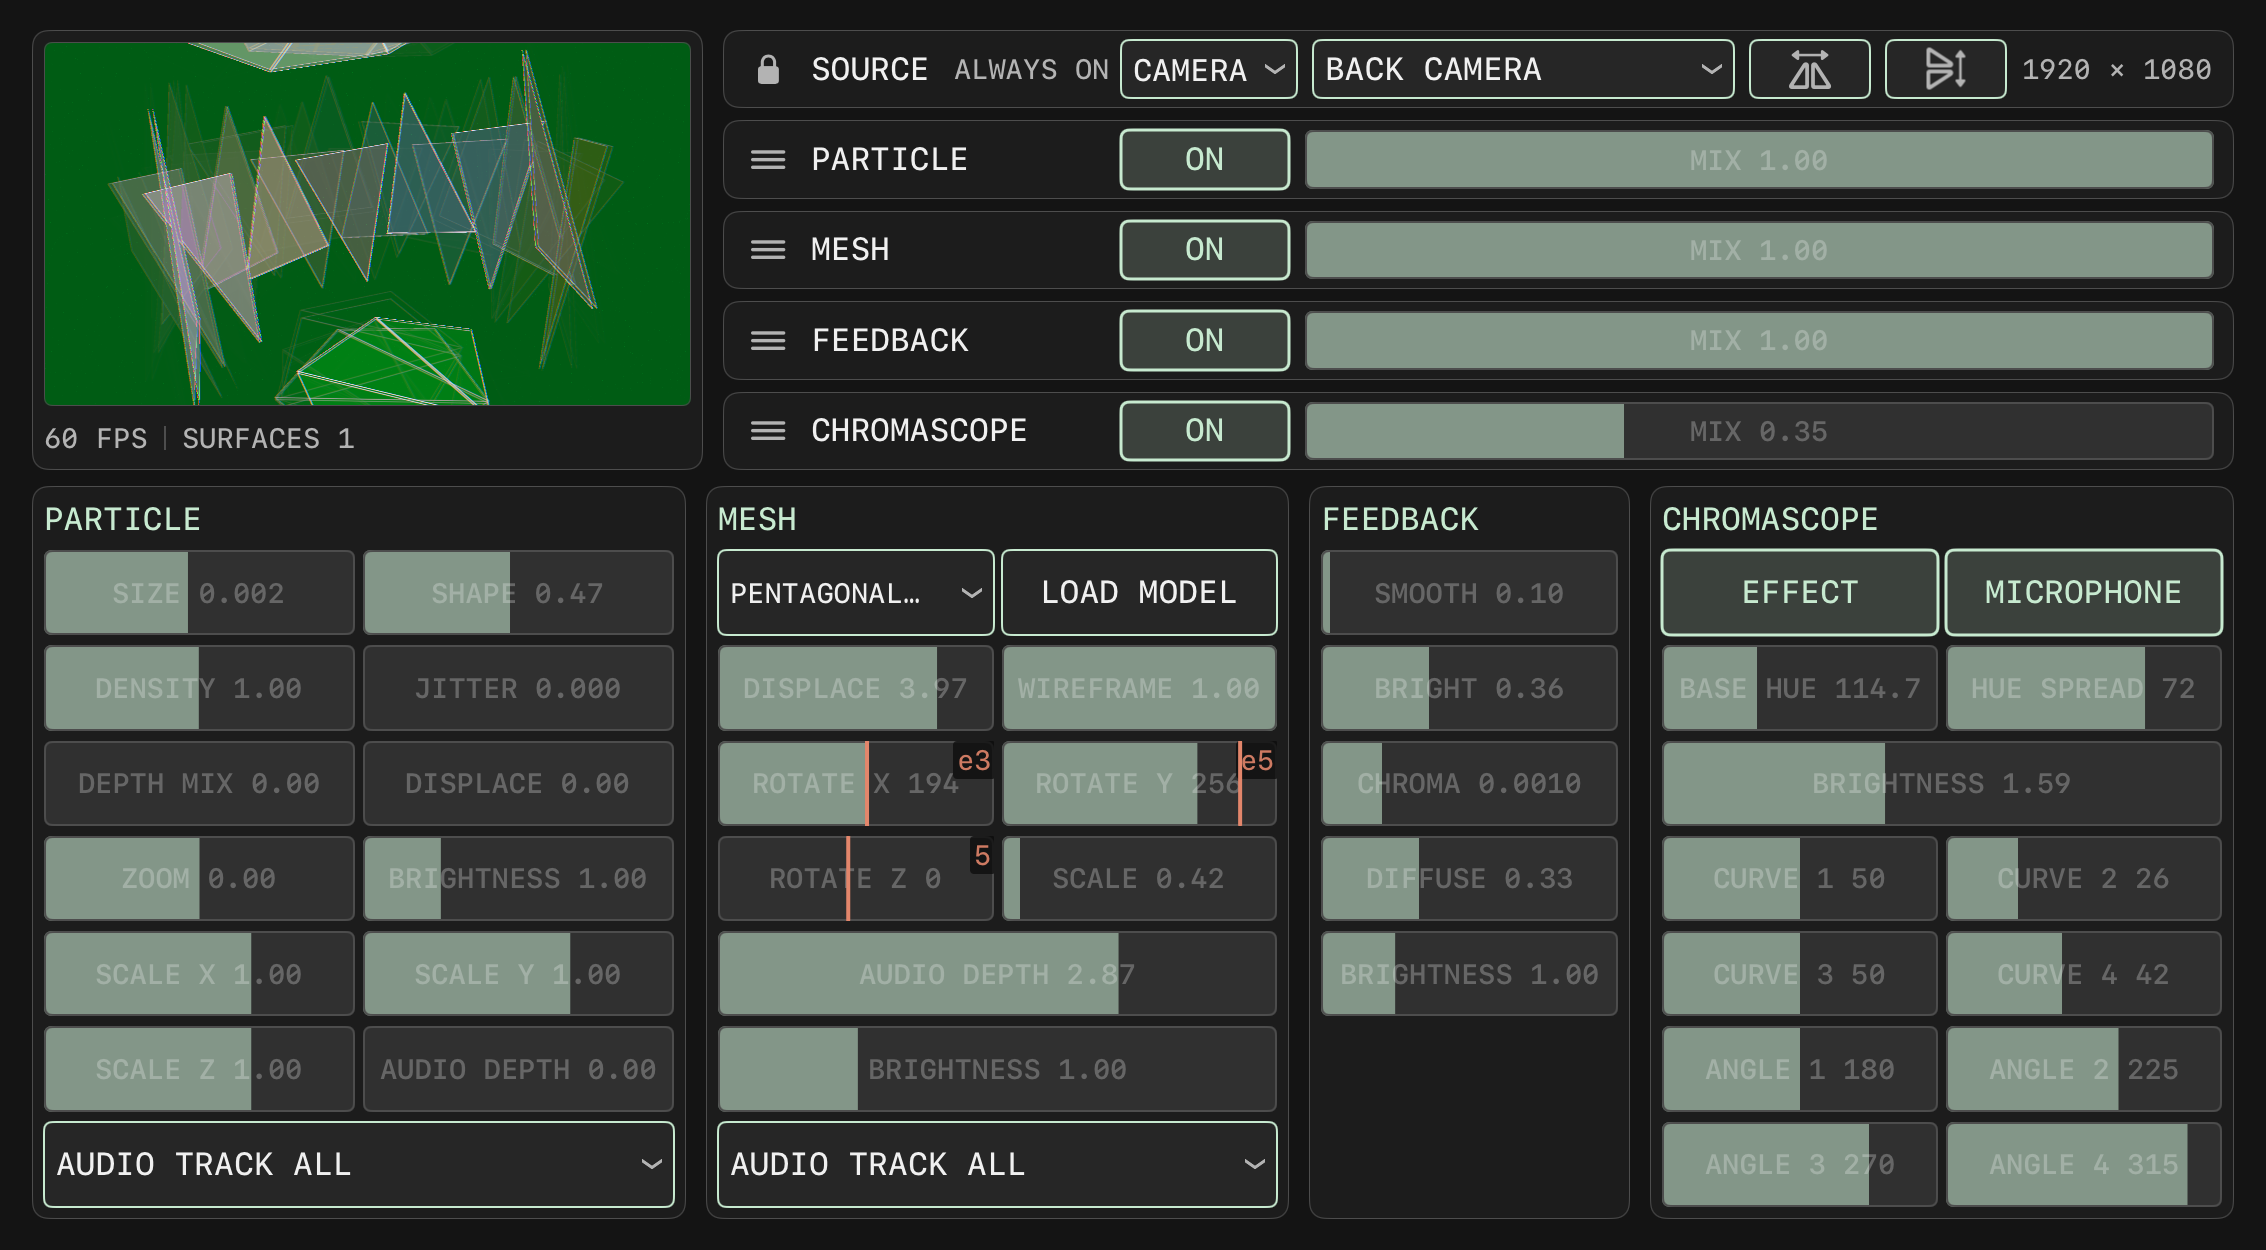
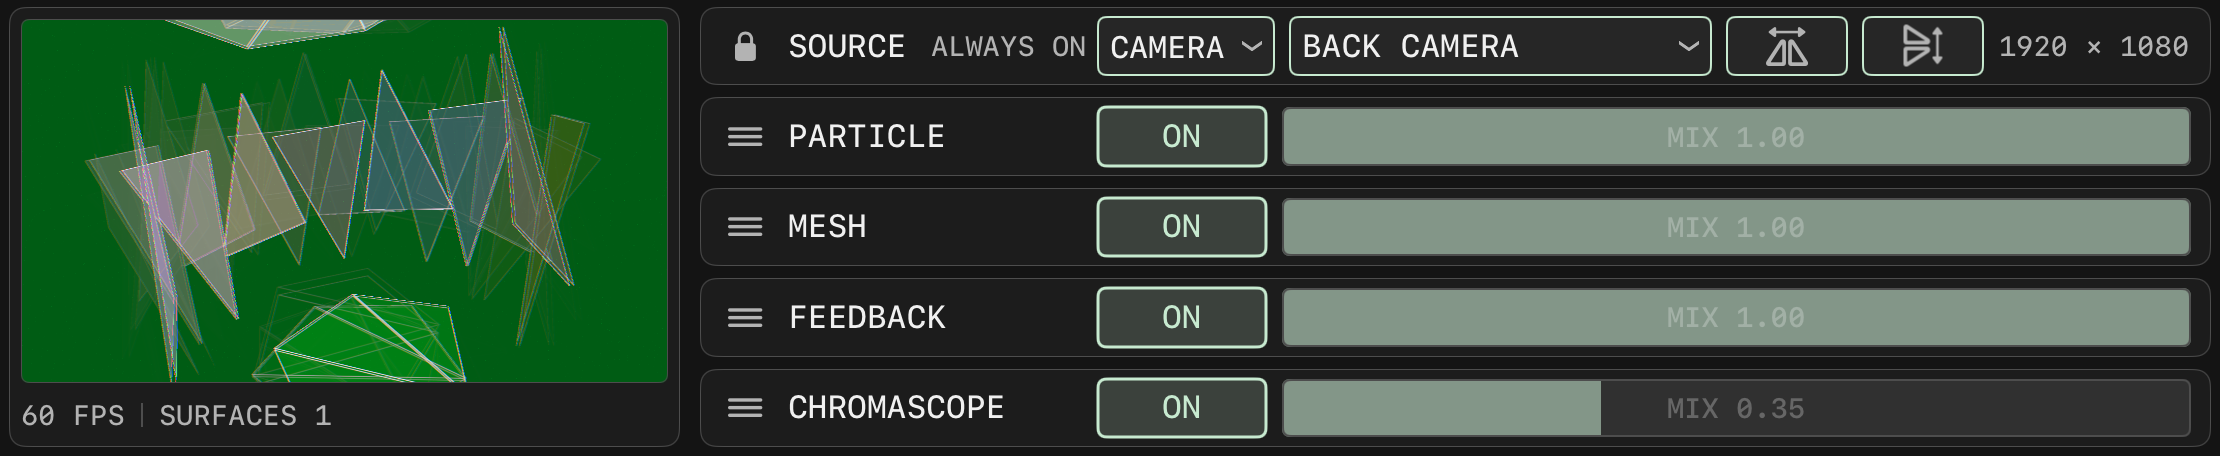
VISUAL full page. Top left is the 16:9 preview with the status line (60 FPS, SURFACES 1). Top right is the SOURCE row (lock icon, ALWAYS ON, the CAMERA menu, BACK CAMERA, the two flip buttons, 1920 x 1080) and the four stations PARTICLE, MESH, FEEDBACK, CHROMASCOPE, each with a drag handle, an ON button and a MIX bar (the first three at 1.00 and CHROMASCOPE at 0.35 in the image). Below, the four parameter panels.
SOURCE row and station rows
SOURCE row: lock icon, SOURCE, ALWAYS ON, the CAMERA drop-down, the lens menu, the horizontal and vertical flip buttons, the resolution 1920 x 1080. The four rows below are PARTICLE, MESH, FEEDBACK, CHROMASCOPE, each with a handle, ON and a MIX bar.
SOURCE / ALWAYS ON
Source status text.
Source menu
CAMERA, PHOTO, VIDEO.
Lens menu
Selects the camera device; shows NO CAMERA FOUND when there is none. The camera runs at 1080p 30 fps; the front camera is mirrored.
PHOTOS / FILES
Shown for the PHOTO and VIDEO sources; loads from the photo library or from files. After loading the file name is shown; on failure LOAD FAILED. Photos are limited to 1920 on the long edge; videos loop and are muted.
FLIP H / FLIP V
Horizontal and vertical flip.
Resolution
Shows the source resolution; shows SOURCE WAITING while not ready.
Station rows
The four stations CHROMASCOPE, PARTICLE, MESH, FEEDBACK; drag the handle on the left to reorder. ON / OFF toggle; only CHROMASCOPE is on by default. With all stations off, the raw source is output.
MIX
0 to 1, default 0.75 for CHROMASCOPE and 1 for the others. The modulation source marker is shown at the top right.
Status line
NN FPS, SURFACES n, EXTERNAL DISPLAY, RENDERER OFFLINE.
VISUAL parameter values are not stored with the bank; only the MOD ROUTE routings are stored in the bank.
Parameter panels
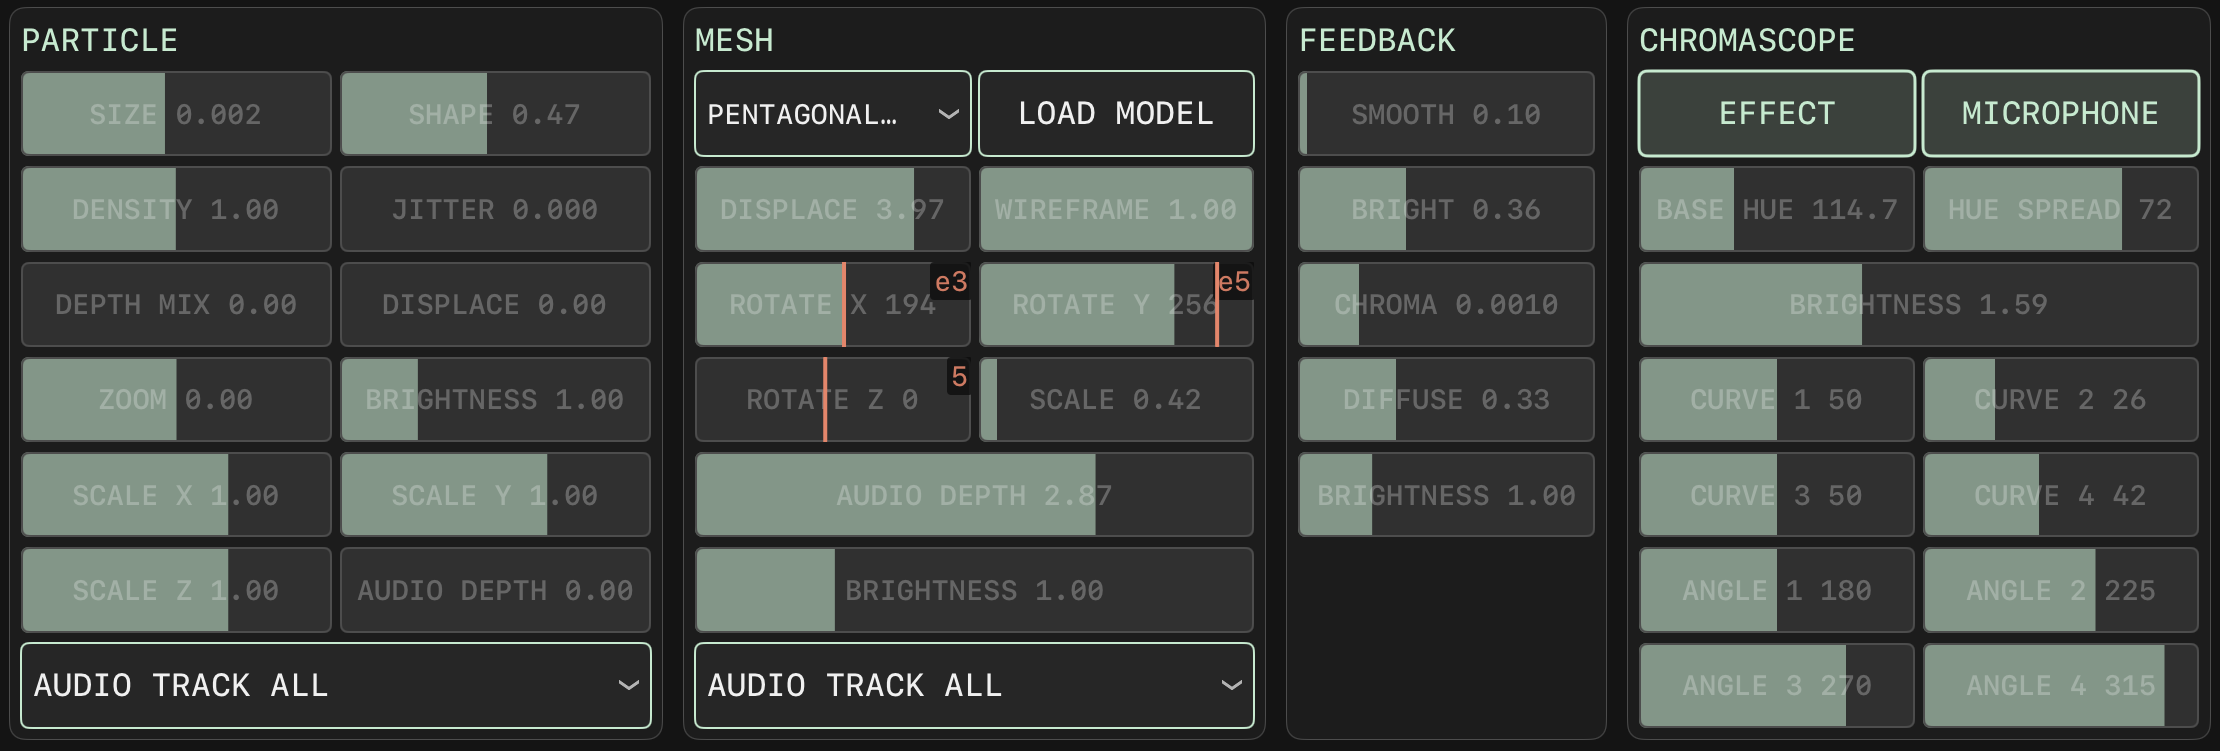
The four parameter panels. PARTICLE: SIZE, SHAPE, DENSITY, JITTER, DEPTH MIX, DISPLACE, ZOOM, BRIGHTNESS, SCALE X / Y / Z, AUDIO DEPTH, AUDIO TRACK ALL. MESH: the model menu (PENTAGONAL), LOAD MODEL, DISPLACE, WIREFRAME, ROTATE X / Y / Z, SCALE, AUDIO DEPTH, BRIGHTNESS, AUDIO TRACK ALL. FEEDBACK: SMOOTH, BRIGHT, CHROMA, DIFFUSE, BRIGHTNESS. CHROMASCOPE: EFFECT / MICROPHONE, BASE HUE, HUE SPREAD, BRIGHTNESS, CURVE 1 to 4, ANGLE 1 to 4. In the image the three MESH ROTATE bars show a modulation source marker at the top right.
CHROMASCOPE
EFFECT
Effect on/off.
MICROPHONE
Drives the image with the master output audio (L / R / mid / side).
BASE HUE
0 to 333, default 166.5.
HUE SPREAD
0 to 100, default 50.
BRIGHTNESS
0 to 4.
CURVE 1 to 4
Each 0 to 100.
ANGLE 1 to 4
Each 0 to 360.
PARTICLE
SIZE
0.001 to 1.
SHAPE
0 to 1, in order circle, square, triangle, hexagon, diamond, star, ring; 1 is random. Cannot be routed with MOD ROUTE.
DENSITY
0.01 to 2.
JITTER
0 to 0.05.
DEPTH MIX
0 to 1.
DISPLACE
0 to 5.
ZOOM
-1 to +1.
BRIGHTNESS
0 to 4.
SCALE X / Y / Z
Each -3 to +3.
AUDIO DEPTH
0 to 4; the displacement is multiplied by (1 + level x depth).
AUDIO TRACK
ALL or TRACK 1 to 8.
MESH
Model menu
100 built-in models with thumbnails; default is the sphere.
LOAD MODEL
Loads an .obj file.
DISPLACE
0 to 5.
WIREFRAME
0 to 1.
ROTATE X / Y / Z
Each 0 to 360.
SCALE
0.1 to 5.
AUDIO DEPTH / BRIGHTNESS / AUDIO TRACK
Same as PARTICLE.
FEEDBACK
SMOOTH
Smoothing amount.
BRIGHT
Brightness decay.
CHROMA
0 to 0.005.
DIFFUSE
Diffusion amount.
BRIGHTNESS
Output brightness.
Audio drive and modulation
The audio source is the RMS of the 8 tracks at the mixer input point, multiplied by VOL, with mute and solo applied.
39 parameters in total can be routed with MOD ROUTE. Not modulatable: station on/off and order, AUDIO TRACK, SHAPE, the MESH model.
MIDI writes the base value.
External display
When connected through USB-C or AirPlay mirroring, the external display shows the video output. You do not need to stay on the VISUAL page.
File and photo pickers still appear on the iPad.
The system asks for camera permission the first time the camera is used.
11. SETUP
SETUP is a centred panel with a title and CLOSE at the top; tapping outside the panel also closes it. The panel has five tabs: AUDIO, CV / MIDI, CLOCK, MIDI CONTROL, SYSTEM, and reopens on the tab used last. Most sections have an INFO button that expands a description when tapped.
AUDIO
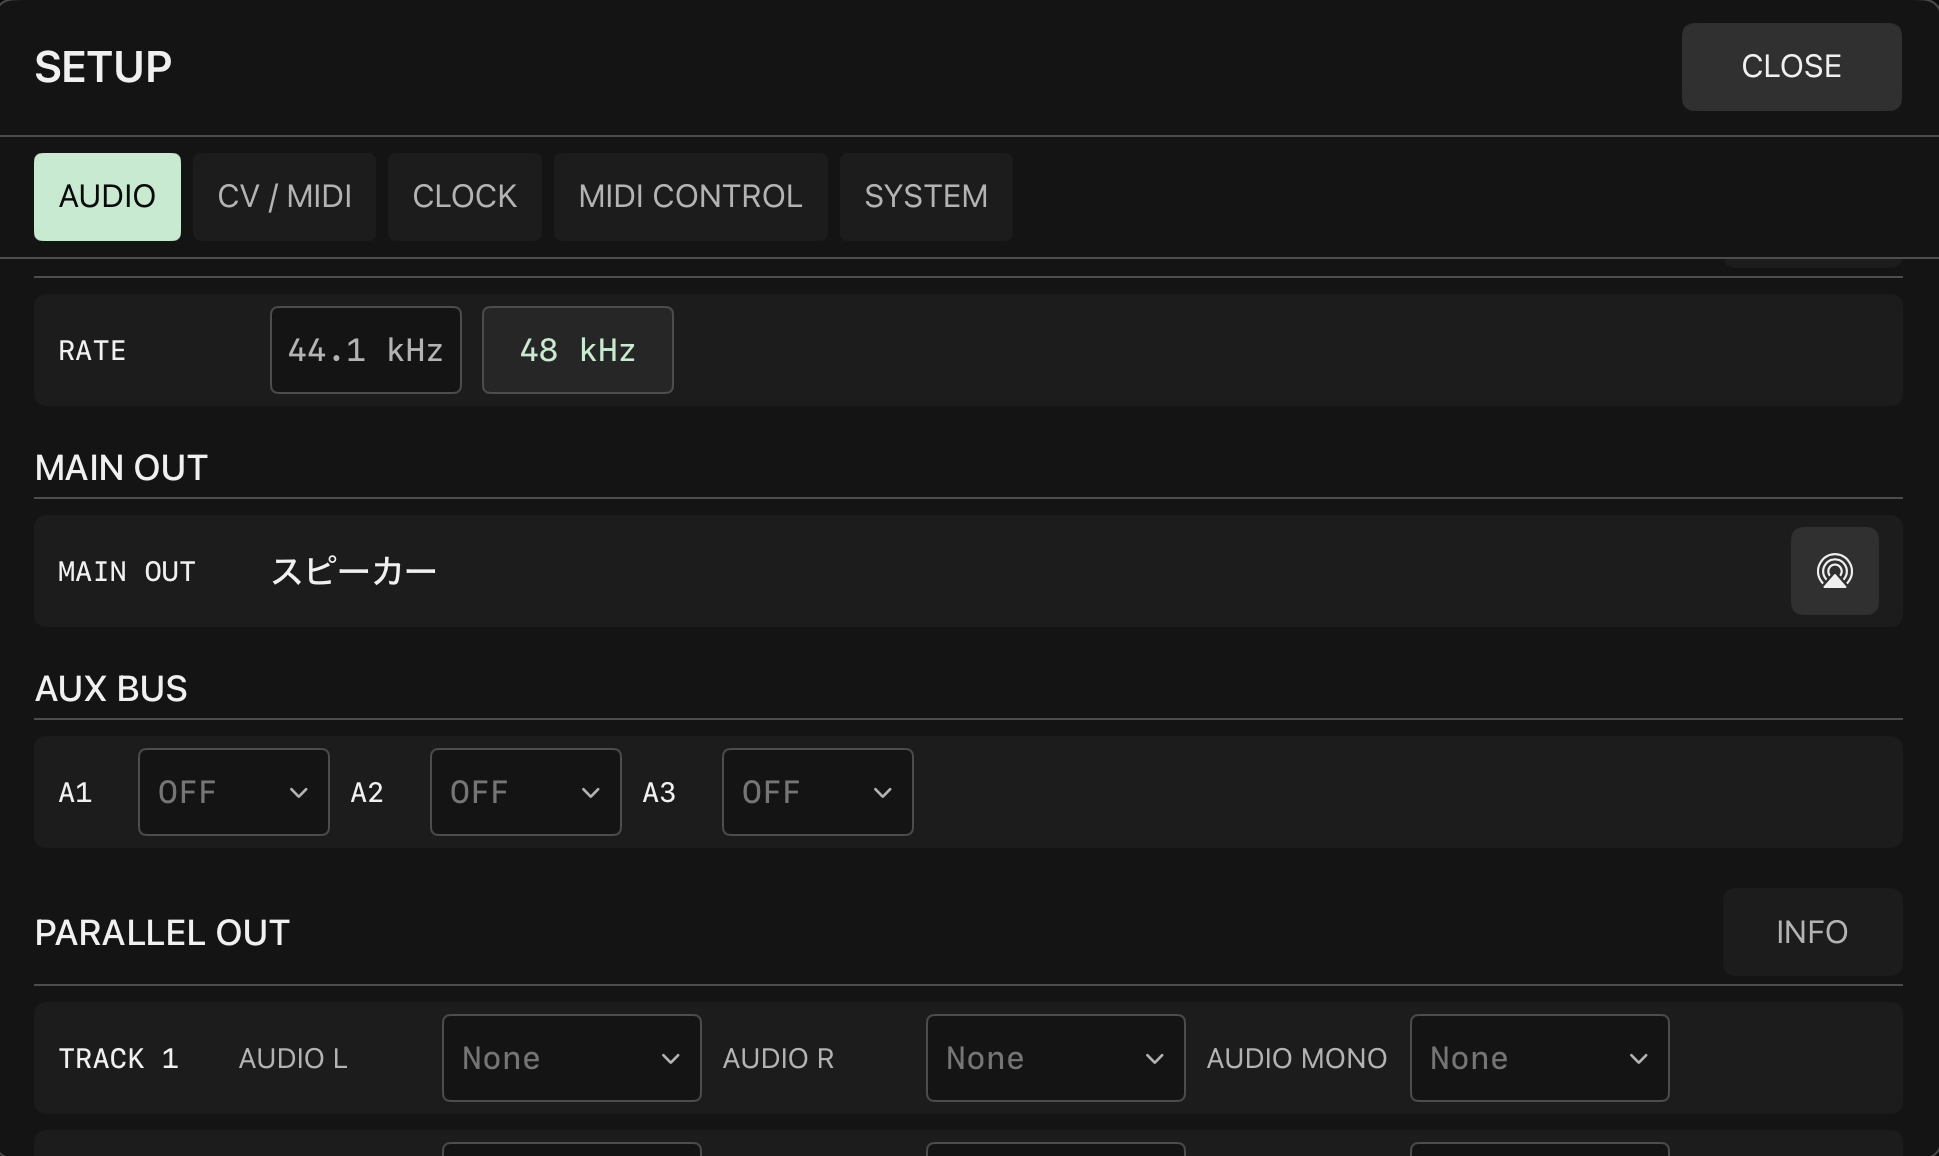
The AUDIO tab of SETUP: RATE, MAIN OUT, A1 to A3 under AUX BUS, and the per-track assignments under PARALLEL OUT.
AUDIO DEVICE
DEVICE dropdown for selecting a multichannel audio device; shows No Device when none is selected. CV output starts as soon as a device is selected.
SAMPLE RATE
44.1 kHz or 48 kHz, default 44.1 kHz.
MAIN OUT
Shows the name of the current system audio route, with the system route picker beside it.
AUX BUS
A1 to A3 are each assigned a physical channel or OFF. Channels already used for other purposes are marked IN USE.
PARALLEL OUT
Parallel output per track: AUDIO L, AUDIO R or MONO. The signal is post-fader, pre-effects.
EXTERNAL INPUT
External input per track: OFF, a single channel, or a stereo pair of channels.
INPUT COMP
Input latency compensation, 0 to 250 ms in 0.1 ms steps.
CV / MIDI
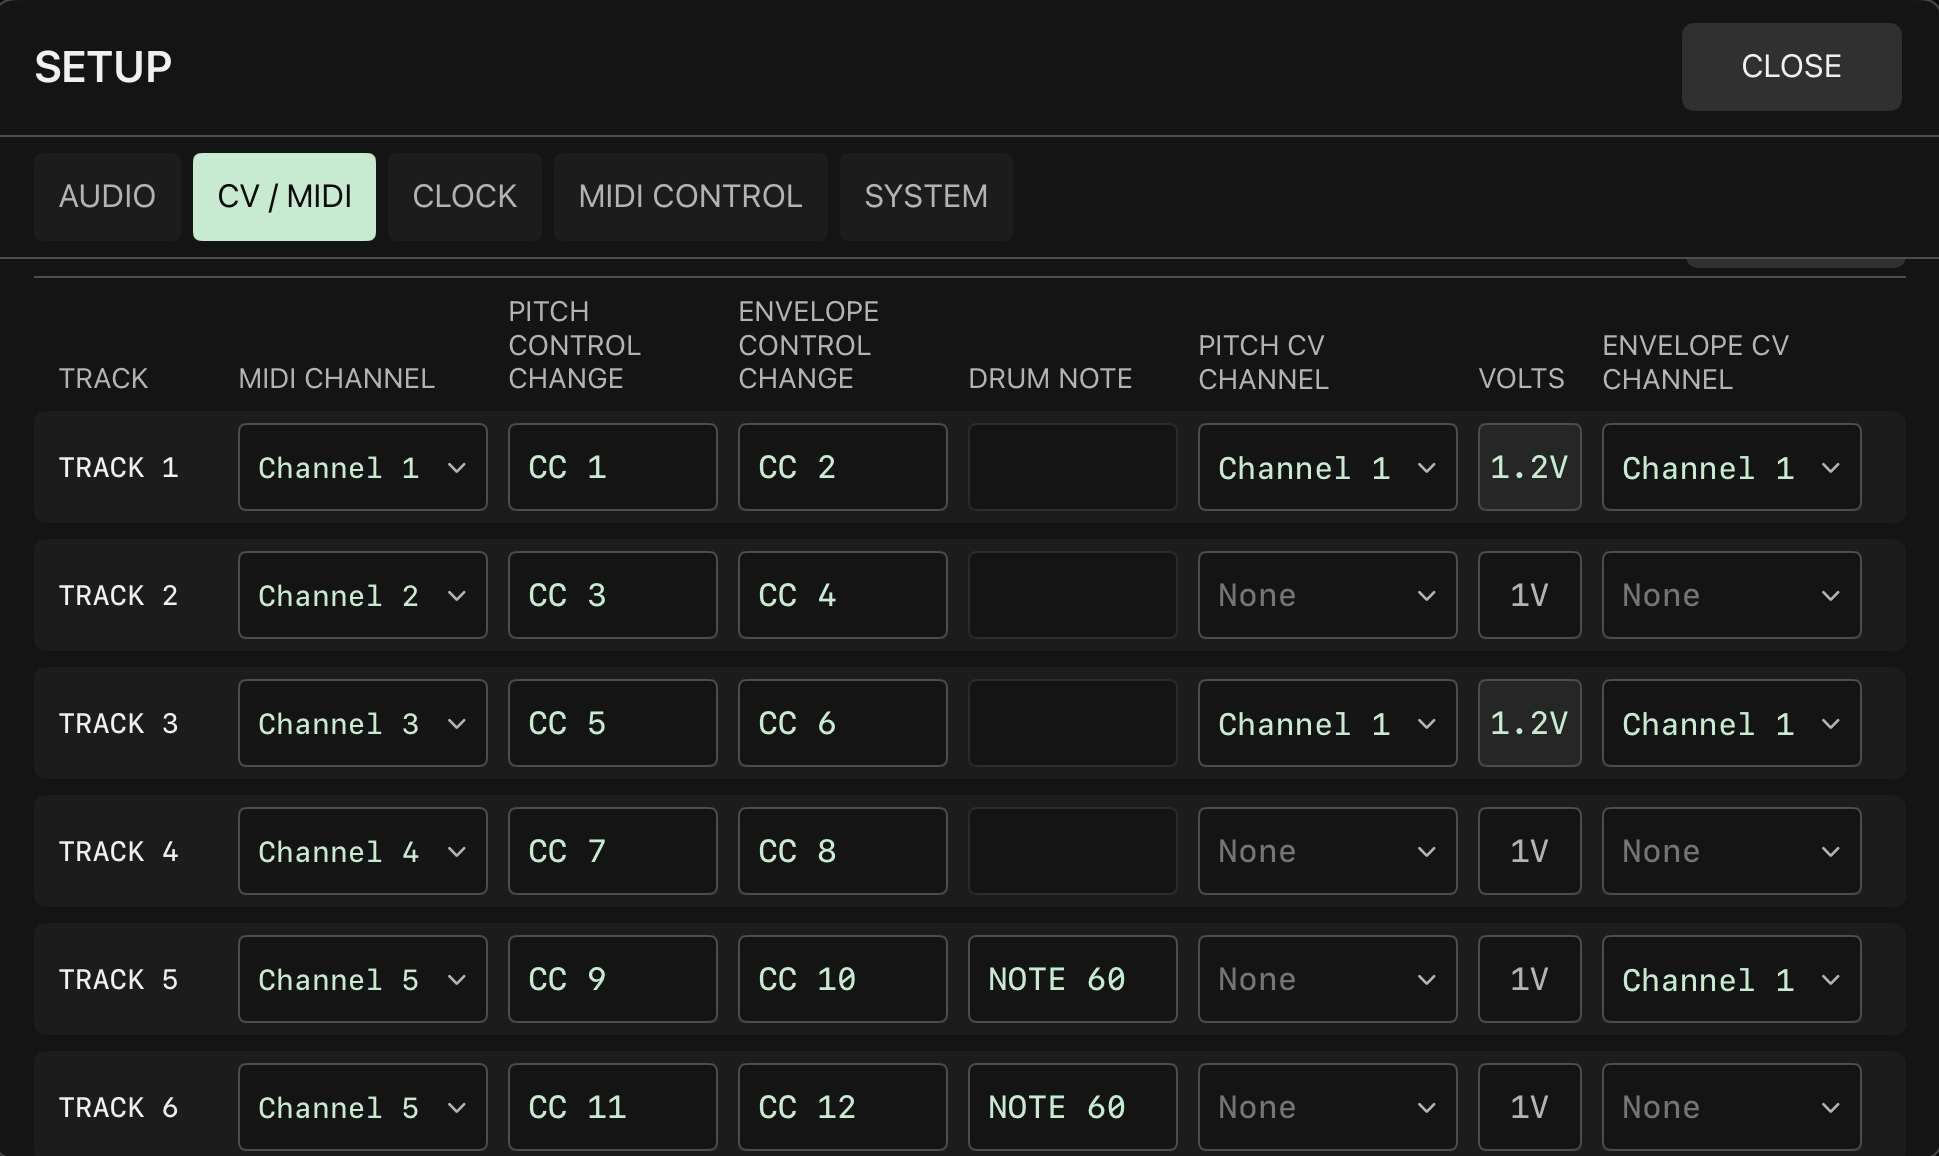
The CV / MIDI tab of SETUP: MIDI CHANNEL, PITCH CONTROL CHANGE, ENVELOPE CONTROL CHANGE, DRUM NOTE, PITCH CV CHANNEL, VOLTS and ENVELOPE CV CHANNEL for each track.
MIDI OUTPUT
DEVICE dropdown (including None), and MIDI CHANNEL ALL TRACKS, which sets all tracks at once.
TRACK ROUTING
One row for each of the 8 tracks, with the columns MIDI CHANNEL, PITCH CONTROL CHANGE, ENVELOPE CONTROL CHANGE, DRUM NOTE (TRACK 5 to 8 only), PITCH CV CHANNEL, VOLTS (1V or 1.2V), ENVELOPE CV CHANNEL. CLEAR ALL is at the top right. CV channels cannot be duplicated; selecting a channel already in use swaps the two. MIDI channels can be duplicated.
MOD OUTPUT
Assigns the physical channels of UTILITY OUTPUT 1 to 4. Channels used by track CV cannot be selected; selecting a channel used by another MOD OUTPUT swaps the two.
BUCHLA PULSE
SPIKE OFF / ON and WIDTH (ms).
ENV DELAY
Envelope delay per track, in ms.
CLOCK
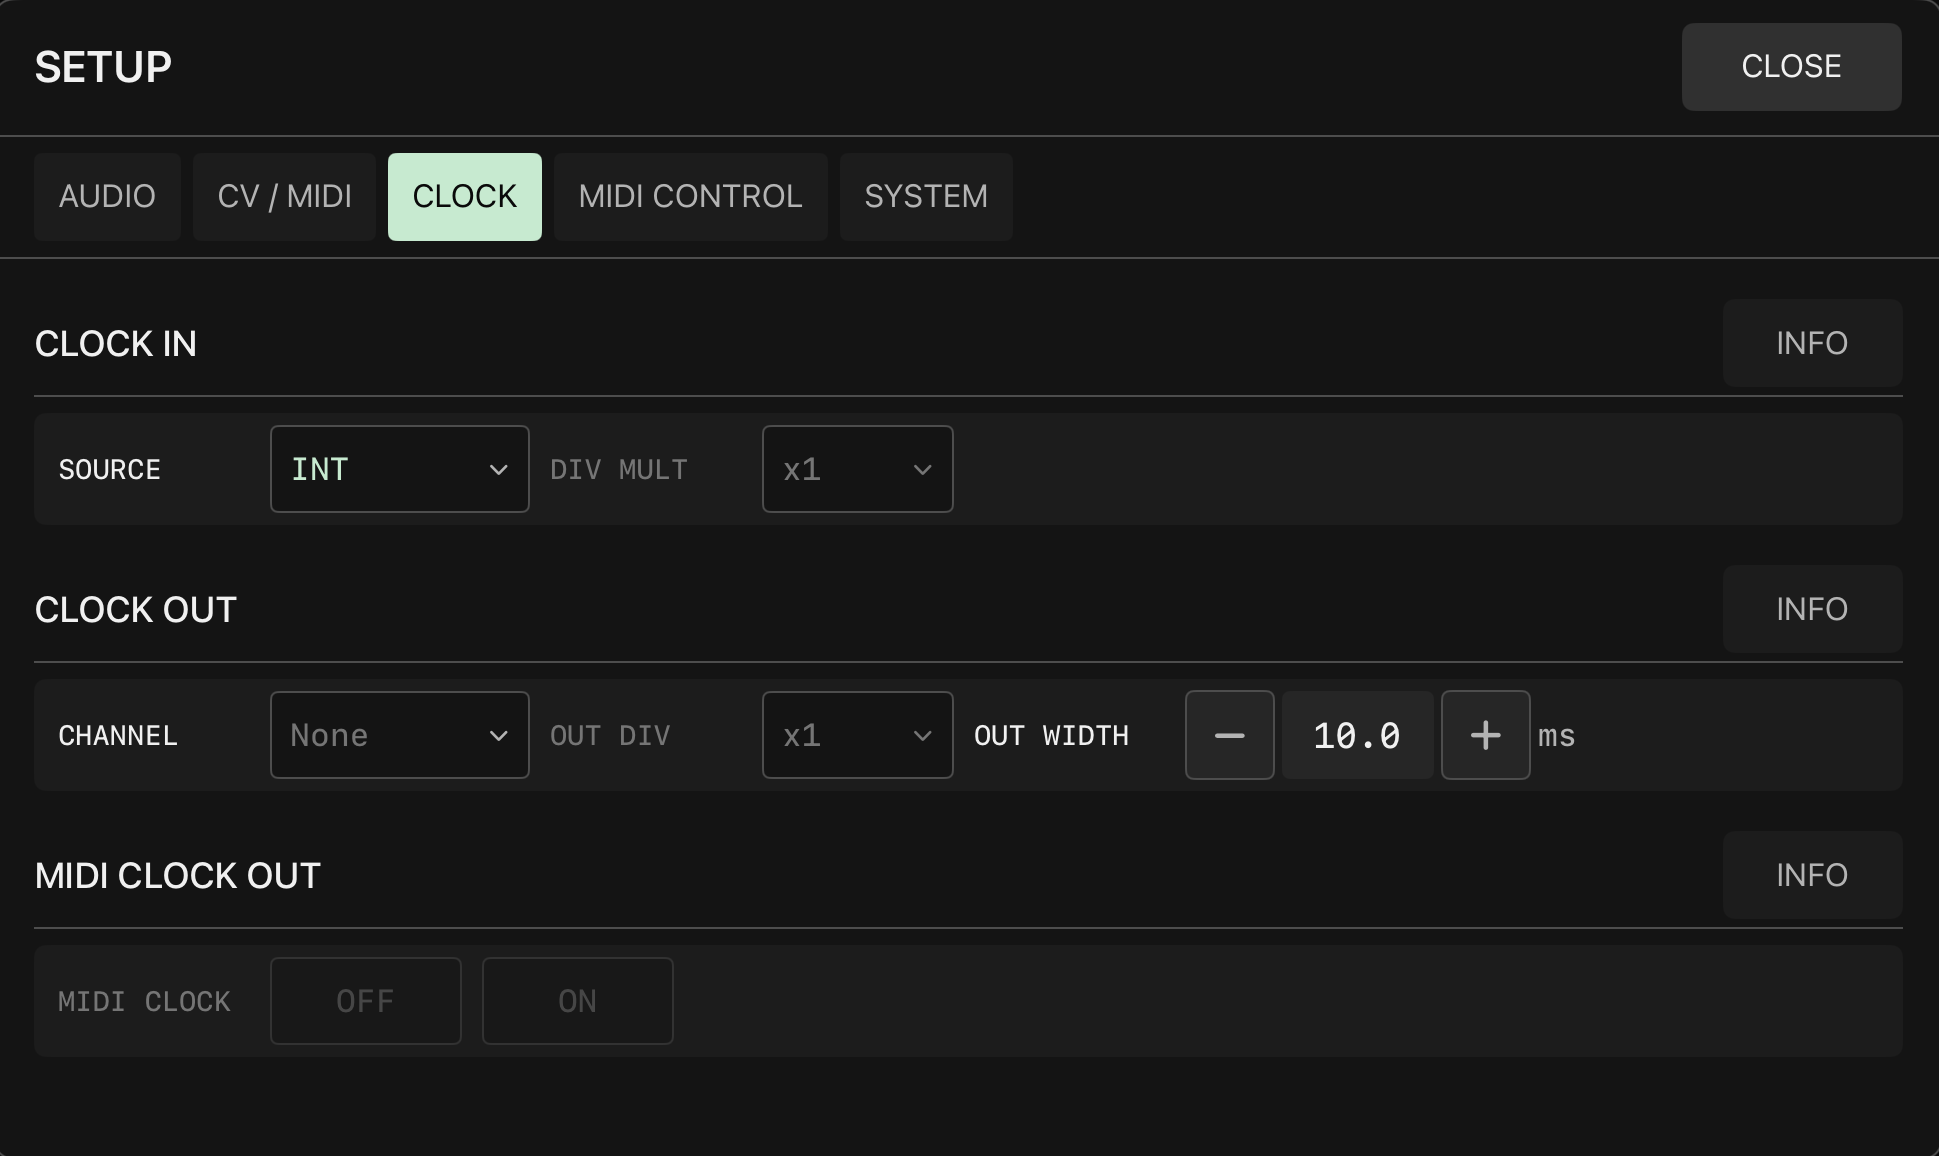
The CLOCK tab of SETUP: SOURCE and DIV MULT under CLOCK IN, CHANNEL, OUT DIV and OUT WIDTH under CLOCK OUT, and MIDI CLOCK OUT.
CLOCK IN
SOURCE: INT / MIDI / CV. DIV MULT: /4, /2, x1, x2, x4, available only with an external source. CV INPUT selects the channel, SIGNAL shows the signal, STATUS shows the state. BPM 20 to 300. MIDI clock is 24 PPQN; 2 seconds without signal is treated as lost.
CLOCK OUT
CHANNEL, OUT DIV, OUT WIDTH (ms).
MIDI CLOCK OUT
OFF / ON. Dimmed when there is no MIDI output device.
MIDI CONTROL
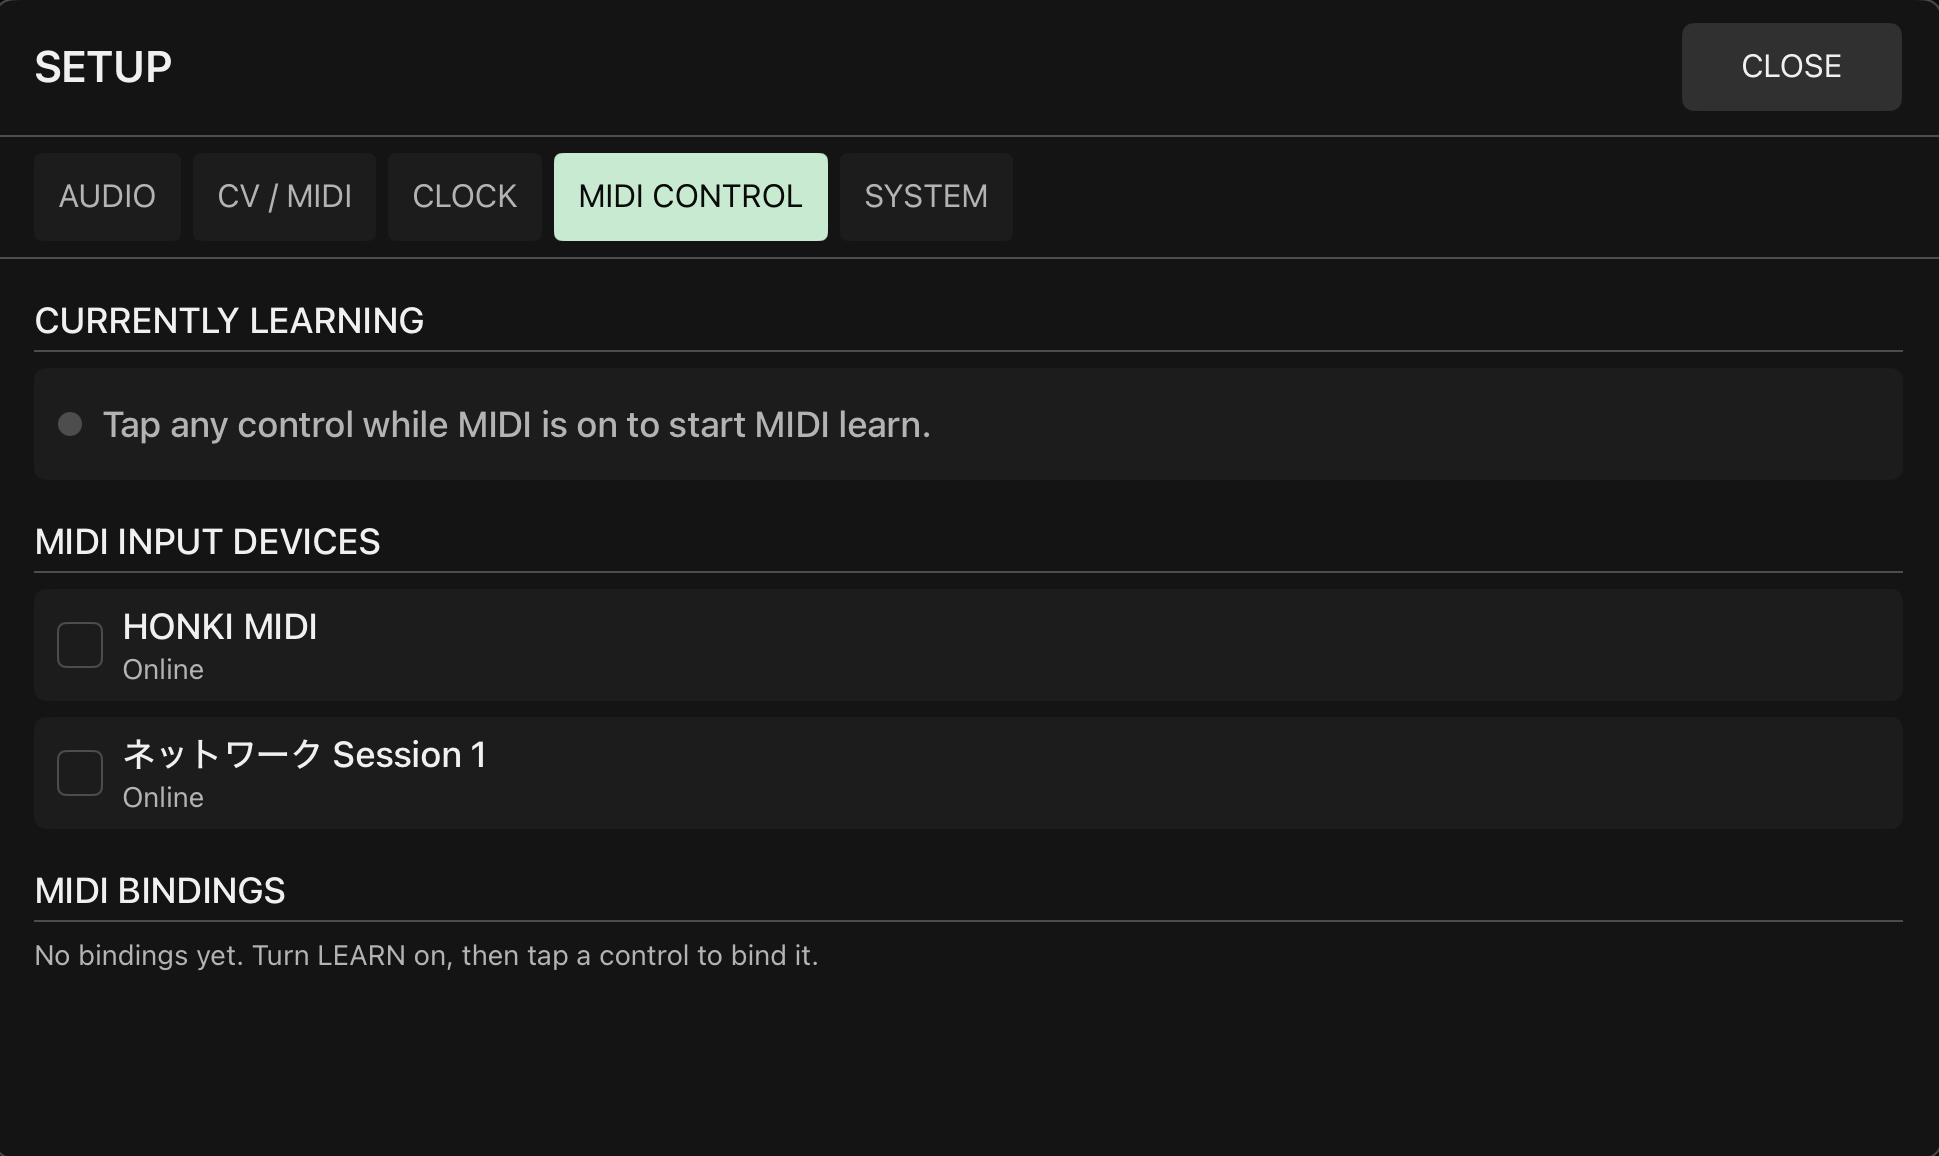
The MIDI CONTROL tab of SETUP: CURRENTLY LEARNING, the device list and checkboxes under MIDI INPUT DEVICES, and MIDI BINDINGS.
CURRENTLY LEARNING
Shows the MIDI Learn target that is waiting; a CANCEL button is shown while waiting.
MIDI INPUT DEVICES
List of MIDI input devices; more than one can be selected.
MIDI BINDINGS
List of bindings. Each item has MODE (LATCH / MOMENTARY), TAKEOVER (JUMP / PICKUP), SCALE (LINEAR / EXP / LOG), MIN and MAX (0 to 100% in 10% steps), and can be deleted singly with REMOVE or all at once with CLEAR ALL.
SYSTEM
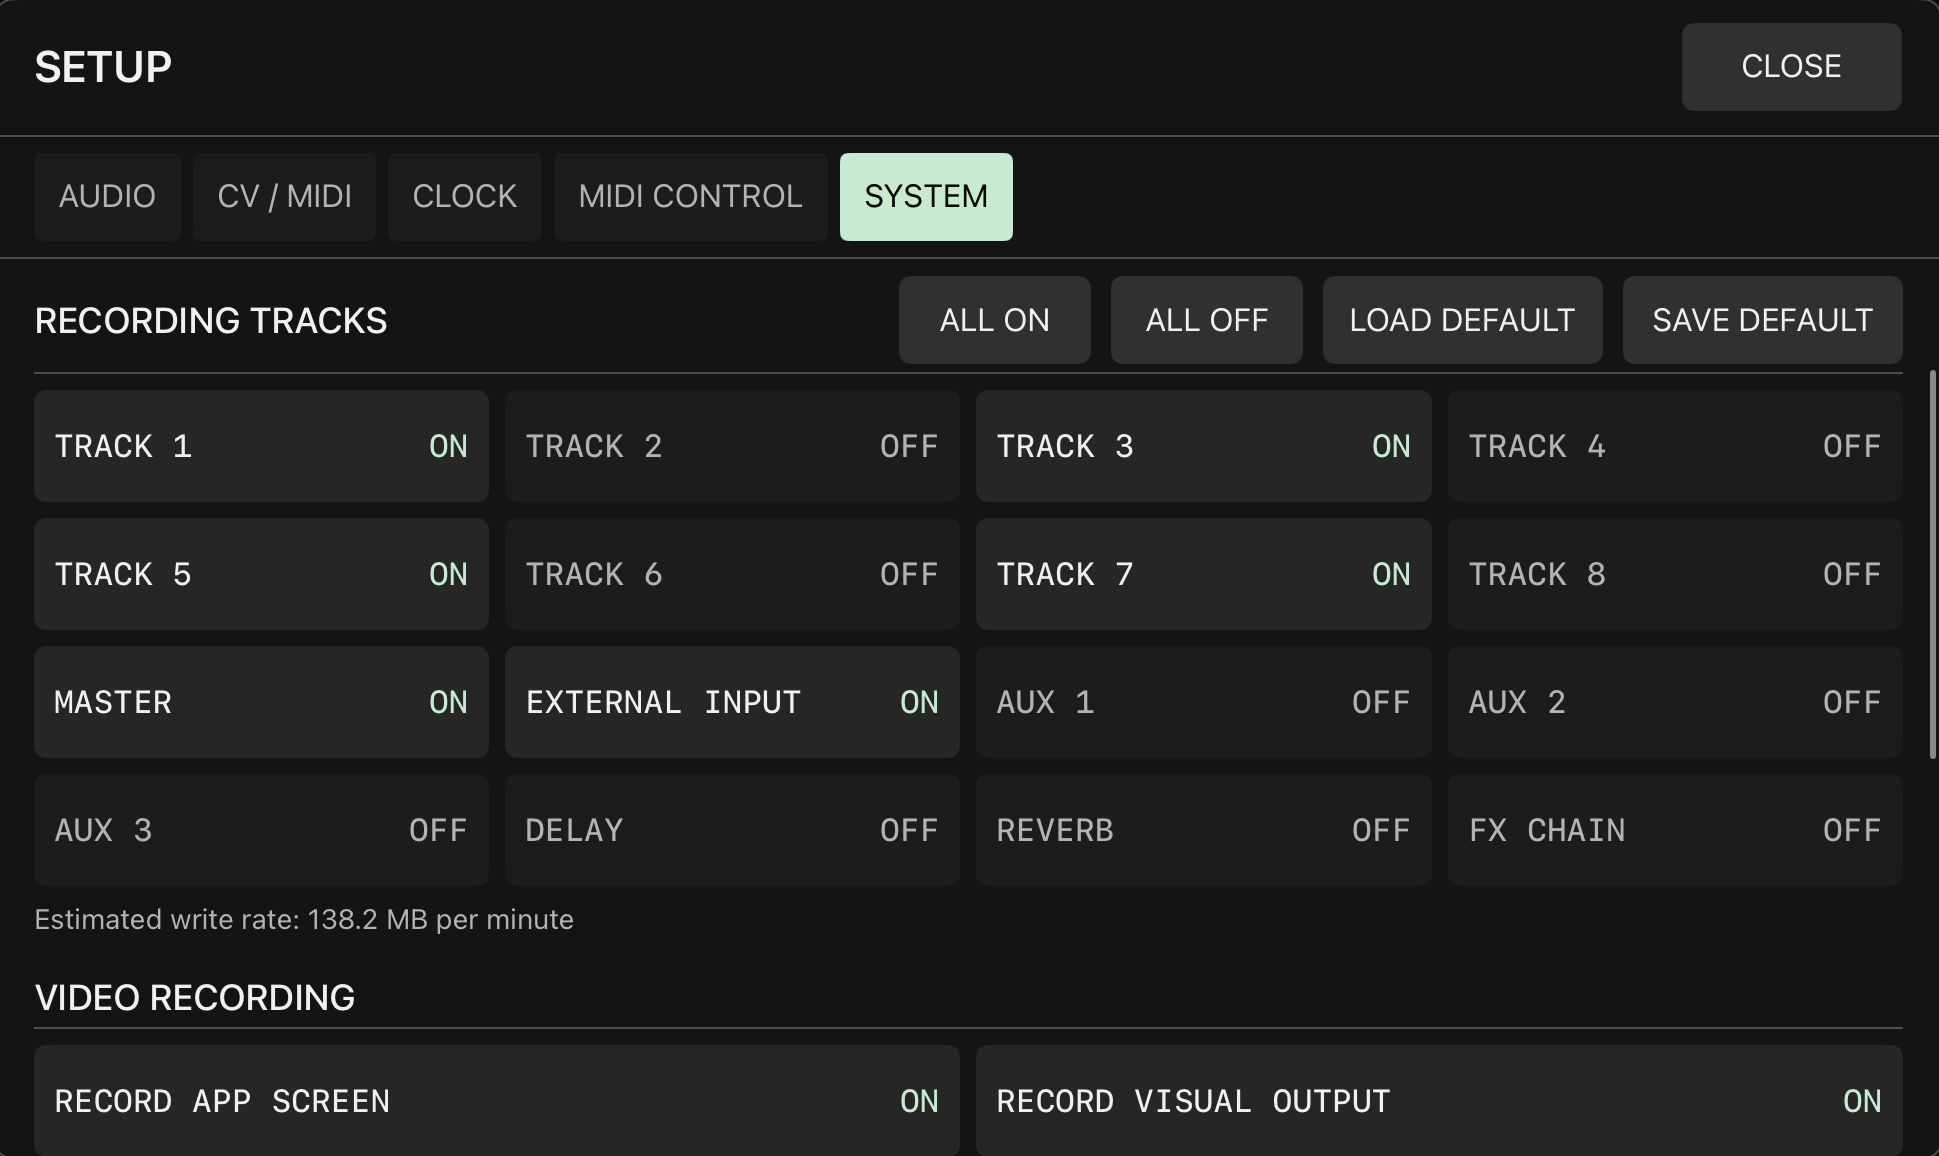
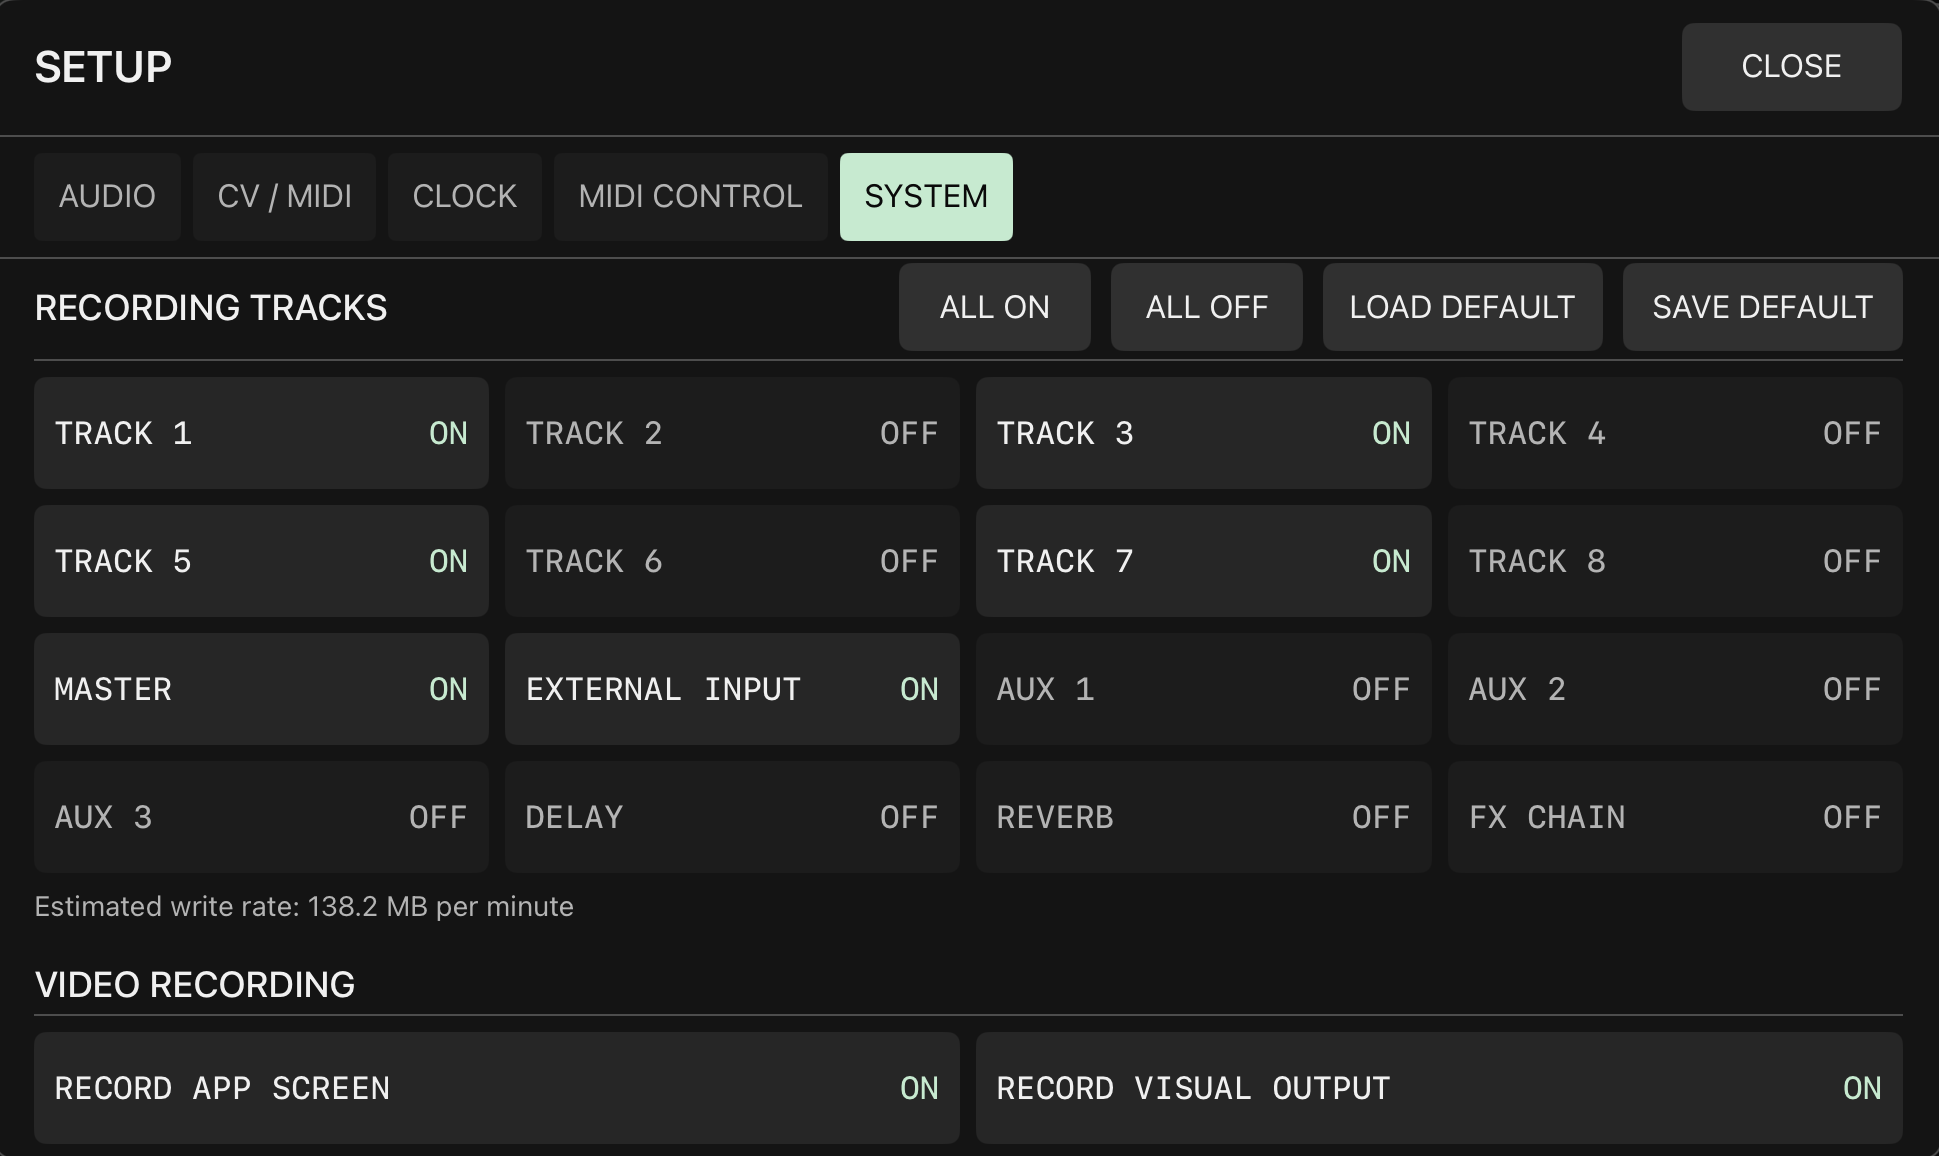
The SYSTEM tab of SETUP: the 16 switches under RECORDING TRACKS with ALL ON, ALL OFF, LOAD DEFAULT and SAVE DEFAULT, then the estimated write rate and the two switches under VIDEO RECORDING.
RECORDING LOCATION
Fixed at Documents/Recordings; the Files app path is "On My iPad / HONKI / Recordings". Sessions holds multitrack recordings and Samples holds sample recordings.
RECORDING TRACKS
Selects the items written by multitrack recording. See chapter 14.
VIDEO RECORDING
Two switches for recording video together with audio. See chapter 14.
GENERATE VELOCITY
A range bar of 1 to 127 per track that sets the velocity range of generation, plus RESET.
DIAGNOSTICS
Status text and EXPORT LOG.
12. MIDI Learn
MIDI on in the transport. Every control that can be bound is marked with a dashed outline; the VOICE page is shown here.
Entering and leaving
Press MIDI in the Transport or Cmd+L to enter. Assignable controls show a dashed outline; the XY pad shows two corners, the top-left corner for the Y axis and the bottom-right corner for the X axis.
Press MIDI or Cmd+L again to leave; pressing MOD also leaves. ESC does not leave MIDI Learn mode.
Assignable targets added after 1.3.4: MIXER PAN, and for FX CHAIN the parameters, DRY WET, RETURN, the effect type (each trigger changes to the next), FREEZE and HOLD (active while held).
Procedure
Tap a control to enter the waiting state; CURRENTLY LEARNING in SETUP shows the target.
Send a MIDI message within 10 seconds. Tapping another control switches the target.
The first matching message completes the binding: buttons are MOMENTARY, everything else is continuous, and the curve defaults to LINEAR. An existing binding is replaced.
Message types
Bindable
CC, Note, Pitch Bend.
Not bindable
Program Change. Aftertouch and SysEx are ignored.
Binding behavior
MODE
LATCH or MOMENTARY.
TAKEOVER
JUMP jumps straight to the new value; PICKUP takes over only after passing the current value.
SCALE
LINEAR, EXP, LOG.
MIN / MAX
Mapping range.
Page switching
Each of the six pages can bind one message.
Bindings are stored in midi_mappings.json, with a .bak backup kept alongside. Each parameter can have only one binding.
13. Motion
Playback
Tap MOTION in the Transport to toggle playback; it is on by default (yellow). Manual operation takes priority; on release the control returns to the recorded value.
Recording
Hold MOTION for 1 second to start recording (red); tap while recording to stop. Playback turns on automatically when recording starts.
Recording conditions
Data is recorded only when all three hold: recording is on, playback is running, and a finger is on the control.
Write timing
Written when recording stops or playback stops.
Sample rate
30 Hz, sample-and-hold.
Lane length
Track parameters: one 64-cell lane per segment. Effect and VISUAL parameters: a global 4-bar lane.
Recordable
Mixer (including PAN), DECAY, harmonics, source parameters (kick, sample, PHYSICAL; not AU tracks), effects (including the FX CHAIN parameters, DRY WET and RETURN), VISUAL, PERFORM controls.
Turn on MOD in the Transport, tap the control, and answer Y to CLEAR MOTION? in the MOD ROUTE panel.
Other actions that clear MOTION
CLEAR of a segment, CLEAR in the top bar, and changing the effect of an FX CHAIN position (clears that position only). There is no button that clears all MOTION at once.
Indication
Controls with recorded data show an indicator line.
Storage
Saved with the bank; can be undone.
MOTION is yellow while playback is on.
With playback off it is dark.
Holding it for one second starts recording, and it turns red while recording.
14. Recording
Multitrack recording
What gets recorded is chosen on the SYSTEM tab of SETUP: the 16 switches under RECORDING TRACKS, the estimated write rate per minute, and RECORD APP SCREEN and RECORD VISUAL OUTPUT under VIDEO RECORDING.
Start
Press PLAY and choose Y in Y / REC? / N.
Stop
Press the red-dot recording stop button and answer Y. Moving the app to the background does not stop recording. When system audio is interrupted the files are closed first, and a new session starts after it resumes; changing the sample rate also starts a new session.
RECORDING TRACKS
In the SYSTEM tab of SETUP, select the items to write with 16 switches: TRACK 1 to 8, MASTER, EXTERNAL INPUT, AUX 1, AUX 2, AUX 3, DELAY, REVERB, FX CHAIN. The factory default has TRACK 1 to 8, MASTER and EXTERNAL INPUT on. There are also ALL ON, ALL OFF, LOAD DEFAULT and SAVE DEFAULT. The selection is saved with the project; a project without a stored selection uses the default saved with SAVE DEFAULT. It cannot be changed while recording. The estimated amount written per minute is shown below. When everything is off, "Nothing selected. Recording is unavailable." is shown, and choosing Y only plays.
Files
WAV (32-bit float): track1 to track4 mono, track5 to track8 stereo, master stereo; aux1 to aux3 mono; delay and reverb stereo, which are the effect return signals tapped before the main FILTER and MASTER VOLUME. With EXTERNAL INPUT on, tracks with an external input route also save trackN_ext.wav. Tracks are sampled post-fader.
VIDEO RECORDING
The SYSTEM tab of SETUP has two switches, RECORD APP SCREEN and RECORD VISUAL OUTPUT, both OFF by default. The settings are stored on the device, not with the project. They cannot be changed while recording. Video starts and ends with the audio recording, and the videos are saved in the same session folder.
AppScreen.mp4
With RECORD APP SCREEN on, the app screen is recorded without using the microphone. The system shows a consent dialog at the start; declining does not affect audio recording.
VisualOutput.mp4
With RECORD VISUAL OUTPUT on, the VISUAL output is recorded: H.264, 1280 x 720, 30 fps, no audio, scaled proportionally with black bars. The visual engine starts automatically if it is not running.
Location
Recordings/Sessions/date-time/. -2, -3 are added for repeats within the same second. On iPad, access from On My iPad / HONKI / Recordings in the Files app.
Header
Updated every 100 ms; files remain readable if interrupted.